This article is about the three iterations of an acousmatic study by Christoph Zimmer, which were carried out as part of the seminar “Symbolic Sound Processing and Analysis/Synthesis” with Prof. Dr. Marlon Schumacher at the HFM Karlsruhe. It covers the basic concept, ideas, subsequent iterations and the technical implementation with OpenMusic.
Responsible persons: Christoph Zimmer, Master student Music Informatics at the HFM Karlsruhe
Basic idea and concept:
I usually work a lot with hardware for music, especially in the field of DIY. This often coincides with the organization and optimization of the workflow associated with this hardware. When we students were given the task of producing an acousmatic study in the form of musique concrète, I was initially disoriented. Up to that point, I had only dealt a little with “experimental” music genres. To be honest, I wasn’t even aware of the existence of musique concrète up to this point. So with this task I was thrown out of my usual workflow, sound synthesis with hardware, and therefore also out of my comfort zone. Now I had to use field recordings as samples.
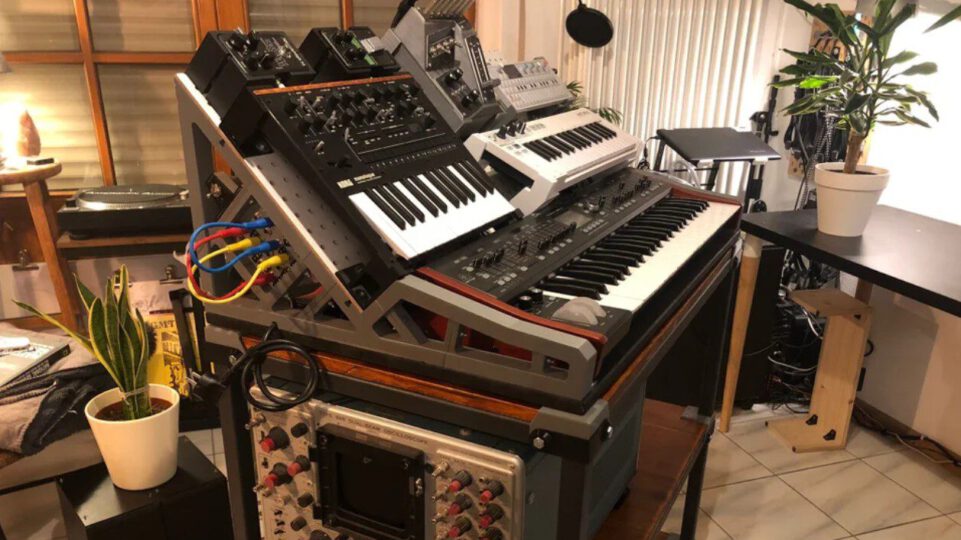
My DIY attitude intuitively led me to the decision to record the samples myself. I wanted to focus on a variation of samples. However, I was still dismissive of the idea of completely cutting myself off from my previous work. I wanted to bring a “meta-connection” to my hardware-focused work into the piece. Based on this idea, the piece “chris builds a trolley for his hardware” was created
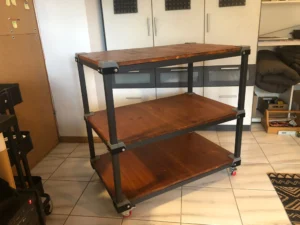
The finished trolley for hardware. More pictures at: https://www.reddit.com/r/synthesizers/comments/ryyw8e/i_finally_made_a_proper_stand_for_my_synth_rack/
First iteration
The piece should therefore consist of samples that were not randomly produced or downloaded from the internet, but were created as a “by-product” of work that I actually carried out myself, in this case the construction of a trolley for music hardware. Over the course of two weeks, I used my smartphone to record the sounds that emerged as I went through the various work steps. As I made use of different materials and processing methods in these work steps, not only did a wide variation of sound textures emerge, but the macroscopic structure of the piece also formed by itself. It composed itself, so to speak. The desired meta-connection was thus created. Once the trolley was complete, it was time to start producing the piece.
The raw audio files of the recordings are each several minutes long. To simplify handling in OpenMusic, the individual sound elements were exported as .wav files. The DAW REAPER was used for this. The result was about 350 individual samples. These are available under the following link:
https://drive.google.com/file/d/1hRk4OZvNEJLkpo_bzSZxP1lwO0YlcpLy/view
Here are a few examples of the sound elements used:
With the samples prepared, the work in OpenMusic could now begin.
As is usual for musique concrète, the samples were to be processed with various effects to support the musical context. However, it was also important to me that these effects should not dominate in such a way that the sounds become unrecognizable and the context is lost. That’s why I had the idea of programming a workspace for the arrangement within an OpenMusic patch to make the samples dynamically editable. The “Maquette” object turned out to be ideal for this. Basically, this makes it possible to place other objects within an x-axis (time) and y-axis (parameterizable). These objects can then access their own properties in the context of the maquette. I then used these functions to create four different “Template Temporal Boxes” which use the parameterization of the maquette in different ways to apply effects to the respective samples. Using multiple templates further reduces complexity while maintaining a variation of modulation possibilities:
tempboxa
- Position y –> Reverbance
- Size y –> Playback speed
- Random –> panning
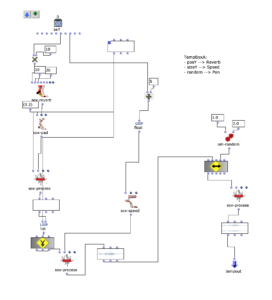
OM Patch of the tempboxa
tempboxb
- Position y –> Delay time
- Size y –> Playback speed
- Random –> panning
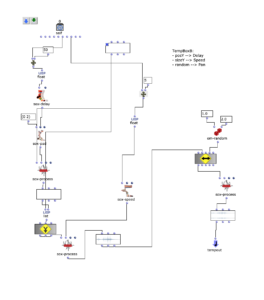
OM Patch of the tempboxb
tempboxc
- Position y –> Tremolo speed
- Size y –> Playback speed
- Random –> panning
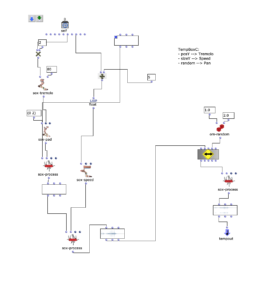
OM Patch of the tempboxc
tempboxd
- Position y –> Lowpass cutoff frequency
- Size y –> Playback speed
- Random –> panning
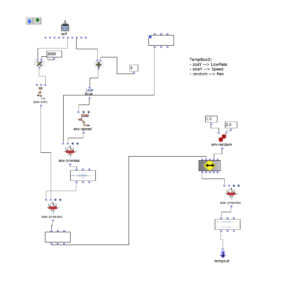
OM Patch of the tempboxd
With the creation of these boxes, the composition of the piece could begin.
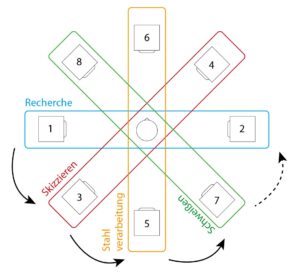
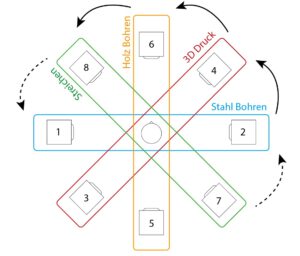
As already mentioned, the macroscopic structure of the construction process was to be retained. In practice, certain samples of the sections (research, sketching, steel processing, welding, steel drilling, 3d printing, wood drilling, wood sanding, painting and assembly) were selected in order to process them with the parameterized tempboxes into interesting sounding combinations, which should describe the current work step.
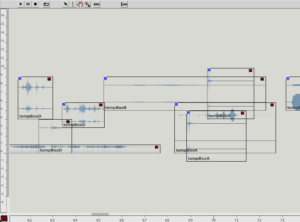
Detail of the maquette with arrangement
The result of the first iteration:
Second iteration
My goal for the second iteration was to place accents on samples that represent anchor points of the piece. More precisely, the panning used in the first iteration was to be reworked by adding a provisional Haas effect (delay between the left and right channels) to the existing logic. For this purpose, the result of the previous panning is duplicated inversely and then extended with a delay (up to 8 ms) and level adjustment, which are dynamically related to the strength of the panning. Finally, both sounds are merged and output from the tempbox.

OM Patch of the extended panning
The result of the first iteration:
Third iteration
For the third and final iteration, the task was to make the piece available for an arbitrarily selectable setup of 8 channels. The structure was not to be changed. This gave me the opportunity to work on the panning again. Instead of setting the limit of the panning randomizer to 8 channels, I came up with the idea of raising the macroscopic structure even further. I chose the following speaker setup for this:
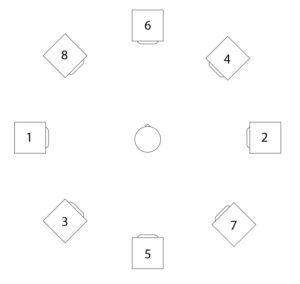
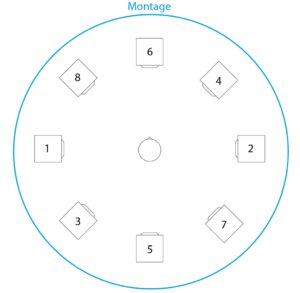
Setup of the speakers (with numbering of the channels)
With this setup, it is possible to distribute the panning to two opposite speakers, depending on the sections of the piece. During the course of the piece, the sound should then move around the listener as a slow rotational movement.
Part 1 of macroscopic panning
Part 2 of macroscopic panning
Part 3 of macroscopic panning
This principle applies in parallel to the accentuation of some samples from the second iteration: while the other samples (depending on the section) are distributed to different pairs of speakers, the anchor elements remain on channels 1 and 2.
The final version is also available in 2-channel format:
Fourth iteration
In this iteration, the task was to spatialize the piece using the tools we learned in the course “Visual Programming of Space/Sound Synthesis” (VPRS) with Prof. Dr. Marlon Schumacher and Brandon L. Snyder
“chris builds a trolley for his hardware” was already so far developed at this point that I submitted it to Metamorphoses 2022 (a competition for acousmatic pieces). For this it was necessary to mix the piece on a 16 channel setup. Due to the imminent deadline, I had very little time to adapt the piece to the requirements. Therefore, the channels were simply doubled in REAPER and LFO panning was added to the respective pairs. Unfortunately, the piece was not accepted afterwards because the length of the piece did not meet the requirements. Since the spatialization also left a lot to be desired, I took the opportunity to use the newly learned tools to improve it.
I decided to discard the Metamorphoses 16-channel spatialization and return to the state of the third iteration. My goal was a spatialization that not only deals with the macroscopic structure (such as the steel processing, 3D printing…), but also with the microscopic structure, i.e. to make individual sounds more dynamic. The audio exported from OM (8 channel) served as the source material, which was then to be processed using the Ambisonics (IEM) VSTs.
The Ambisonics template for REAPER was used as a workspace template, as it already provided a setup for the audio busses to finally render a 5th order Ambisonics file and a binaural stereo downmix. In the first step, the 8-channel audio file was routed so that it could be processed separately. To do this, channels 1-2, 3-4, 5-6 and 7-8 were sent to new tracks and the master send was deactivated. These tracks were then defined as multi-channel tracks with 36 channels and the stereo encoder (IEM) was inserted into the effect chain. The parameters for the spatialization (azimuth, elevation, roll and width) were then added as envelopes to the REAPER timeline to enable their dynamic processing. Finally, all tracks can be merged into the Ambisonics bus. The binaural downmix was used as a monitoring output.
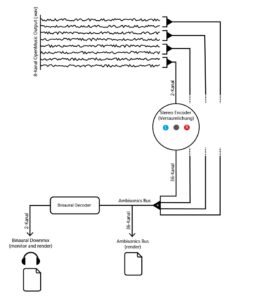
A simplified representation of the routing in REAPER
In practice, points were inserted into the envelope tracks by hand, between which linear interpolation was then used to create dynamic changes in the parameters. I proceeded intuitively and listened to individual sections to get a basic idea of what kind of spatialization would emphasize this section. Then I looked at the individual sounds and their origins and tried to describe them with the help of the parameters. Examples of this are: an accelerating rotary movement when drilling, a jumping back and forth when the digital input of the 3D printer beeps or a complete mess when crumpling paper. I was already familiar with this type of workflow, not only when using DSP VSTs in the DAW, but also when programming DMX lights via the envelope.
When editing, I found the visual feedback of the EnergyVisualizer (IEM) not only very helpful to keep an overview. I therefore decided to record it and add it to the binaural downmix:
All uncompromised files can be found under the following link: https://drive.google.com/drive/folders/1bxw-iZEQTNnO92RTCmW_l5qRFjeuVxA9?usp=sharing
About the author