Marlon Schumacher will serve as music and installation co-chair together with Esther Fee Feichtner for the IEEE
5th International Symposium on the Internet of Sounds
held at the International Audio Laboratories Erlangen, from 30 September – 2 October 2024. Follow this link to the official IEEE Website:
“The Internet of Sounds is an emerging research field at the intersection of the Sound and Music Computing and the Internet of Things domains. […] The aim is to bring together academics and industry to investigate and advance the development of Internet of Sounds technologies by using novel tools and processes. The event will consist of presentations, keynotes, panels, poster presentations, demonstrations, tutorials, music performances, and installations.”
We present an approach to geometrically represent and analyze the harmonic content of musical compositions based on a formalization of chord sequences as spatial trajectories. This allows us in particular to introduce a toolbox of novel descriptors for automatic music genre classification. Our analysis method first of all implies the definition of harmonic trajectories as curves in a type of geometric pitch class spaces called Tonnetz. We define such curves by representing successive chords appearing in chord progressions as points in the Tonnetz and by connecting consecutive points by geodesic segments. Following a recently established hypothesis that assumes the existence of a narrow link between the musical genre of a work and specific geometric properties of its spatial representation, we introduce a toolbox of descriptors relating to various geometric aspects of the harmonic trajectories. We then assess the appropriateness of these descriptors as a classification tool that we test on compositions belonging to different musical genres. In a further step, we define a representation of transitions between two consecutive chords appearing in a harmonic progression by vectors in the Tonnetz. This allows us to introduce an additional classification method based on this vectorial representation of chord transitions.
Abstract: The entry describes the spatialization of the piece “Ode An Die Reparatur” (“Ode To The Repair”) (2021) and its transformation into a Higher Order Ambisonics version. A binaural mix of the finished piece makes it possible to understand the working process based on the result.
Supervisor: Prof. Dr. Marlon Schumacher
A contribution by: Jakob Schreiber
Piece
The piece “Ode An Die Reparatur” (2021) consists of four movements, each of which refers to a different aspect of a fictional machine. What was interesting about this process was to investigate the transition from machine sounds to musical sounds and to shape it over the course of the piece.
Production
The production resources for the piece were, on the one hand, a UHER tape recorder, which enables simple repitch changes and was predestined for the realization of this piece based on mechanical machines due to its functionality with motors and belts. SuperCollider was also used as a digital sound synthesis and alienation environment.
Structure
The piece consists of four movements.
First movement
The sound material of the beginning is composed of various recordings from a tape recorder, over which clearly audible, synthesized engine sounds are played alongside silence.
Second movement
The sound objects, some of which are reminiscent of birdsong, suddenly emerge from sterile silence into the foreground.
Third movement
The perforative characteristics inside a gearwheel are transformed into tonal resonances in the course of the movement.
Fourth movement
In the last movement, the engines play a monumental final hymn.
Spatialization
Based on the compositional form of the piece, the spatialization drafts adhere to the division into movements.
Working practice
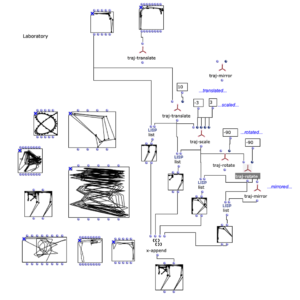
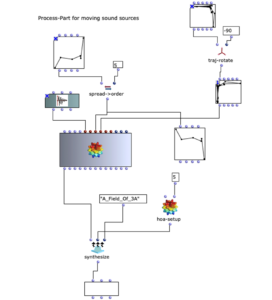
The working process can be divided into different sections, similar to the OM patch. In the laboratory section, I explored different forms of spatialization in terms of their aesthetic effect and examined their conformity with the compositional form of the existing piece.
In order to determine different trajectories, or fixed positions of sound objects, the visual assessment of the respective trajectories played an important role in addition to the auditory effect.
Ultimately, the parameters of the pre-selected trajectories were supplemented with a scattering curve, finely adjusted and finally transformed into a fifth-order Higher Order Ambisonics audio file via a chain of modules.
Iteratively, the synthesized multi-channel files are added to the overall structure in REAPER and their effect is examined before they are run through the synthesis process again with an optimized set of parameters and trajectories.
More details on the individual sentences
First, you can listen to the binaural version of the spatialized piece as a whole. The approaches of the individual parts are described briefly below
In the first part, the long, drawn-out clouds of sound, lying on top of each other like layers, move according to the basic tempo of the movement. The trajectories lie in a U-shape around the listening area, covering only the sides and front.
Second movement
Individual sound objects should be heard from very different positions. Almost percussive sounds from all directions of the room make the listener’s attention jump.
Third movement
The sonic material of this part is a sound synthesis based on the sound of cogwheels or gears. The focus here was on immersion in the fictitious machine. From this very sound material, resonances and other changes create horizontal tones that are strung together to form short motifs.
The spatialization concept for this part is made up of moving and partly static objects. The moving ones create an impression of spatial immersion at the beginning of the movement. At the end of the movement, two relatively static objects are added to the left and right of the stereo base, which primarily emphasize the melodic aspects of the sound and merely oscillate fleetingly on the vertical axis at their respective positions.
Fourth movement
The instrumentation of this part of the piece consists of three simulations of an electric motor, each of which follows its own voice. In order to separate the individual voices a little better, I decided to treat each of the four motors as an individual sound object. To support the monumental character of the final part, the objects only move very slowly through the fictitious space.
In this comprehensive article, I will describe the creative process of my composition in order to present my experience in the course of multi-channel processing . I produced the composition as part of the seminar “Visual Programming of Space/Sound Synthesis (VPRS)” with Prof. Dr. Marlon Schumacher at the HFM Karlsruhe.
Supervisor:: Prof. Dr. Marlon Schumacher A study by: Mila Grishkova
Summer semester 2022
University of Music, Karlsruhe
✅ The goal
The aim of my project work was to gain a complete experience with multi-channel editing.
I use 3 sounds to build composition.
Then I realize the piece in 3D Ambisonics 5th order format (36-channel audio file). I use multi-channel processing with OM-SoX Spatialization/Rendering in Ambisonics with OMPrisma, here: Dynamic Spatialization(hoa.continuous). I import the resulting audio files into a corresponding Reaper project (template is provided(see Fig 7)). Within Reaper, the Ambisonics audio tracks are processed with plug-ins.
✅ 1st figure & 1st sound
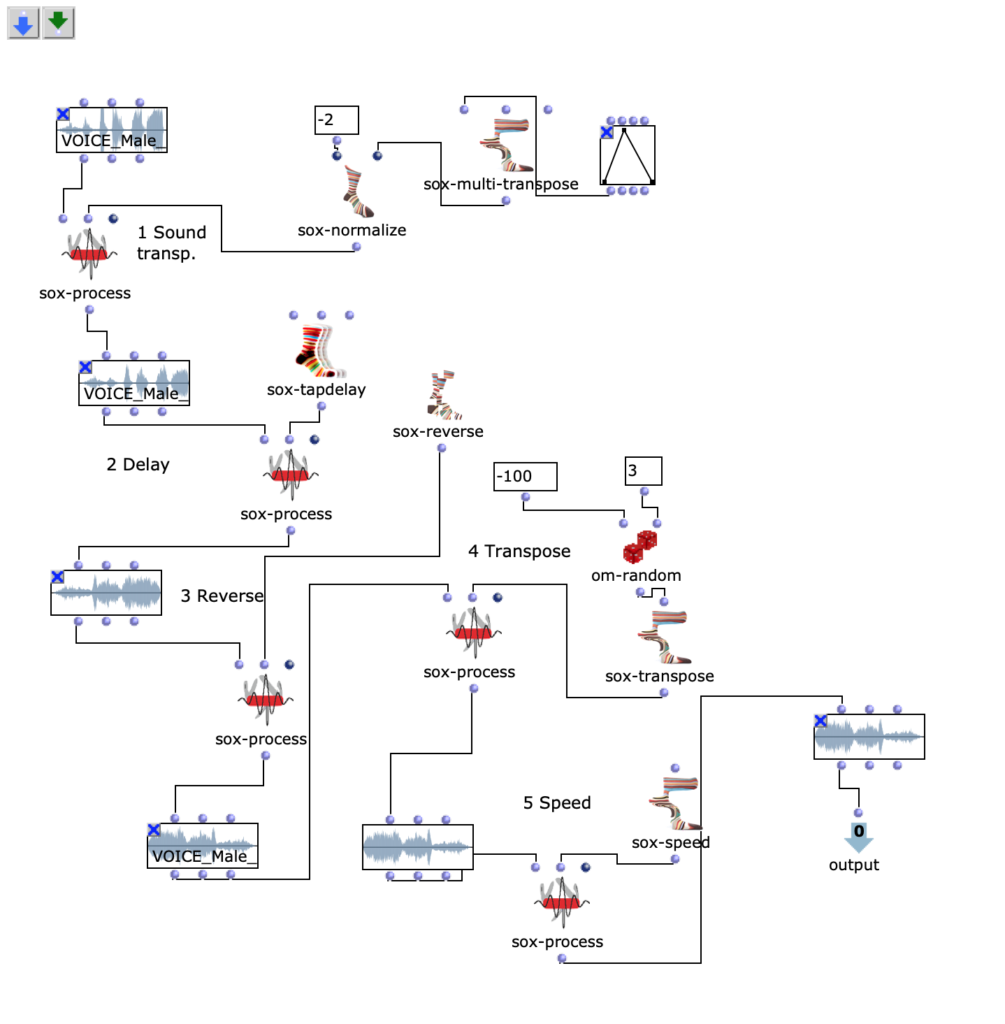
In the 1st figure you can recognize an OpenMusik patch. The patch “Sound1” contains the method Sound1 for editing. I use sound-voice, then I make a transposition(OMsox-transpose, OM sox-normalize), then I use delay lines(OMsox-tapdelay). The next step is backwards (OMsox-reverse). Then you can see in patch transpose and I use the random method (OMsox-random). The last element of this patch is the speed processing (OMsox-speed).
Fg. 1 shows OpenMusic Patch Sound1: This patch shows transformation of the 1st sound
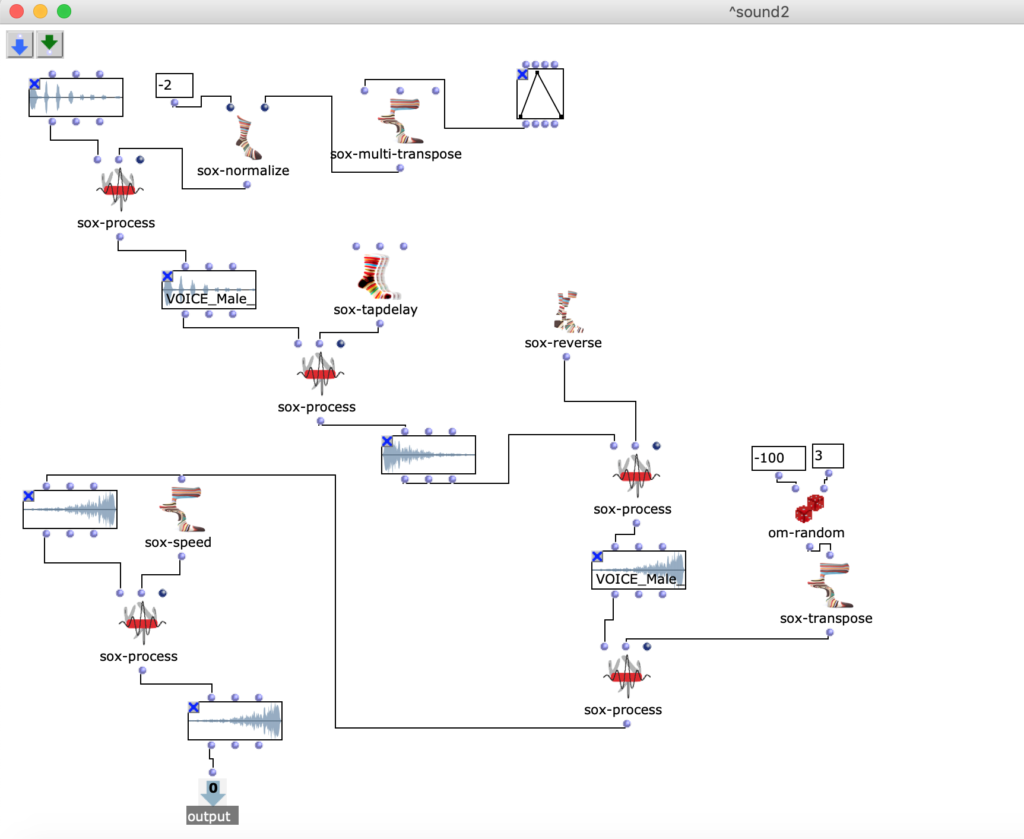
In the 2nd figure you can see an OpenMusik patch. The patch “Sound2” contains the method“Sound2” for editing. I do the same manipulations as with the 1st sound to edit the 2nd sound. You can read the description above.
Fg. 2 shows OpenMusic Patch Sound2: This patch shows transformation of the 2nd sound
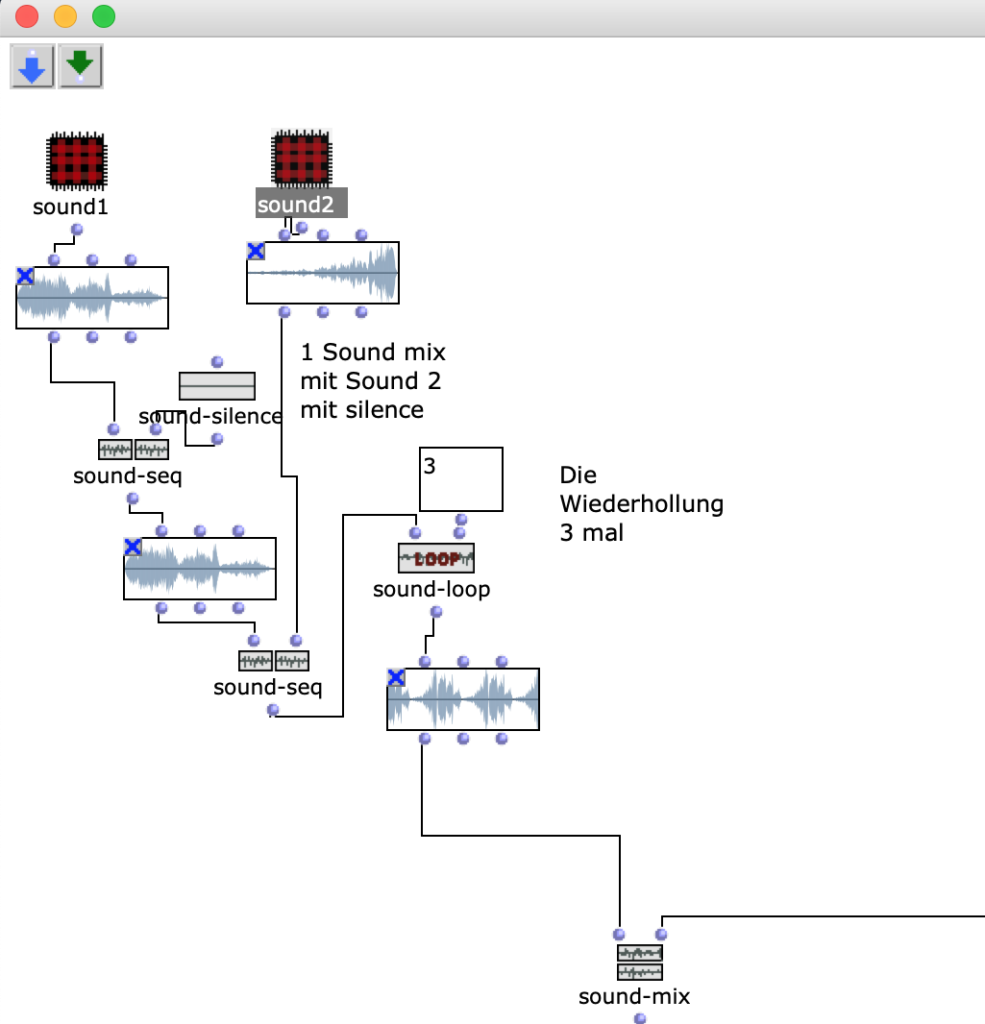
In the 3rd figure you can see the OpenMusic patch “Mix“. This patch contains the mix process“2 sounds“(OM sound-mix), which I described in the last 2 patches. I add pauses(OM sound-silence) and then I repeat the sound material 3 times(OM sound-loop).
Fg. 3 shows OpenMusic patch “Mix”: This patch shows sound-mix (sound 1 and sound 2).
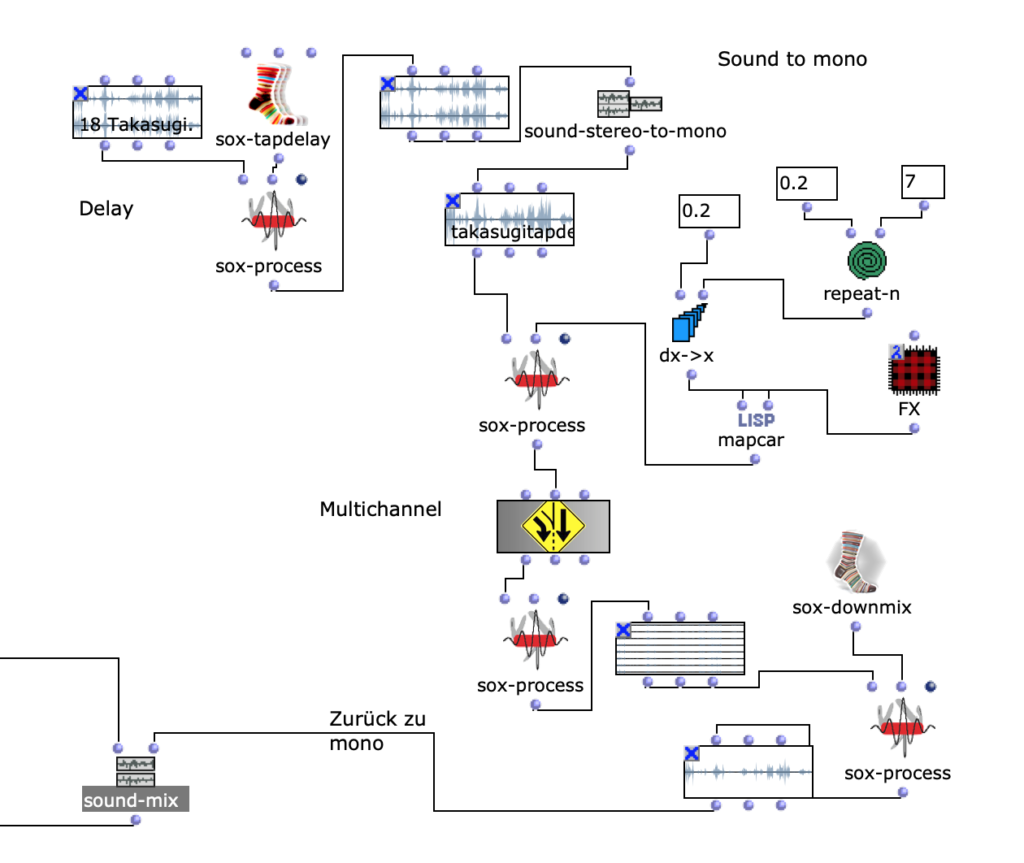
The 4th figure contains patch 4, in which you can see the arrangement of Takasugi’s composition “Diary of a Lung”.
The composer Steven Kazuo Takasugi presented his music piece “Diary of a Lung, version for eighteen musicians and electronic playback” at the University of Music Karlsruhe and he was looking for 2 sound engineers who could play his composition live with several channels at the concert.
“Takasugi is one of the most renowned composers in the field of new music today. His work focuses on electro-acoustic composition, mostly with music-theatrical elements: his internationally acclaimed work “Sideshow” for live octet, electronic amplification and playback (2009-2015) is a good example. Remarkably, his oeuvre comprises fewer than two dozen works. He often works on a piece for years – which makes the excitement with which each new piece is anticipated all the greater.”(C)
Mr. Takasugi develops his musical language. As a composer, Mr. Takasugi has processed his composition with a conception. The main idea was that one must use one’s body as an instrument. Takasugi’s projects are characterized by a reference not only to the content of artistic expression (for example, the content of a musical work), but also to the act of expression (the fact that music is played, the performer’s body, the performer’s breath).
The concept of the body plays a major role in Takasugi’s philosophy. The body brings time into the process and helps to focus in the moment (here and now). The body helps to perceive this process as a meditative process. To produce this piece of music, Mr. Tahasugi recorded himself and various sounds from his body.
The sound director has to take great responsibility and has to play the music as an instrumentalist. Therefore, this work of sending the audio signal to multiple channels cannot be done by a machine, computer or code (says Mr. Takasugi).
As a sound director, I played this piece of music. That’s why it was interesting for me (as a music computer scientist) to test what can be algorithmized in this music.
That’s why I took Takasugi’s music piece as part of my material.
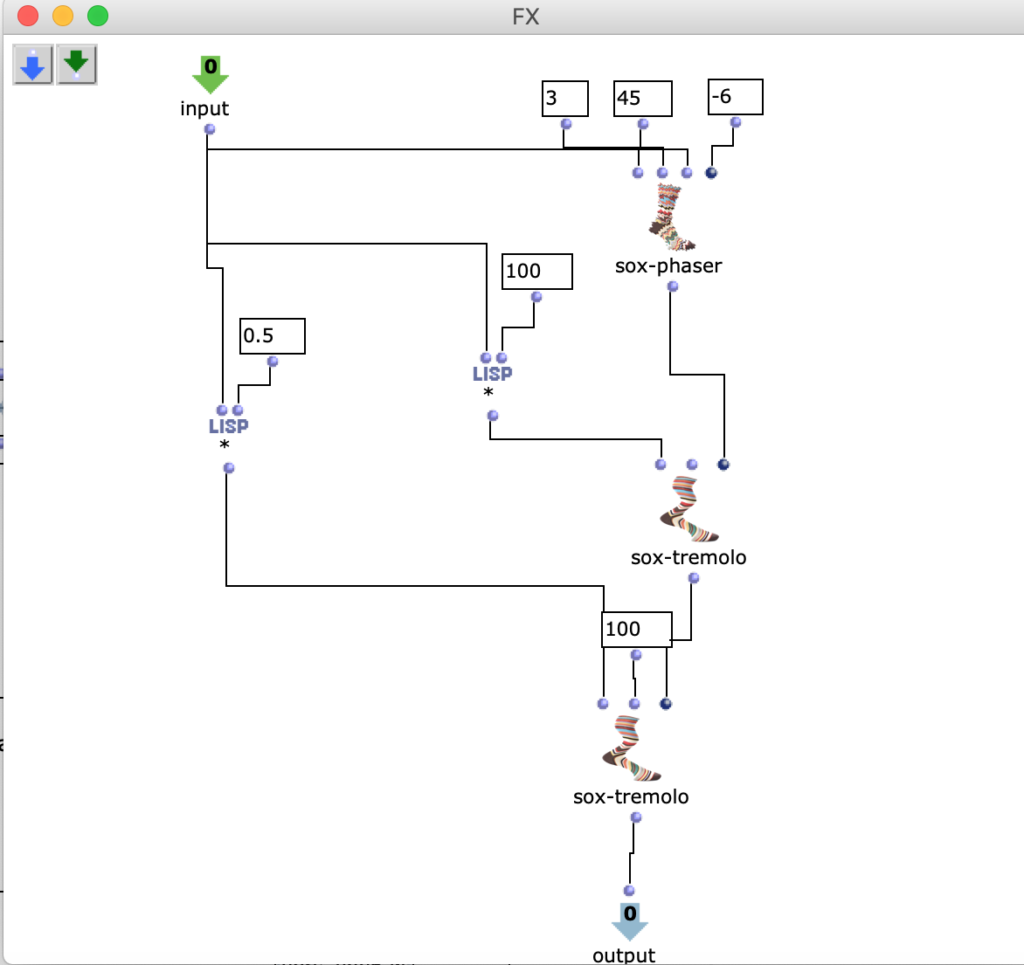
As processing method I use delay(OM sox-tapdelay), then make stereo to mono. In patch“FX” there are OM sox-phaser, OM sox-tremolo(see Fg 5).
Fg. 4 shows OpenMusic patch “Takasugi”: This patch shows editing of the material from the audio Takasugi “Diary of a Lung”
In the next figure(Fig. 5) you can see the patch“FX“.
Fg. 5 shows OpenMusic patch “FX”: This patch shows OM sox-phaser, OM sox-tremolo
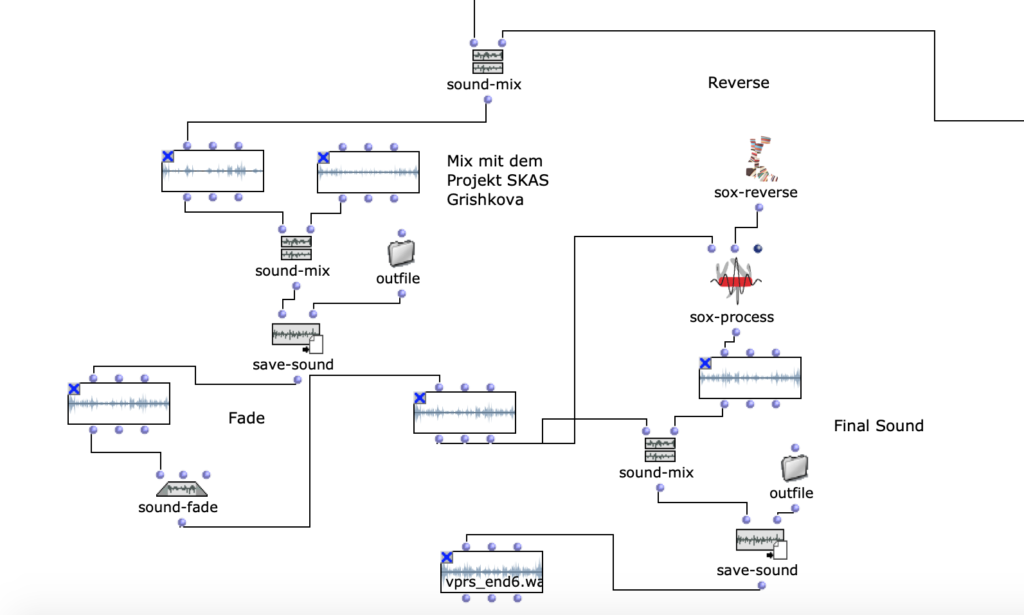
In the 6th figure you can see the final editing. I make a mix with an audio material(Mix 2 Sound Takasugi) and my project, which I realized in the context of SKAS. The description of the project can be found here.
Fg. 6 shows OpenMusic Patch “FinalMix”: This patch shows the final transformation with the mono track
The result of the last iteration can be heard here:
Then I edited the resulting audio files with OMPrisma(see Fig 7).
Main idea of Mr. Takasugi is that composer (and musician) must produce very personal music. You have to bring“yourself” in the composition.
The idea that you have to bring “yourself” in the composition, practically means that you have to bring some random elements. Random elements are necessary: as humans we make mistakes, we can overlook something, or decide spontaneously. I use OM-random to integrate these random elements into the composition.
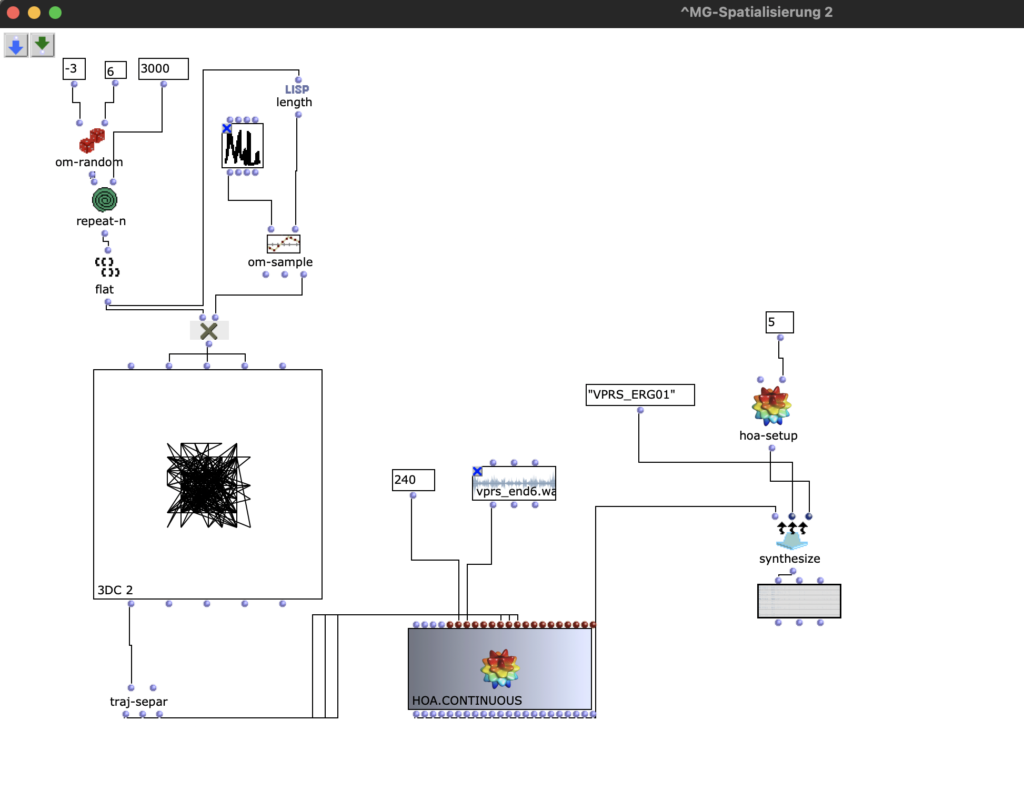
Fg. 7 shows OpenMusic Patch “OMPrisma”: This patch shows the transformation with HOA.Continuous
As a method to personalize composition I use my name(Mila) as a pattern for the movement(see Fig 8).
Fg. 8 shows OpenMusic object “BPF”: This object shows my name as a pattern for the transformations
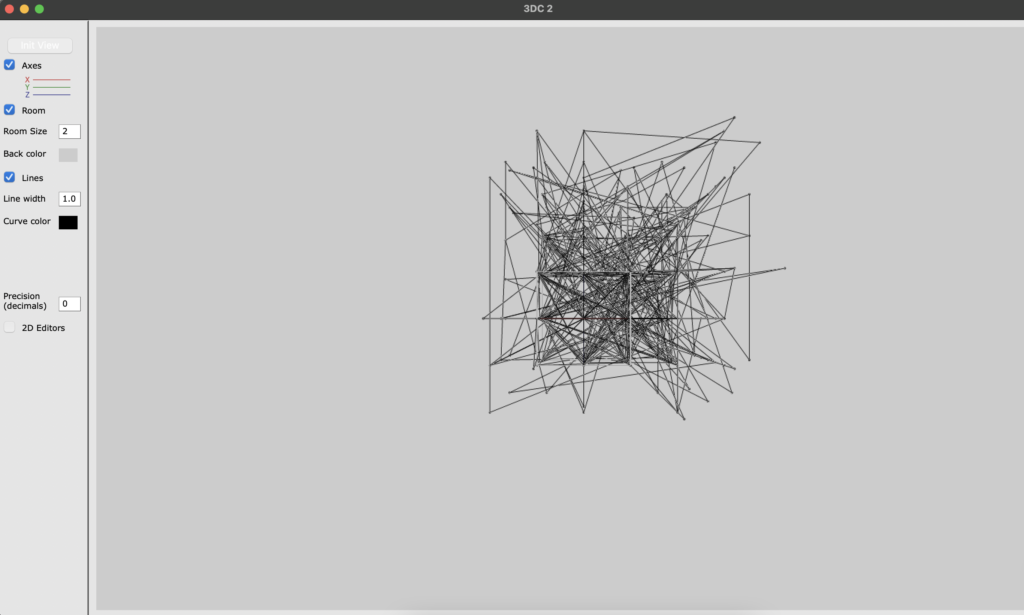
Then use 3D OpenMusic object. You can also see 3D well(see Fig. 9).
Fg. 9 shows OpenMusic object “3DC”: This object shows the transformations
With the traj-separ object you can send x-, y-, z- coordinates to HOA.Continu ous. With HOA.Continuous you can also select the length of the composition (in sec). In my case it says 240, which means 4 minutes.
Then with hoa-setup you can select which class of HOA you need. In my case, HOA-setup is 5, which means that I use High Order Ambisonic.
You can distinguish between First Order Ambisonic and High Order Ambisonic. First Order Ambisonic is a recording option for 3D sound (“First Order Ambisonic” (FOA)), which consists of four channels and can also be exported to various 2D formats (e.g. stereo, surround sound).
With Ambisonic higher order you can localize sound sources even more precisely. A more precise determination of the angle can be realized. The higher the order, the more spheres are added.
“The increasing number of components gives us higher resolution in the domain of sound directivity. The amount of B-format components in High order Ambisonics (HOA) is connected with formula for 3D Ambisonics: (? 1)2 or for 2D Ambisonics 2? 1 where n is given Ambisonics order”.(C)
✅ Result OpenMusic project with OMPrisma can be downloaded ? here? as audio. ✅ Result OpenMusic project with OMPrisma can be downloaded ? here? as code.
✴✴✴✴✴✴✴✴✴✴✴✴✴✴✴✴✴✴✴✴✴✴✴✴✴✴✴✴✴✴✴✴✴✴✴✴✴✴✴✴✴✴✴✴✴✴
✅ Reaper
Then I imported the resulting audio files into a Reaper project and edited the Ambisonics audio tracks with plugins and made new manipulations.
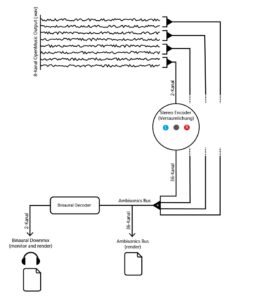
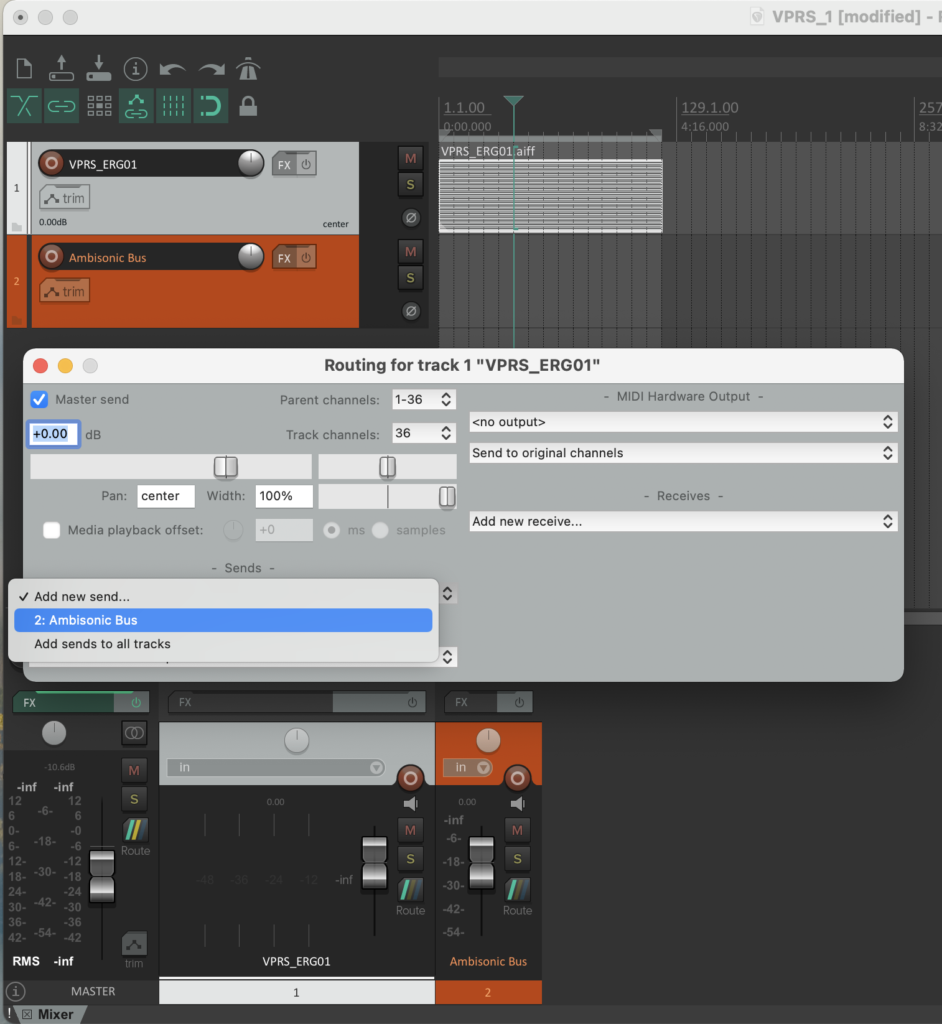
After the audio material is added to Reaper, you have to do routing. The main idea is that 36 channels are selected and sent to Ambisonic Buss (new track(see Fig 10)).
Fg. 10 shows Reaper project: step routing (36 channels), sends to Ambisonic bus
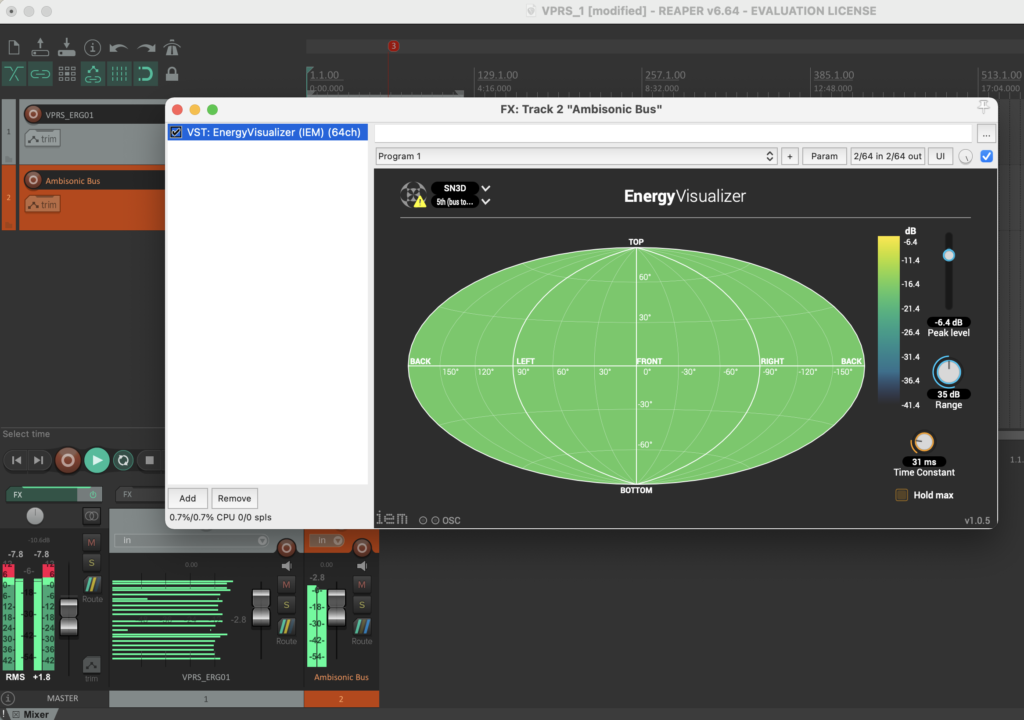
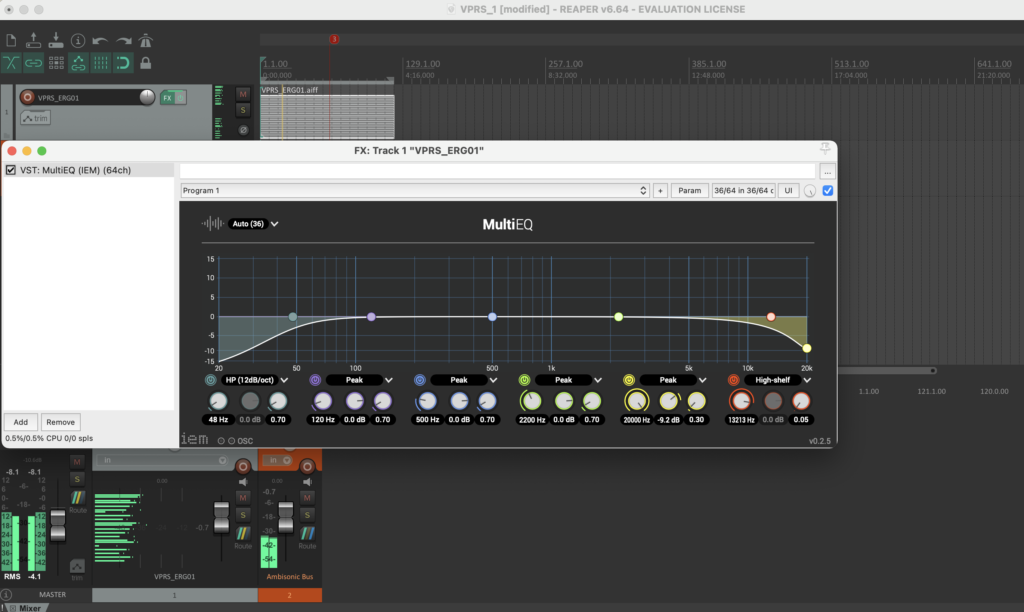
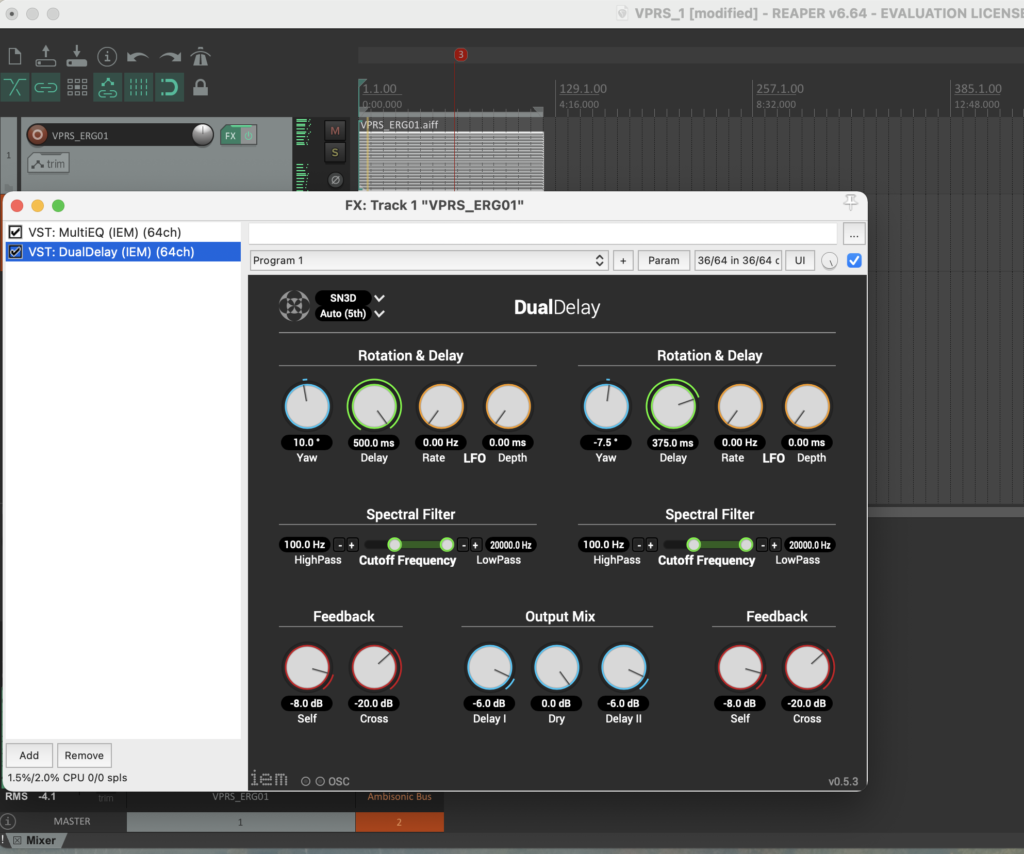
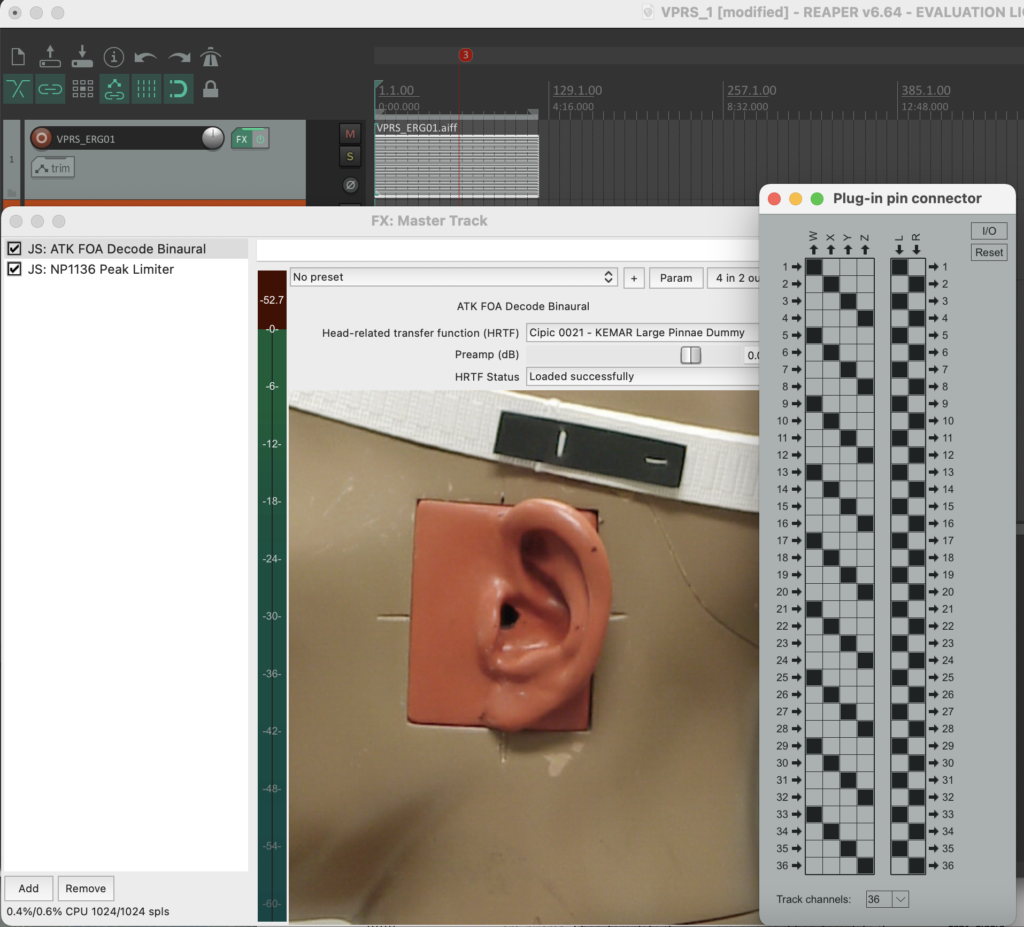
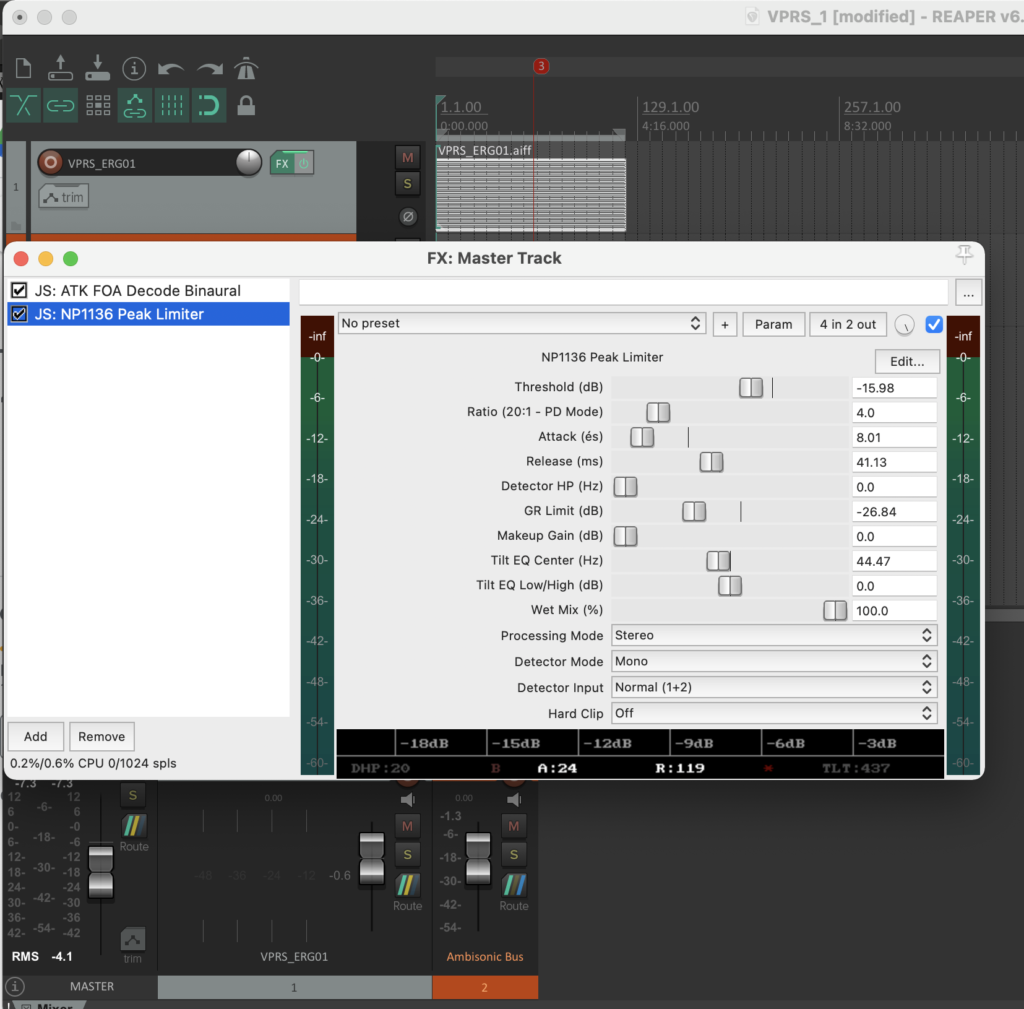
✅ Mixing & Plugins
I did the encoding of the prepared material into B-format using automated dynamic spaialization. I also made dynamic correction(limiter).
With plugins you can change and improve the sound as you wish. In audio technology, there are extensions for DAWs, including those that simulate various instruments or add reverb and echo. I used Reaper for this:
This article is about the fourth iteration of an acousmatic study by Zeno Lösch, which was carried out as part of the seminar “Visual Programming of Space/Sound Synthesis” with Prof. Dr. Marlon Schumacher at the HFM Karlsruhe. The basic conception, ideas, iterations and the technical implementation with OpenMusic will be discussed.
Responsible persons: Zeno Lösch, Master student Music Informatics at HFM Karlsruhe, 2nd semester
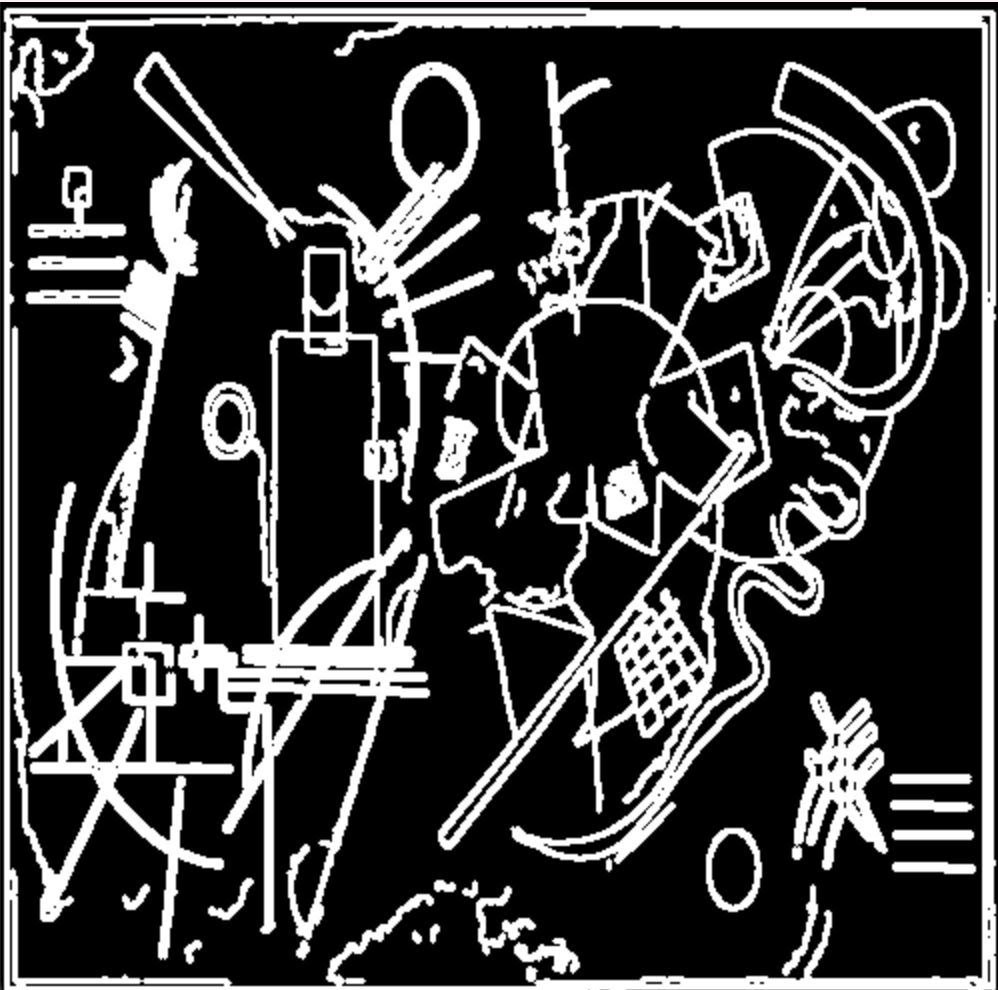
Pixel
A Python script was used to obtain parameters for modulation.
This script makes it possible to scale any image to 10 x 10 pixels and save the respective pixel values in a text file. “99 153 187 166 189 195 189 190 186 88 203 186 198 203 210 107 204 143 192 108 164 177 206 167 189 189 74 183 191 110 211 204 110 203 186 206 32 201 193 78 189 152 209 194 47 107 199 203 195 162 194 202 192 71 71 104 60 192 87 128 205 210 147 73 90 67 81 130 188 143 206 43 124 143 137 79 112 182 26 172 208 39 71 94 72 196 188 29 186 191 209 85 122 205 198 195 199 194 195 204 ” The values in the text file are between 0 and 255. The text file is imported into Open Music and the values are scaled.
These scaled values are used as pos-env parameters.
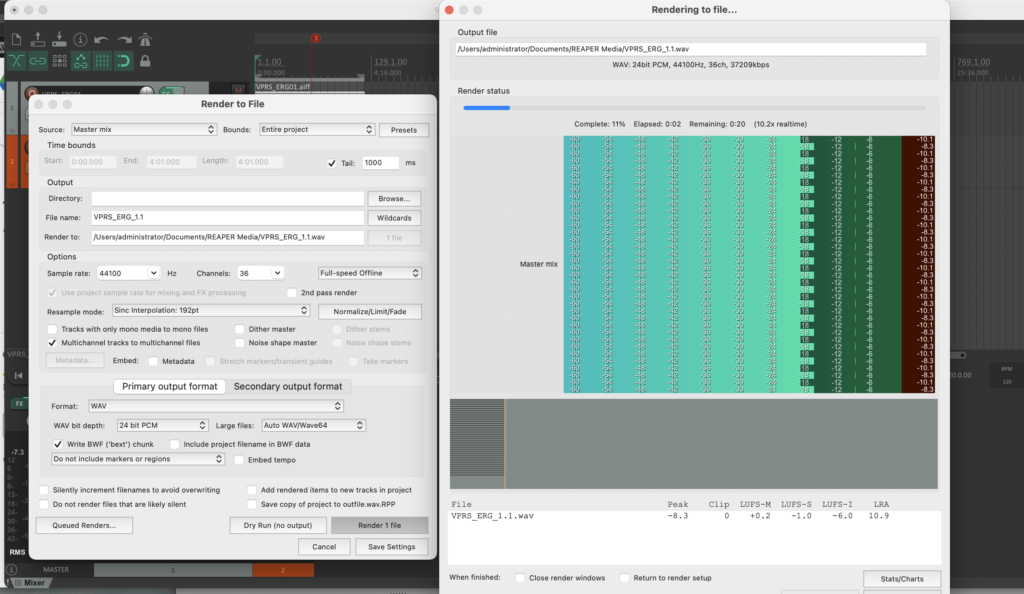
Reaper and IEM-Plugin Suite
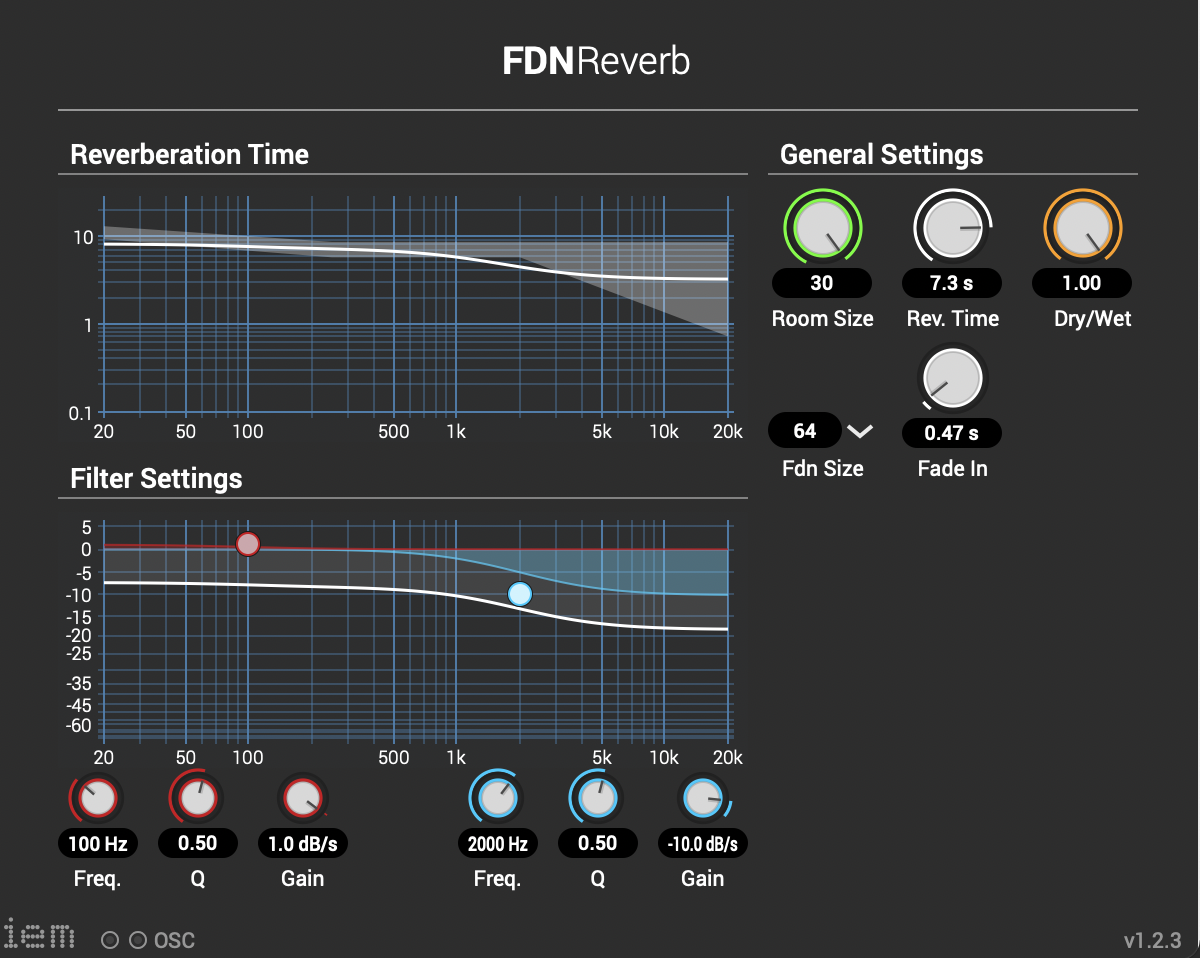
With different images and different scaling, you get different results that can be used as parameters for modulation. In Reaper, the IEM plug-in suite was used in post-production. These tools are used for Ambisonics of different orders. In this case, Ambisonics 5 order was used. One effect that was often used is the FDNReverb. This reverb unit offers the possibility of applying an Ambisonics reverb to a multi-channel file. The stereo and mono files were first encoded in 5th order Ambisonics (36 channels) and then converted into two channels using the binaural encoder. Other post-processing effects (Detune, Reverb) were programmed by myself and are available on Github. The reverb is based on a paper by James A. Moorer About this Reverberation Business from 1979 and was written in C. The algorithm of the detuner was written in C from the HTML version of Miller Puckette’s handbook “The Theory and Technique of Electronic Music”. The result of the last iteration can be heard here.
Inspired by the “Infinite Bad Guy” project, and all the very different versions of how some people have fueled their imaginations on that song, I thought maybe I could also experiment with creating a very loose, instrumental cover version of Billie Eilish’s “Bad Guy”.
Supervisor: Prof. Dr. Marlon Schumacher
A study by: Kaspars Jaudzems
Winter semester 2021/22
University of Music, Karlsruhe
To the study:
Originally, I wanted to work with 2 audio files, perform an FFT analysis on the original and “replace” its sound content with content from the second file, based only on the fundamental frequency. However, after doing some tests with a few files, I came to the conclusion that this kind of technique is not as accurate as I would like it to be. So I decided to use a MIDI file as a starting point instead.
Both the first and second versions of my piece only used 4 samples. The MIDI file has 2 channels, so 2 files were randomly selected for each note of each channel. The sample was then sped up or down to match the correct pitch interval and stretched in time to match the note length.
The second version of my piece added some additional stereo effects by pre-generating 20 random pannings for each file. With randomly applied comb filters and amplitude variations, a bit more reverb and human feel was created.
Acoustic study version 1
Acousmatic study version 2
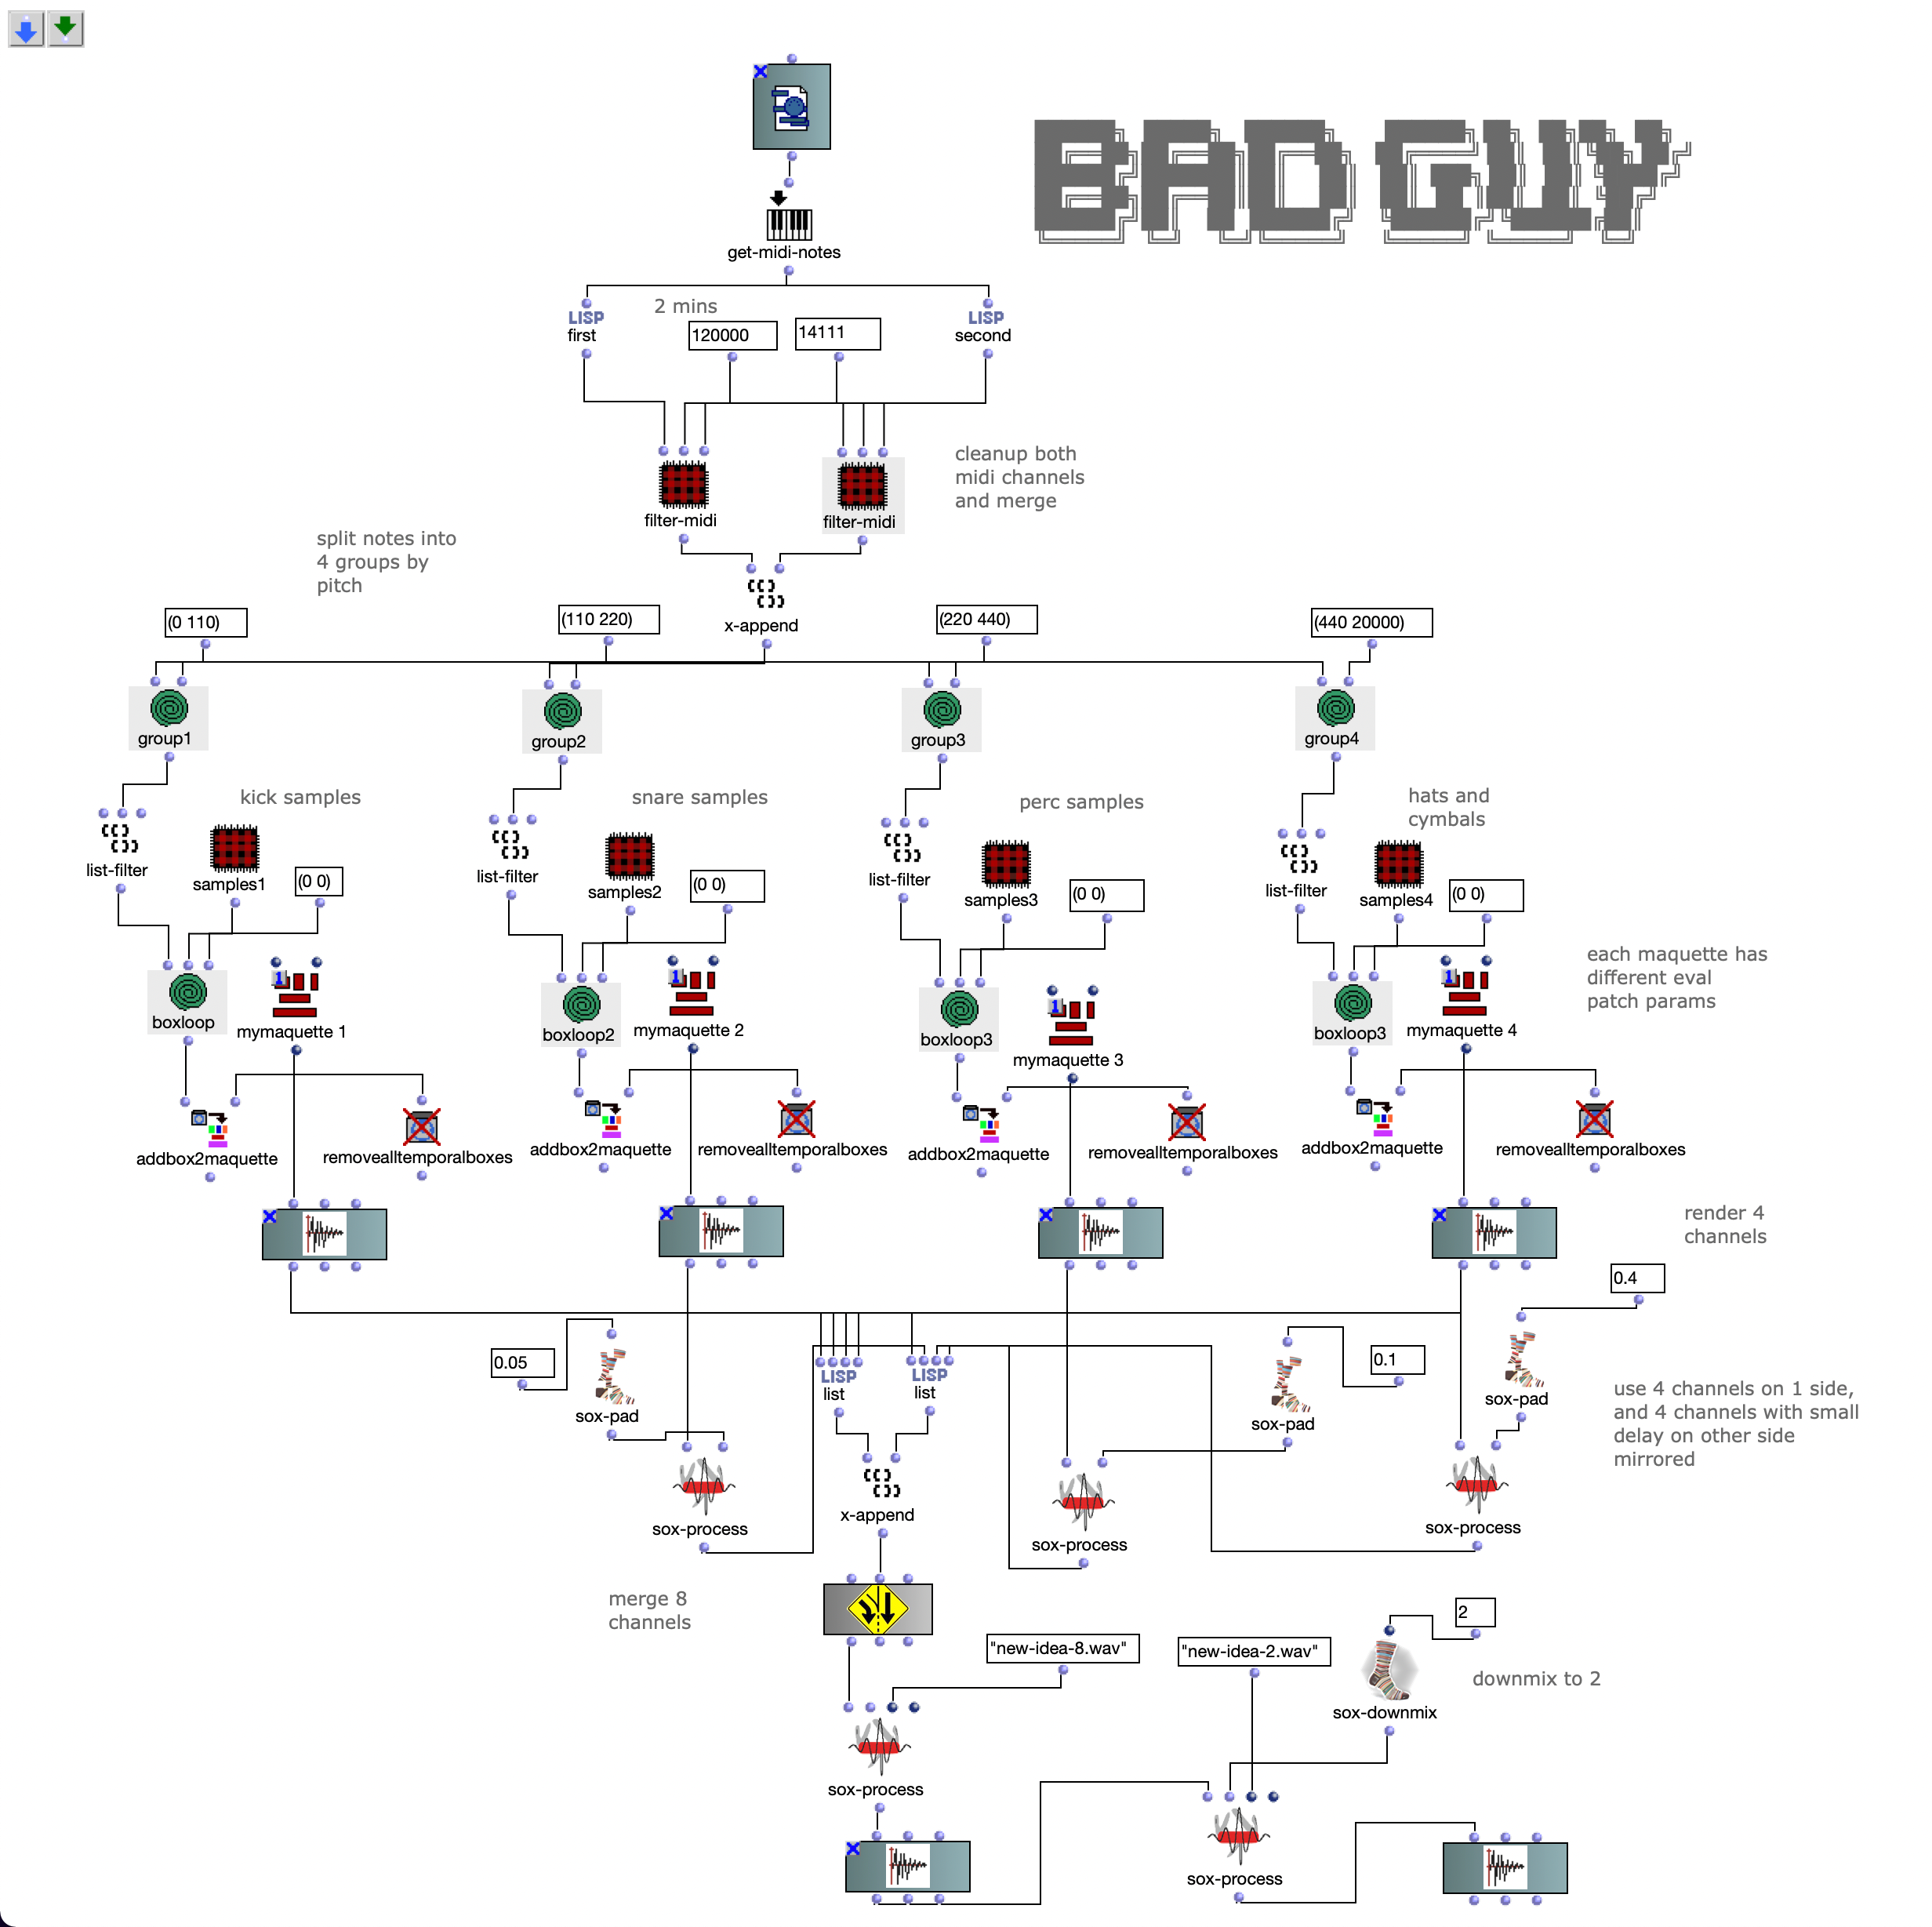
The third version was a much bigger change. Here the notes of both channels are first divided into 4 groups according to pitch. Each group covers approximately one octave in the MIDI file.
Then the first group (lowest notes) is mapped to 5 different kick samples, the second to 6 snares, the third to percussive sounds such as agogo, conga, clap and cowbell and the fourth group to cymbals and hats, using about 20 samples in total. A similar filter and effect chain is used here for stereo enhancement, with the difference that each channel is finely tuned. The 4 resulting audio files are then assigned to the 4 left audio channels, with the lower frequency channels sorted to the center and the higher frequency channels sorted to the sides. The same audio files are used for the other 4 channels, but additional delays are applied to add movement to the multi-channel experience.
Acousmatic study version 3
The 8-channel file was downmixed to 2 channels in 2 versions, one with the OM-SoX downmix function and the other with a Binauralix setup with 8 speakers.
Acousmatic study version 3 – Binauralix render
Extension of the acousmatic study – 3D 5th-order Ambisonics
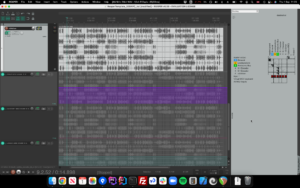
The idea with this extension was to create a 36-channel creative experience of the same piece, so the starting point was version 3, which only has 8 channels.
Starting point version 3
I wanted to do something simple, but also use the 3D speaker configuration in a creative way to further emphasize the energy and movement that the piece itself had already gained. Of course, the idea of using a signal as a source for modulating 3D movement or energy came to mind. But I had no idea how…
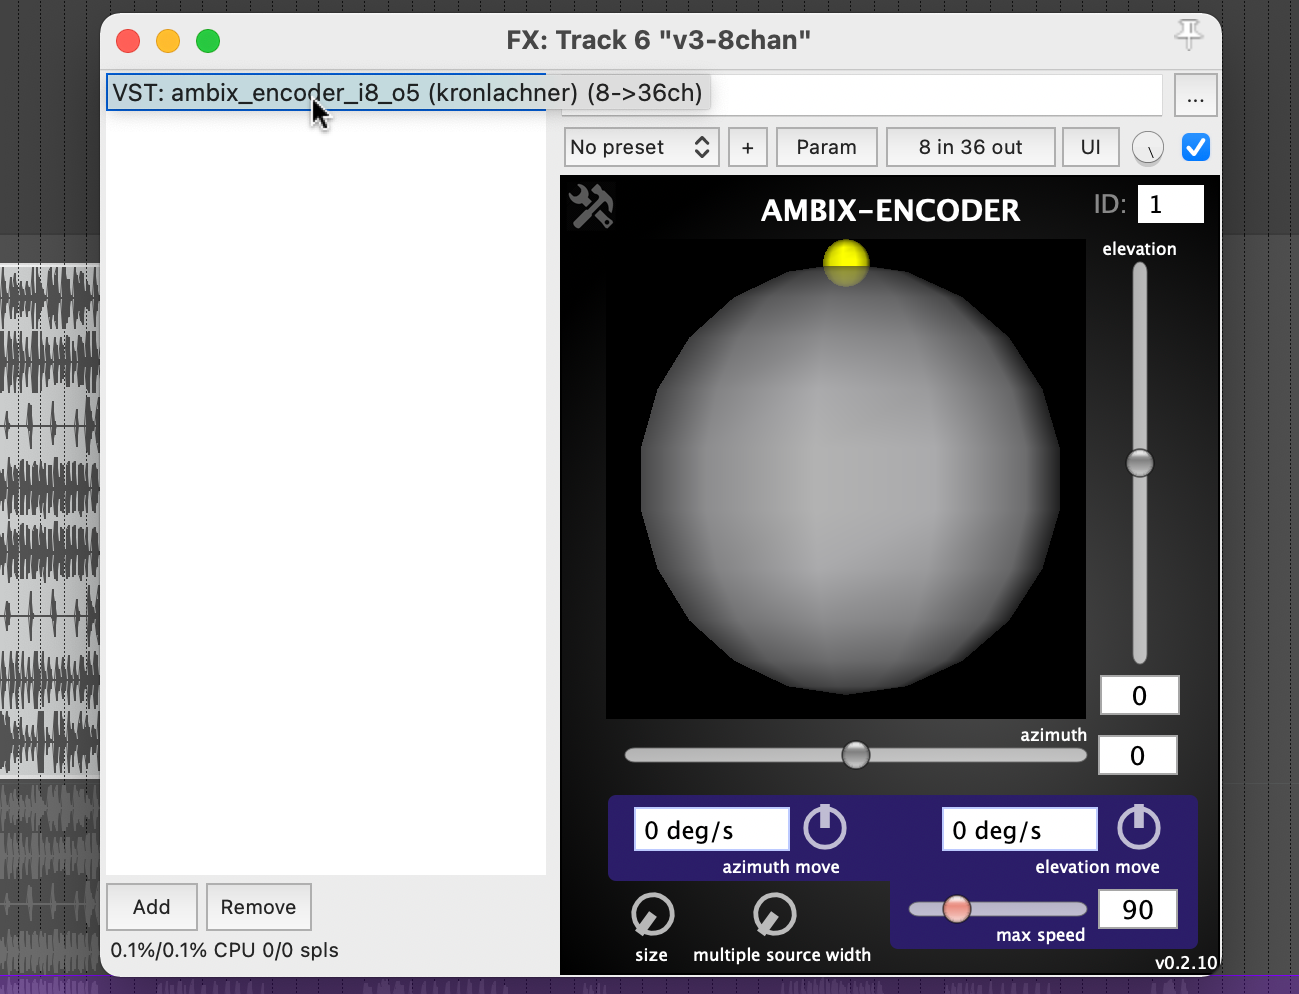
Plugin “ambix_encoder_i8_o5 (8 -> 36 chan)”
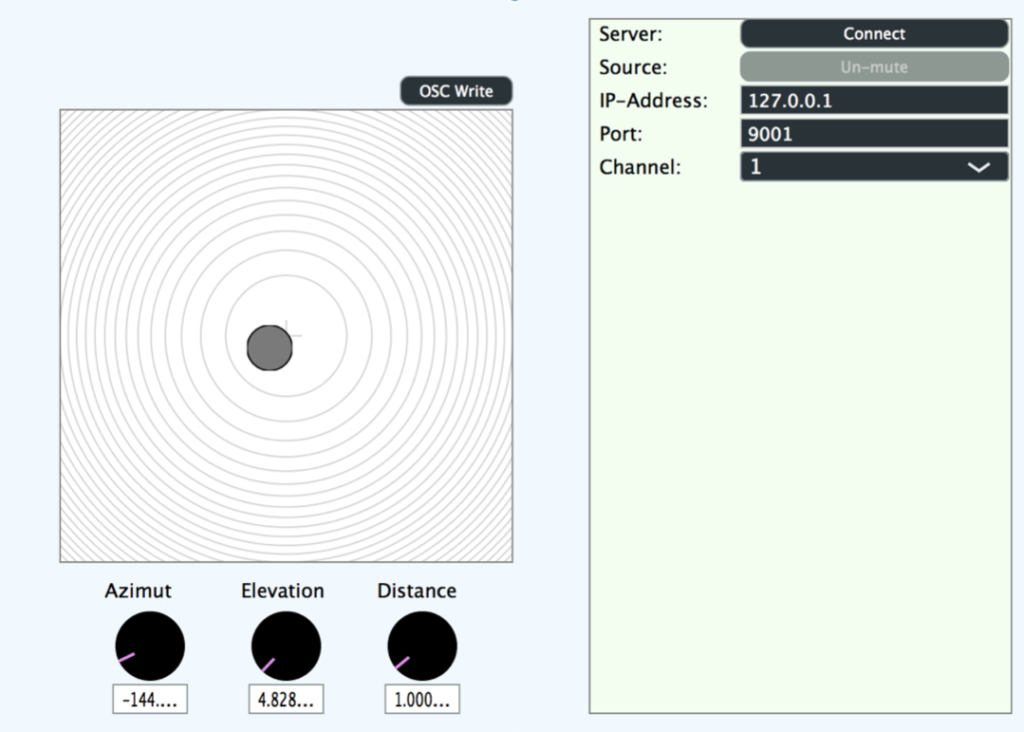
While researching the Ambix Ambisonic Plugin (VST) Suite, I came across the plugin “ambix_encoder_i8_o5 (8 -> 36 chan)”. This seemed to fit perfectly due to the matching number of input and output channels. In Ambisonics, space/motion is translated from 2 parameters: Azimuth and Elevation. Energy, on the other hand, can be translated into many parameters, but I found that it is best expressed with the Source Width parameter because it uses the 3D speaker configuration to actually “just” increase or decrease the energy.
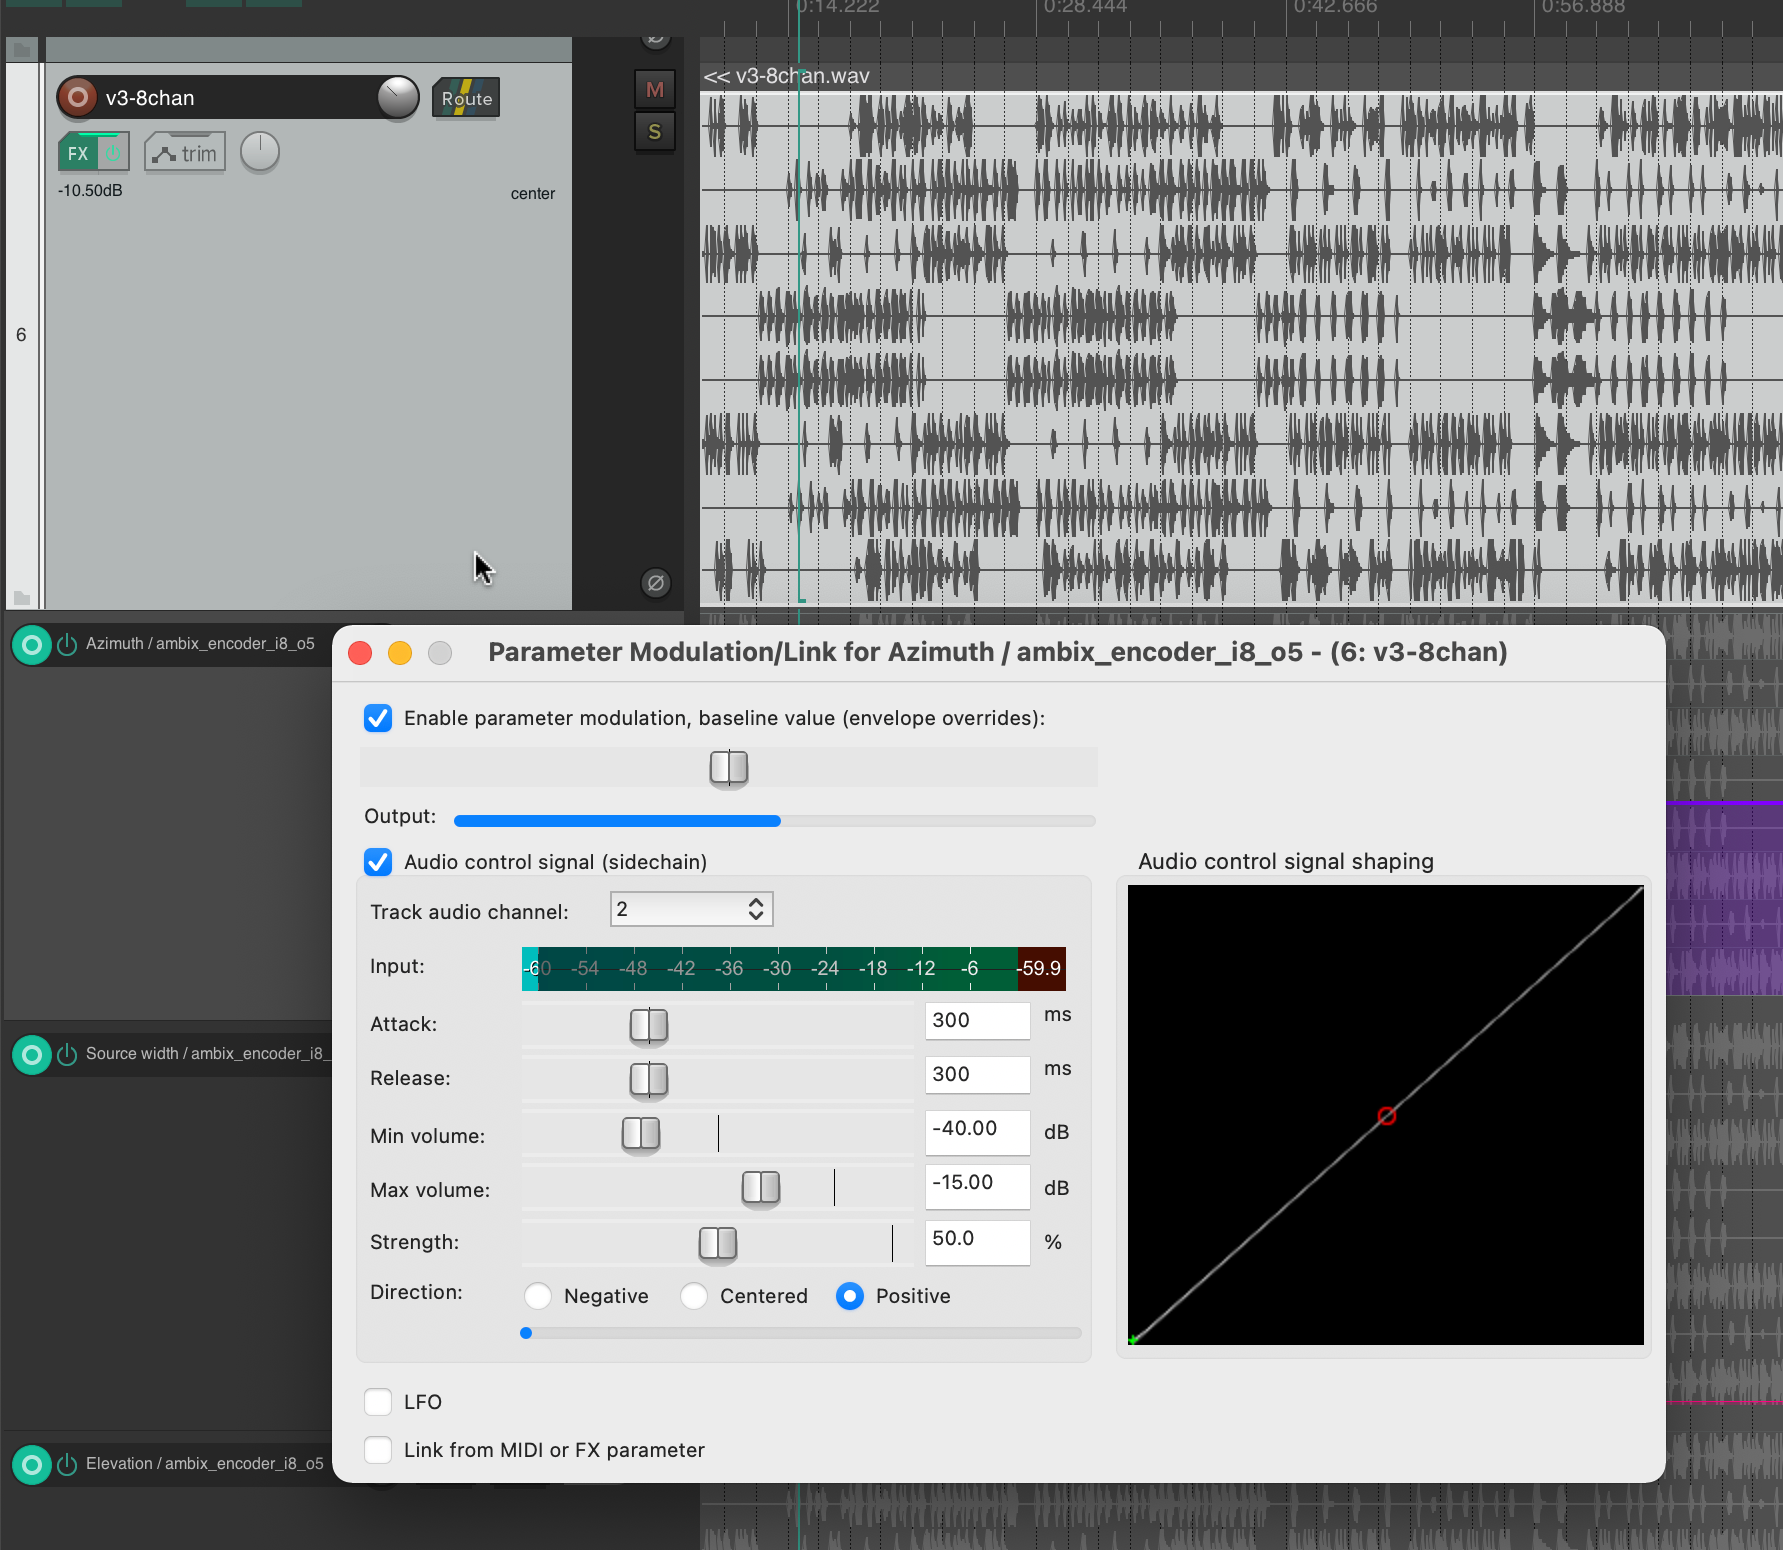
Knowing which parameters to modulate, I started experimenting with using different tracks as the source. To be honest, I was very happy that the plugin not only provided very interesting sound results, but also visual feedback in real time. When using both, I focused on having good visual feedback on what was going on in the audio piece as a whole.
This helped me to select channel 2 for Azimuth, channel 3 for Source Width and channel 4 for Elevation. If we trace these channels back to the original input midi file, we can see that channel 2 is assigned notes in the range of 110 to 220 Hz, channel 3 notes in the range of 220 to 440 Hz and channel 4 notes in the range of 440 to 20000 Hz. In my opinion, this type of separation worked very well, also because the sub-bass frequencies (e.g. kick) were not modulated and were not needed for this. This meant that the main rhythm of the piece could remain as a separate element without affecting the space or the energy modulations, and I think that somehow held the piece together.
Acousmatic study version 4 – 36 channels, 3D 5th-order Ambisonics – file was too big to upload
Abstract: Spectral Select explores the spectral content of one sample and the amplitude curve of a second sample and unites them in a new musical context. The meditative character of the output created by iteration is both contrasted and structured by louder amplitude peaks. In a revised version, Spectral Select was spatialized in Ambisonics HOA-5 format.
Supervisor: Prof. Dr. Marlon Schumacher
A study by: Anselm Weber
Winter semester 2021/22 University of Music, Karlsruhe
About the study: In which forms of expression is the connection between frequency and amplitude expressed ? Are both areas intrinsically connected and if so, what could be approaches to redesigning this order? Such questions have occupied me for some time. That’s why the attempt to redesign them is the core topic of Spectral Select. I was inspired by AudioSculpt from IRCAM, which we got to know in our course: “Symbolic Sound Processing and Analysis/Synthesis” together with Prof. Dr. Marlon Schumacher and Brandon L. Snyder and which we partially rebuilt.
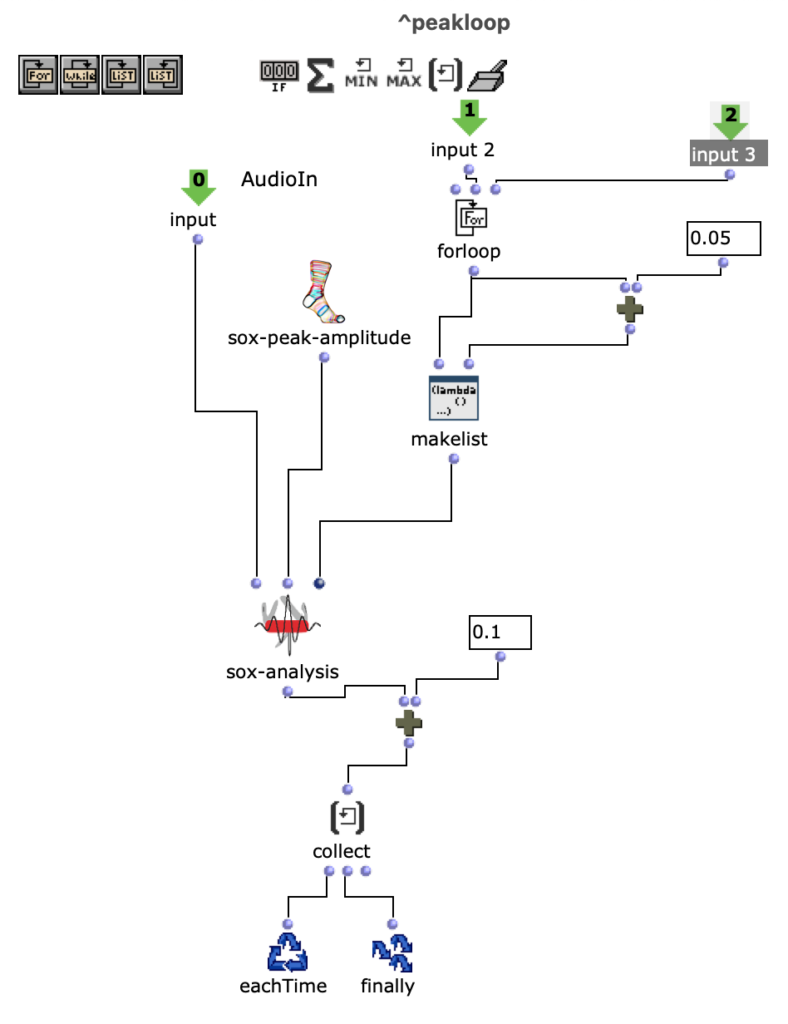
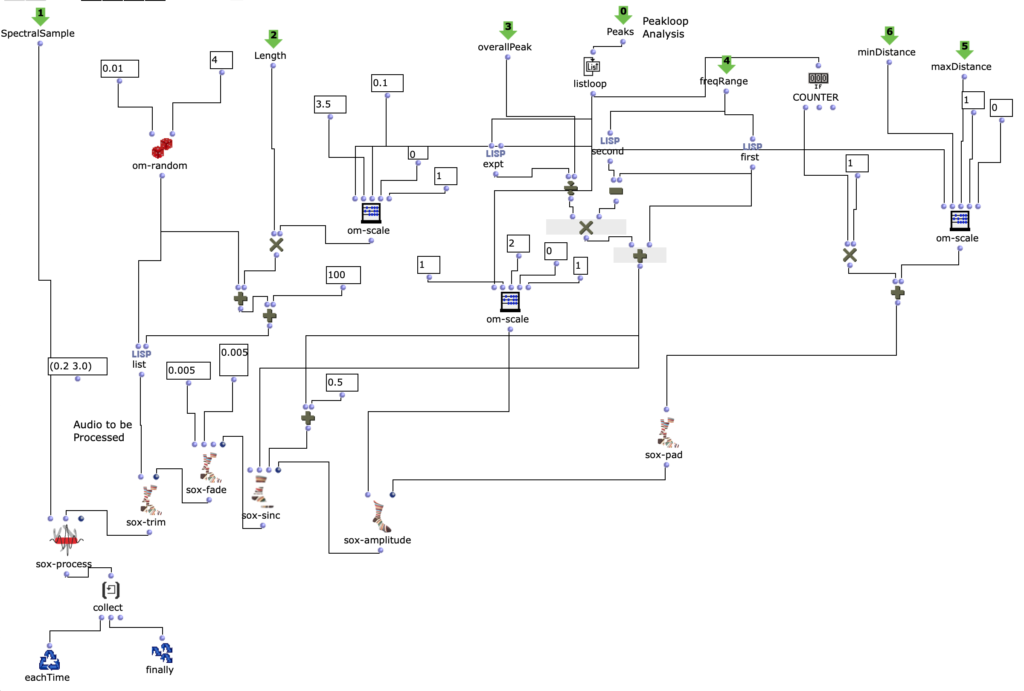
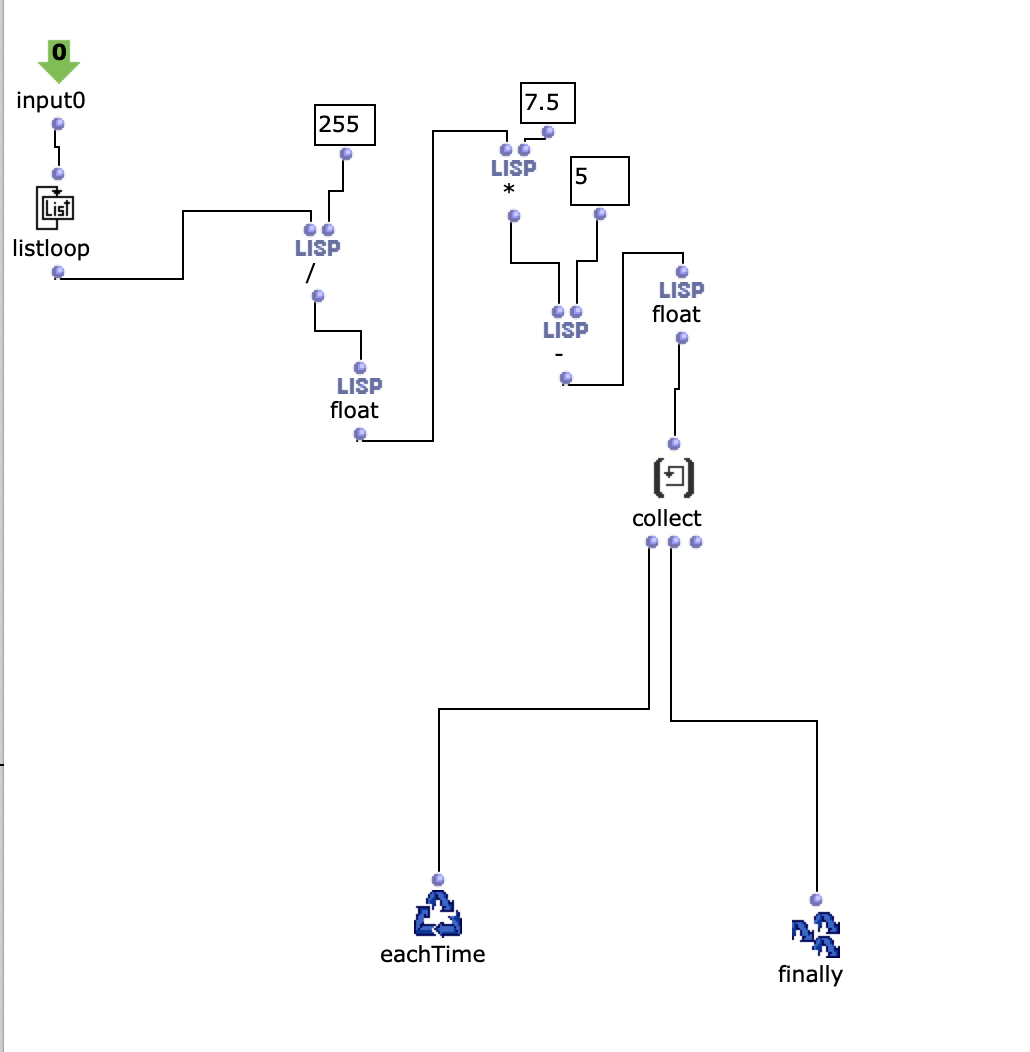
Spectral Edit works on a similar principle, but instead of having a user work out interesting areas within a spectrum of a sample, it was decided to use a second audio sample. This additional sample (from now on referred to as “amplitude sound” in the course of this article) determines how the first sample (from now on referred to as “spectral sound”) is to be processed by OM-Sox. To achieve this, two loops are used: First, individual amplitude peaks are analyzed out of the amplitude sound in the first “peakloop”. This analysis is then used in the heart of the patch, the “choosefreq” loop, to select interesting sub-ranges from the spectral sample. Loud peaks filter narrower bands from higher frequency ranges and form a contrast to weaker peaks, which filter somewhat broader bands from lower frequency ranges.
peakloop – Analysis
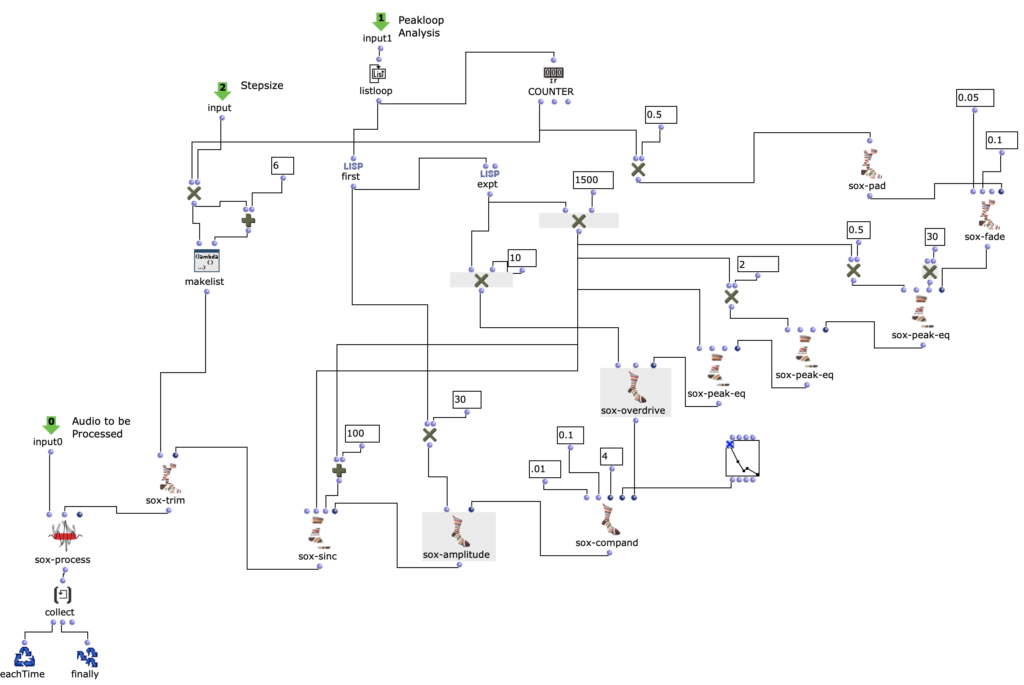
choosefreq Loop – Audio Processing
How small the respective iteration steps are affects both the length and the resolution of the overall output. Depending on the sample material, a large number of short grains or fewer but longer subsections can be created. However, both of these parameters can be selected freely and independently of each other.
In the enclosed piece, for example, a relatively high resolution (i.e. an increased number of iteration steps) was chosen in combination with a longer duration of the cut sample. This creates a rather meditative character, whereby no two sections will be 100% identical, as there are constantly minimal changes under the peak amplitudes of the amplitude sound. The still relatively raw result of this algorithm is the first version of my acousmatic study.
Acousmatic study version 1
The subsequent revision step was primarily aimed at working out the differences between the individual iteration steps more precisely. For this purpose, a series of effects were used, which in turn behave differently depending on the peak amplitude of the amplitude sound. To make this possible, the series of effects was integrated directly into the peak loop.
Acousmatic study version 2
In the third and final revision step, the audio was spatialized to 8 channels. The individual channels sound into each other and change their position in a clockwise direction. This means that the basic character of the piece remains the same, but it is now also possible to follow the “working through” of the choosefreq loop spatially. To maintain this spatiality, the output was then converted to binaural stereo for the upload using Binauralix.
Acoustic study version 3 – Binaural
Spectral Select – Ambisonics
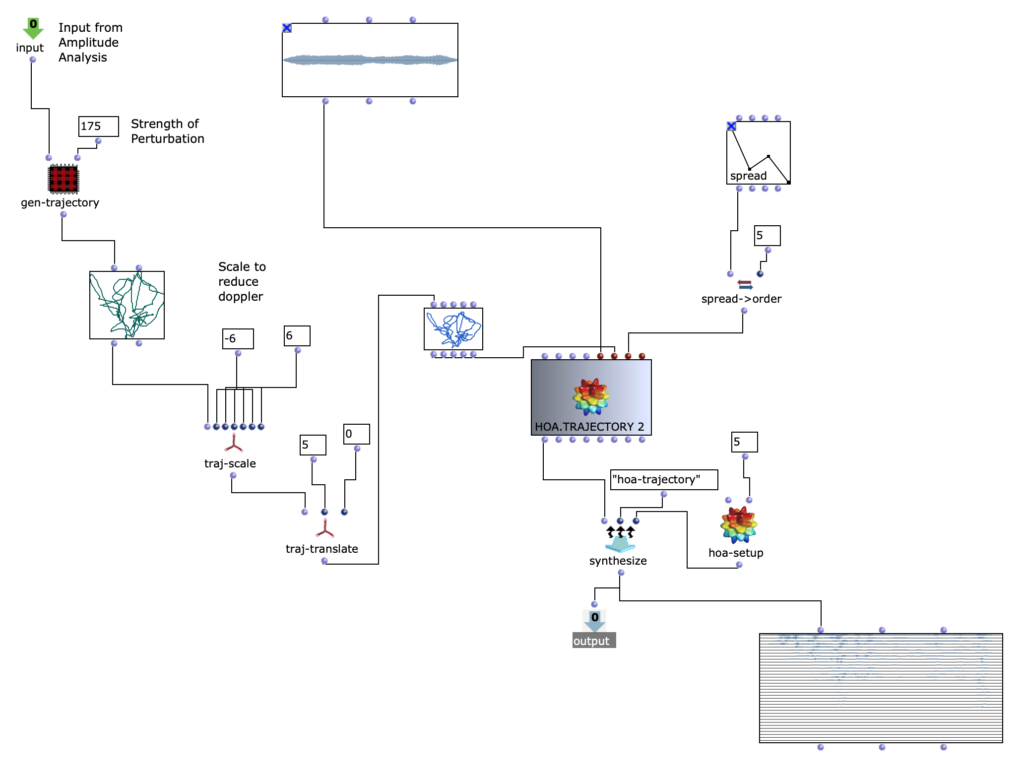
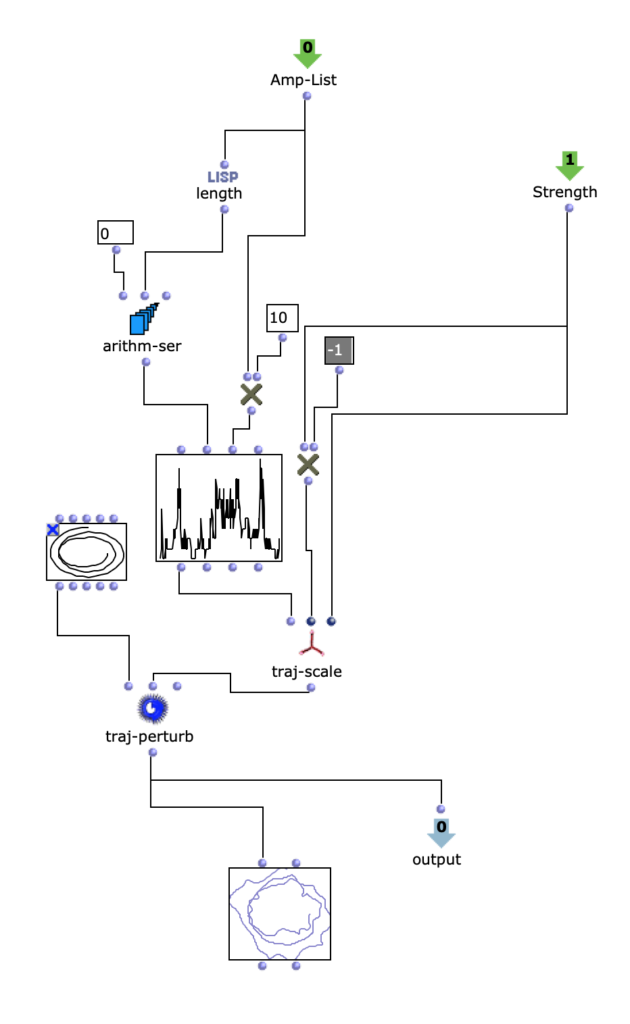
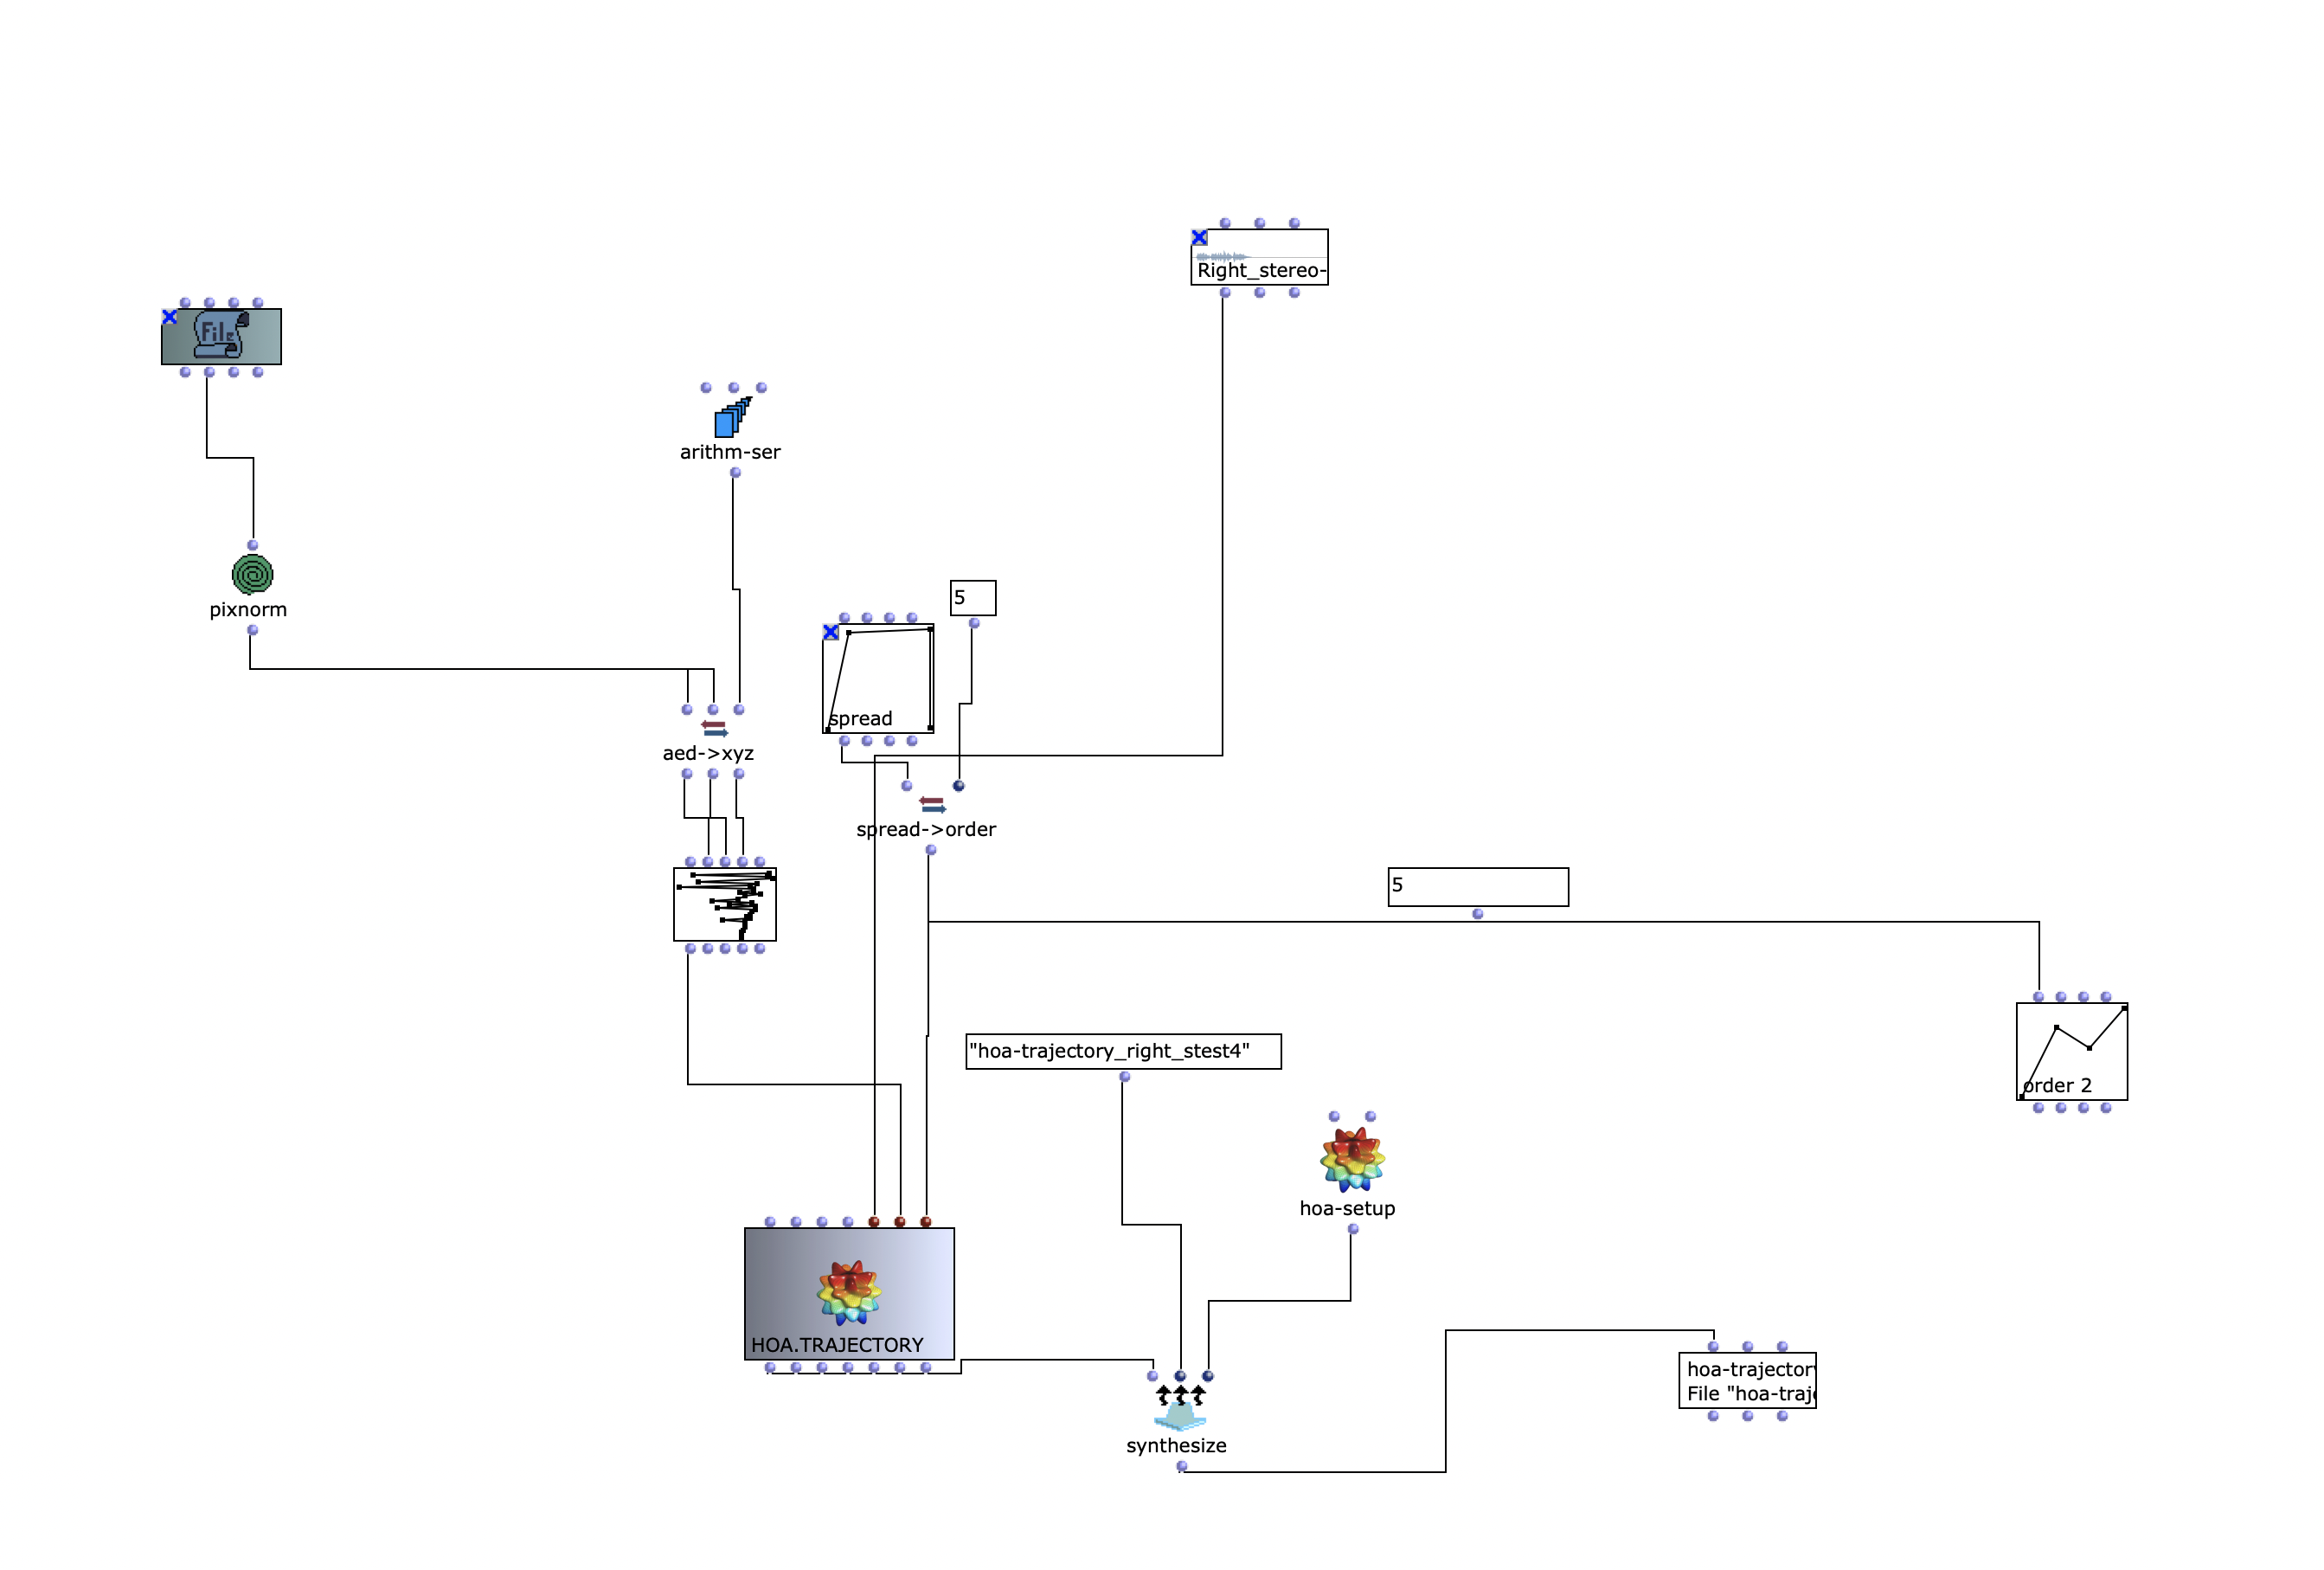
In the course of a further revision, Spectral Select was re-spatialized using the spatialization class “Hoa-Trajectory” from OM-Prisma and converted to the Ambisonics format. To ensure that this step fits in well conceptually and sonically with the previous edits, the amplitude sound should also play an important role in the spatial position. The possibilities for spatializing sounds with the help of Open Music and OM Prism are numerous. In the end, it was decided to work with Hoa-Trajectory. Here, the sound source is not bound to a fixed position in space and can be described with a trajectory that is scaled to the total duration of the audio input.
Spatialization with HOA.TRAEJECTORY
The trajectory is created depending on the amplitude analysis in the previous step. A simple, three-dimensional circular movement, which spirals downwards, is perturbed with a more complex, two-dimensional curve. The Y-values of the more complex curve correspond to the analyzed amplitude values of the amplitude sound. Depending on the scaling of the amplitude curve, this results in more or less pronounced deviations in the circular motion. Higher amplitude values therefore ensure more extensive movements in space.
It is interesting to note that OM-Prisma also takes Doppler effects into account. As a result, it is also audible that at higher amplitude values, more extreme distances to the listening position are covered in the same time. This step therefore has a direct influence on the timbre of the entire piece. Depending on the scaling of the trajectory, fast movements can be strongly overemphasized, but artifacts can also occur (if the distance is too great). To get a better impression, 2 different runs of the algorithm with different distances to the listener follow.
Version with extreme Doppler effects which can result in artifacts – binaural stereo
Versionwith closer distance and more moderate Dopp ler effects – Binaural Stereo
In contrast to the previous sound examples, the spectral sound and amplitude sound have been replaced in this example. This is a longer sound file for analyzing the amplitudes and a less distorted drone as a spectral sound. The idea behind this project is to experiment with different sound files anyway. Therefore, the old algorithm has been reworked to offer more flexibility with different sound files:
Revised scalable version of the old algorithm for selecting from the spectral sound
In addition, a randomized selection is now made from the spectral sound on the time axis. As a result, any shaping context should come from the magnitude of the amplitude sound and any timbre should be extracted from the spectral sound.
This article is about the three iterations of an acousmatic study by Zeno Lösch, which were carried out as part of the seminar “Symbolic Sound Processing and Analysis/Synthesis” with Prof. Dr. Marlon Schumacher at the HfM Karlsruhe. It deals with the basic conception, ideas, constructive iterations and the technical implementation with OpenMusic.
Responsible persons: Zeno Lösch, Master student Music Informatics at HfM Karlsruhe, 1st semester
Idea and concept
I got my inspiration for this study from the Freeze effect of GRM Tools.
This effect makes it possible to layer a sample and play it back at different speeds at the same time.
With this process you can create independent compositions, sound objects, sound structures and so on.
My idea is to program the same with Open Music.
For this I used the maquette and om-loops.
In the OpenMusicPatch you can find the different processes of layering the source material.
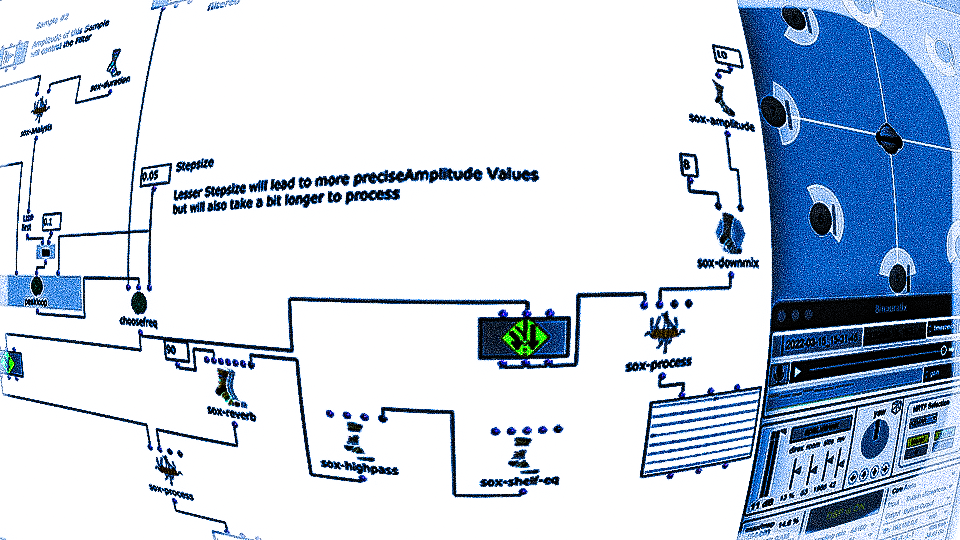
The source material is a “filtered” violin. This was created using the cross-synthesis process. This process of the source material was not created in Open Music.
Source material
Music cannot exist without time. Our perception connects the different sounds and seeks a connection. In this process, also comparable to rhythm, the individual object is connected to other objects. Digital sound manipulation makes it possible to use processes to create other sounds from one sound, which are related to the same sound.
For example, I present the sound in one form and change it at another point in the composition. This usually creates a connection, provided the listener can understand it.
You can change a transposition or the pitch in a similar way to notes.
This changes the frequency of a note. With digital material, this can lead to very exciting results. On a piano, the overtones of each note are related to the fundamental. These are fixed and cannot be changed with traditional sheet music.
With digital material, the effect that transposes plays a very important role. Depending on the type of effect, I have various possibilities to manipulate the material according to my own rules.
The disadvantage with instruments is that with a violin, for example, the player can only play the note once. Ten times the same note means ten violins.
In OpenMusic it is possible to play the “instrument” any number of times (as long as the computer’s processing power allows it).
Process
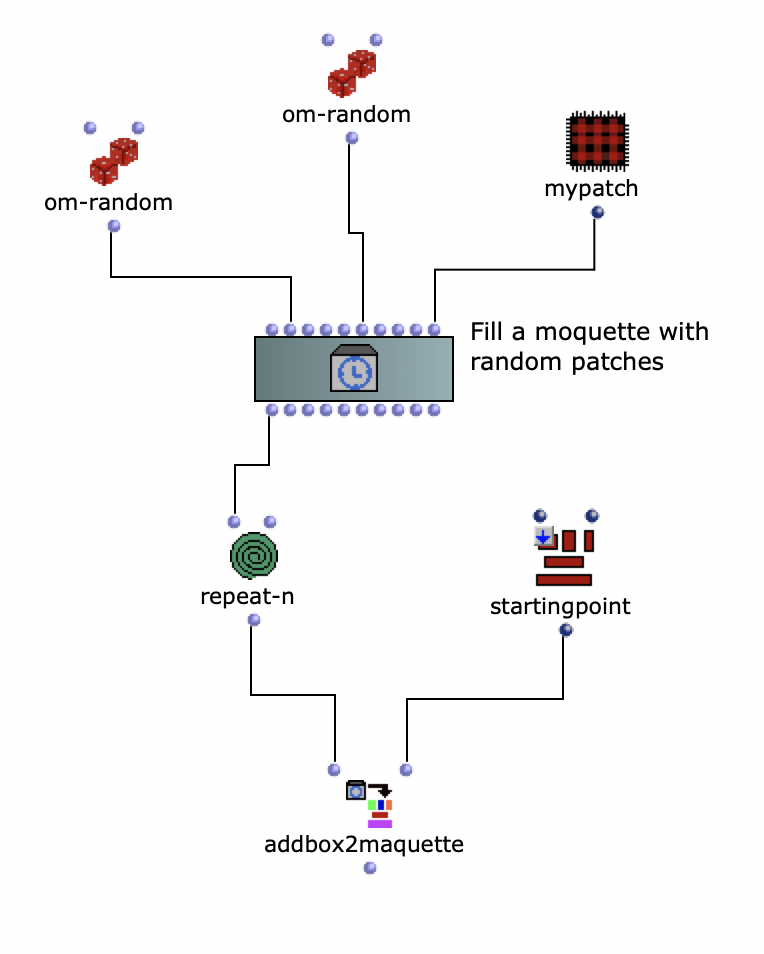
To recreate the Grm-Freeze, a moquette was first filled with empty patches.
Filling a moquette with empty patches
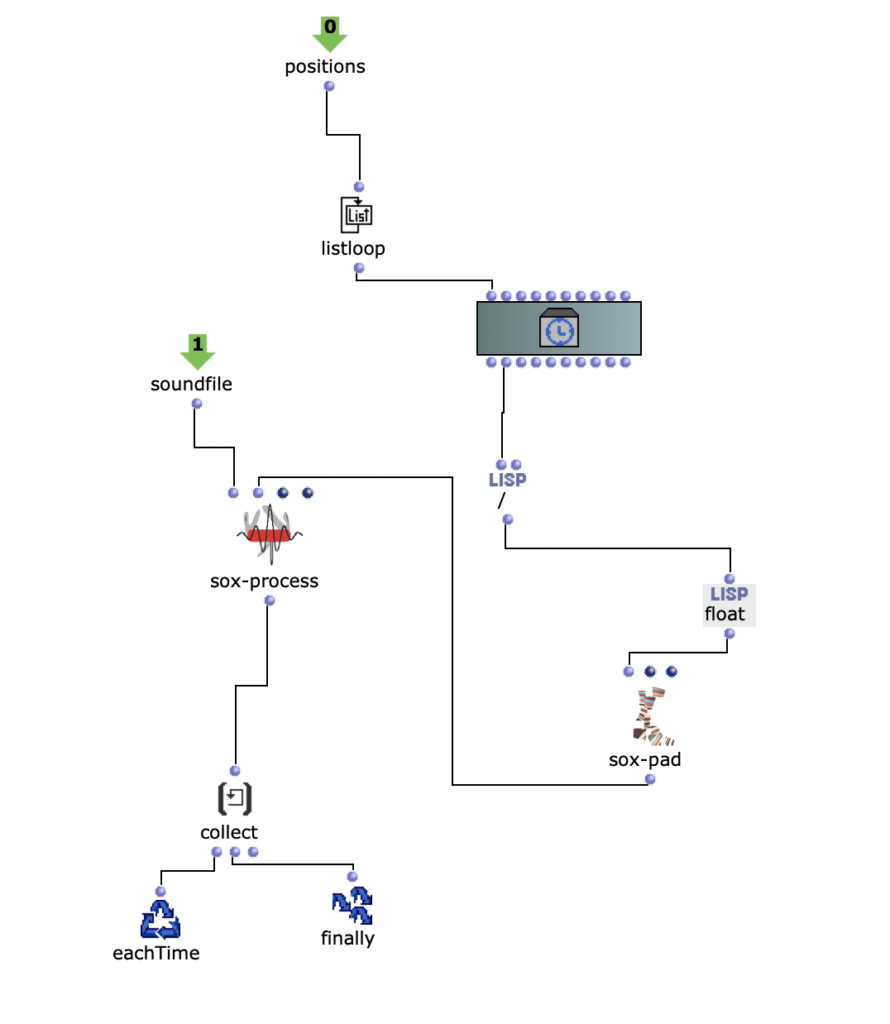
The soundfile was then rendered from the moquette with an om-loop to the positions of the empty patches.
Loop for soundfile positions
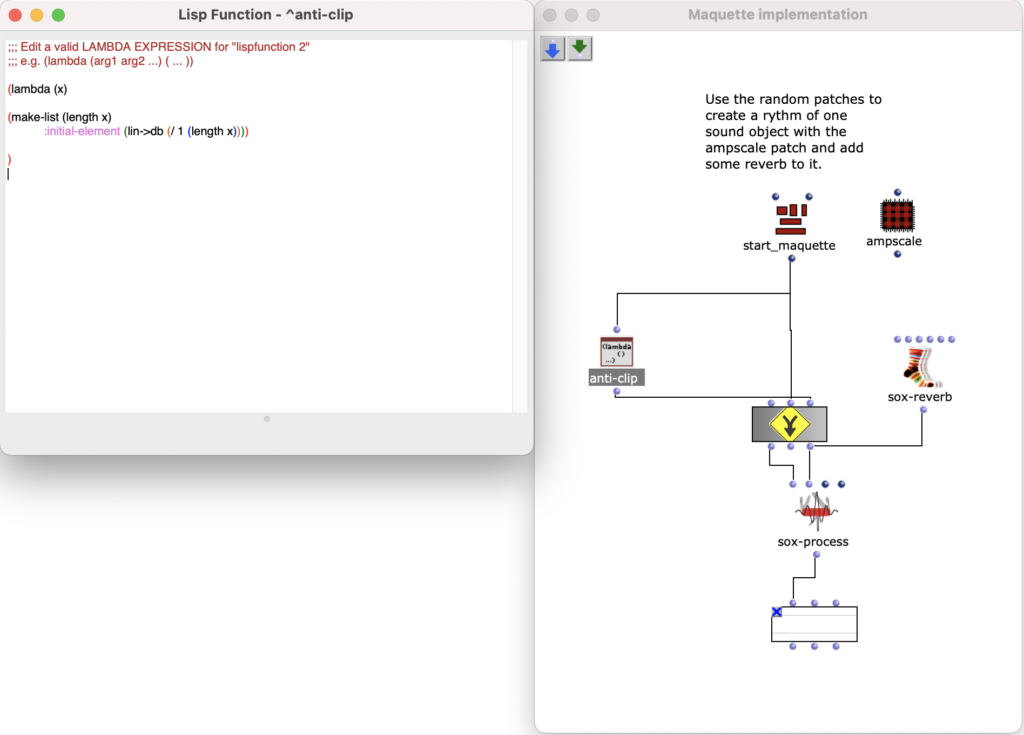
The following code was used to avoid clipping.
Sox-Mix and Anti Clip
Layer Study first iteration
The source material is presented at the beginning. In the course of the study, it is repeatedly changed and stacked in different ways.
The study itself also plays with the dynamics. Depending on the sound stacking algorithm, the dynamics in each sound object are changed. As there is more than one sound in time, these sounds are normalized depending on how many sounds are present in the algorithm to avoid clipping.
The study begins with the source material. This is then presented in a different temporal sequence.
This layer is then filtered and is also quieter. The next one develops into a “reverberant” sound. A continuum. The continuum remains it is presented differently again.
In the penultimate sound, a form of glissandi can be heard, which again ends in a sound that is similar to the second, but louder.
The process of stacking and changing the sound is very similar for each section.
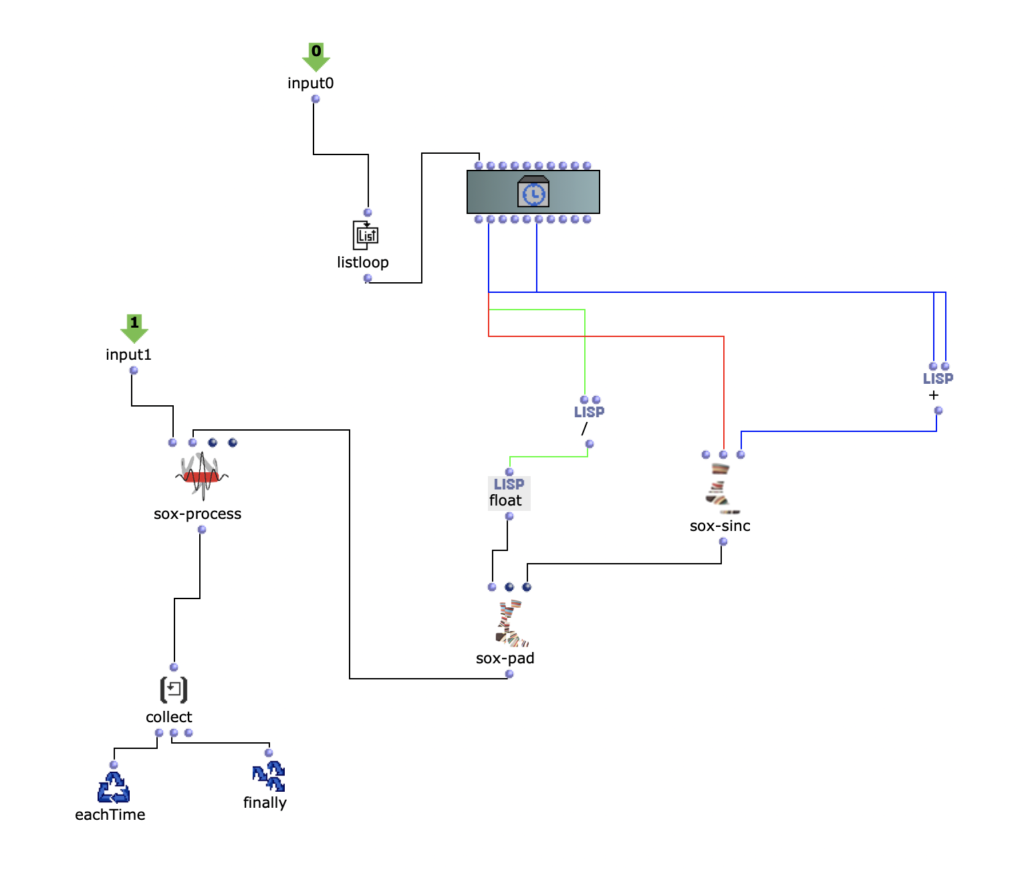
The position is given by the empty patch in the moquette.
Then the y-position and x-position parameters are used for modulation
Implementation of the x and y positions as modulation parametersLayer study first iteration
Layer Study second iteration
I tried to create a different stereo image for each section.
Different rooms were simulated.
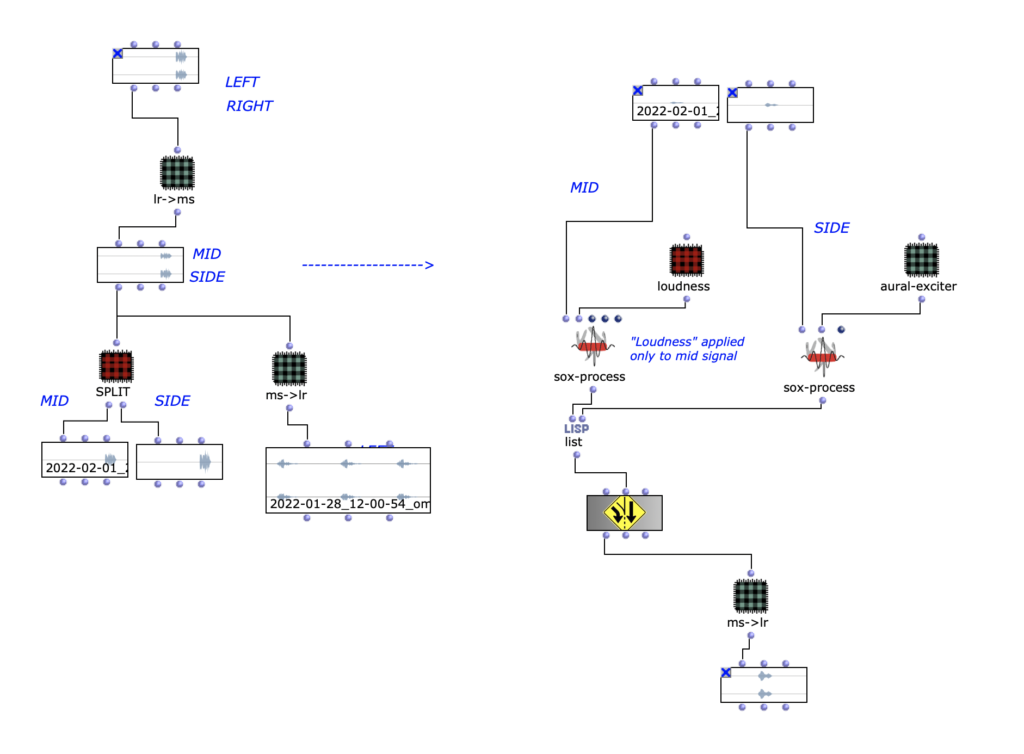
One technique that was used is the mid/side.
In this technique, the mid and side are extracted from a stereo signal using the following process:
Mid = (L R) * 0.5
Side = (L – R) * 0.5
An aural exciter has also been added.
In this process, the signal is filtered with a high-pass filter, distorted and added back to the input signal. This allows better definition to be achieved.
Through the mid/side, the aural exciter is only applied to one of the two and it is perceived as more “defined”.
To return the process to a stereo signal, the following process is used:
L = Mid Side
R = Mid – Side
Mid Side process
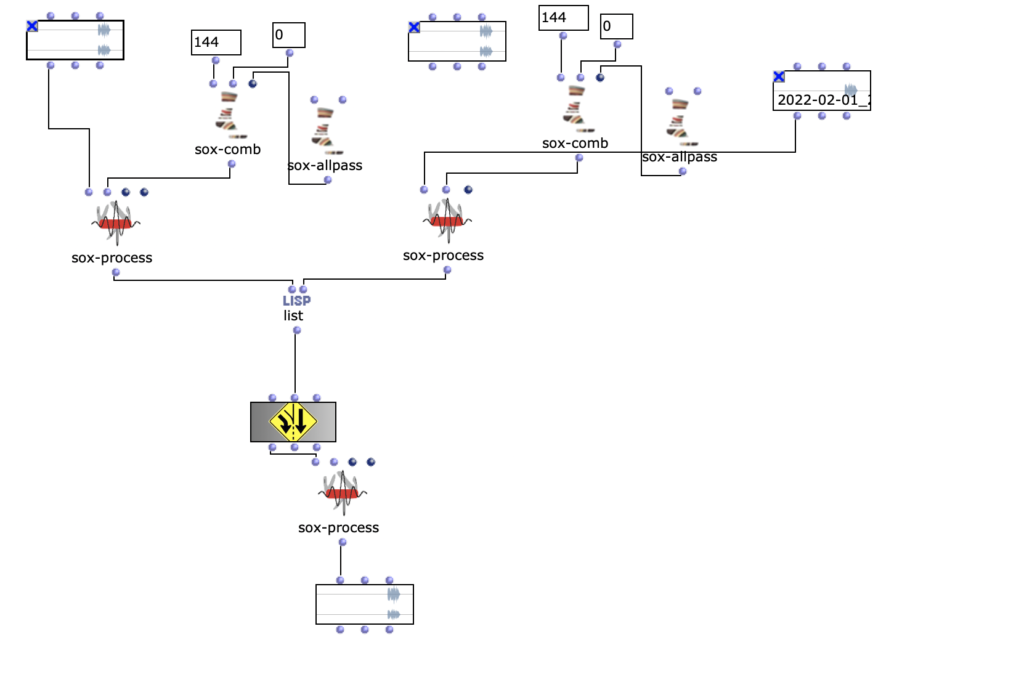
To further spatialize the sound, an all-pass filter and a comb filter were used to change the phase of the mid or side component.
Decorrelation of the phase
Layer Study Stereo
Layer Study third iteration
In this iteration, the stereo file was divided into eight speakers.
The different sections of the stereo composition were extracted and different splitting techniques were used.
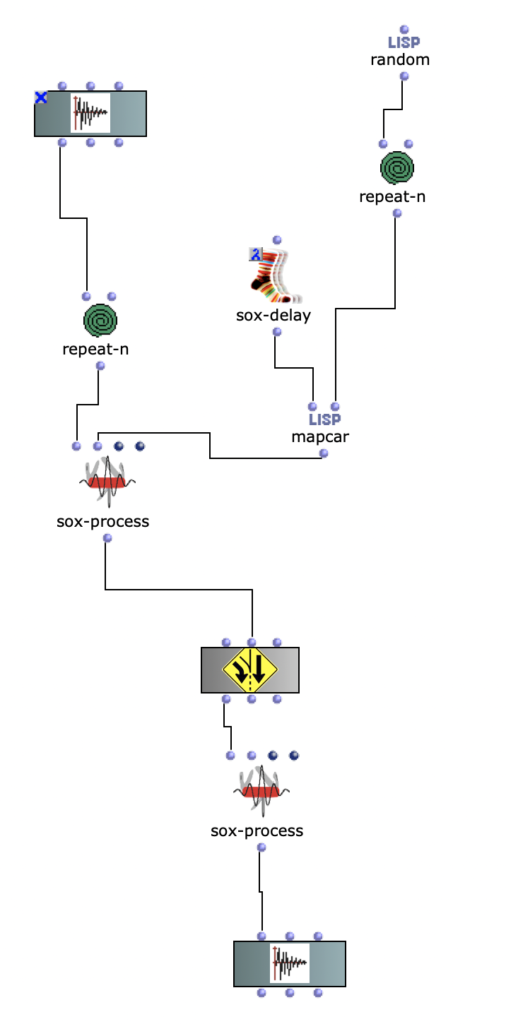
In one of these, a different fade in and fade out was used for each channel.
In an acousmatic version of a composition, this fade in and fade out can be achieved with the controls of a mixer.
A mapcar and repeat-n were used for this purpose.
Random fades for multichannel
The position of the respective channels was changed in the other processes. A delay was used.
This article is about the three iterations of an acousmatic study by Christoph Zimmer, which were carried out as part of the seminar “Symbolic Sound Processing and Analysis/Synthesis” with Prof. Dr. Marlon Schumacher at the HFM Karlsruhe. It covers the basic concept, ideas, subsequent iterations and the technical implementation with OpenMusic.
Responsible persons: Christoph Zimmer, Master student Music Informatics at the HFM Karlsruhe
Basic idea and concept:
I usually work a lot with hardware for music, especially in the field of DIY. This often coincides with the organization and optimization of the workflow associated with this hardware. When we students were given the task of producing an acousmatic study in the form of musique concrète, I was initially disoriented. Up to that point, I had only dealt a little with “experimental” music genres. To be honest, I wasn’t even aware of the existence of musique concrète up to this point. So with this task I was thrown out of my usual workflow, sound synthesis with hardware, and therefore also out of my comfort zone. Now I had to use field recordings as samples.
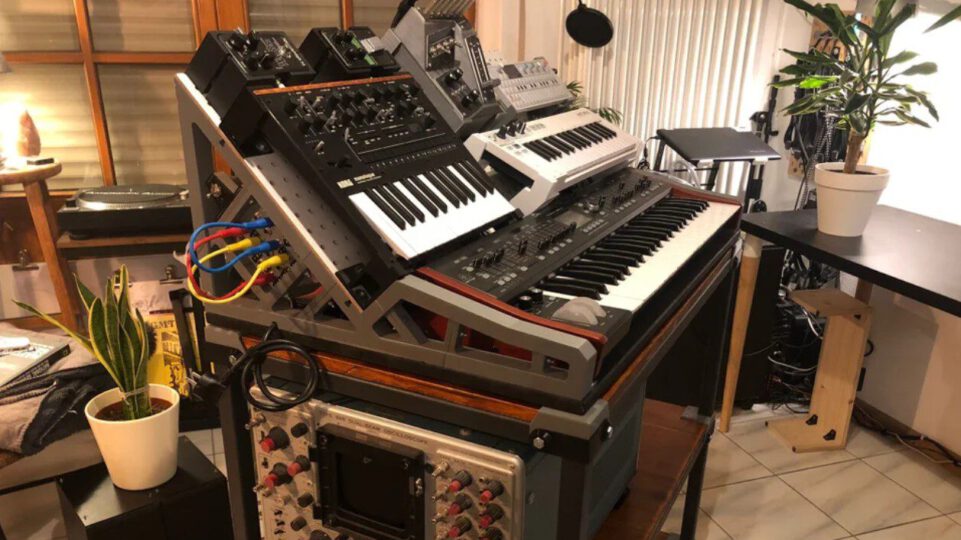
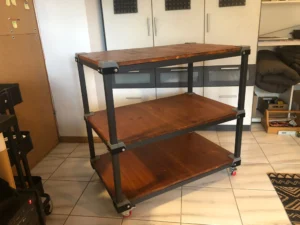
My DIY attitude intuitively led me to the decision to record the samples myself. I wanted to focus on a variation of samples. However, I was still dismissive of the idea of completely cutting myself off from my previous work. I wanted to bring a “meta-connection” to my hardware-focused work into the piece. Based on this idea, the piece “chris builds a trolley for his hardware” was created
The finished trolley for hardware. More pictures at: https://www.reddit.com/r/synthesizers/comments/ryyw8e/i_finally_made_a_proper_stand_for_my_synth_rack/
First iteration
The piece should therefore consist of samples that were not randomly produced or downloaded from the internet, but were created as a “by-product” of work that I actually carried out myself, in this case the construction of a trolley for music hardware. Over the course of two weeks, I used my smartphone to record the sounds that emerged as I went through the various work steps. As I made use of different materials and processing methods in these work steps, not only did a wide variation of sound textures emerge, but the macroscopic structure of the piece also formed by itself. It composed itself, so to speak. The desired meta-connection was thus created. Once the trolley was complete, it was time to start producing the piece.
The raw audio files of the recordings are each several minutes long. To simplify handling in OpenMusic, the individual sound elements were exported as .wav files. The DAW REAPER was used for this. The result was about 350 individual samples. These are available under the following link:
Here are a few examples of the sound elements used:
With the samples prepared, the work in OpenMusic could now begin.
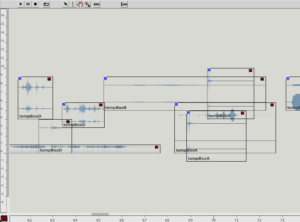
As is usual for musique concrète, the samples were to be processed with various effects to support the musical context. However, it was also important to me that these effects should not dominate in such a way that the sounds become unrecognizable and the context is lost. That’s why I had the idea of programming a workspace for the arrangement within an OpenMusic patch to make the samples dynamically editable. The “Maquette” object turned out to be ideal for this. Basically, this makes it possible to place other objects within an x-axis (time) and y-axis (parameterizable). These objects can then access their own properties in the context of the maquette. I then used these functions to create four different “Template Temporal Boxes” which use the parameterization of the maquette in different ways to apply effects to the respective samples. Using multiple templates further reduces complexity while maintaining a variation of modulation possibilities:
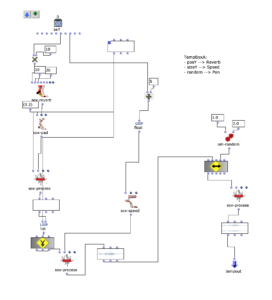
tempboxa
Position y –> Reverbance
Size y –> Playback speed
Random –> panning
OM Patch of the tempboxa
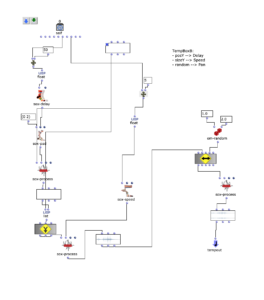
tempboxb
Position y –> Delay time
Size y –> Playback speed
Random –> panning
OM Patch of the tempboxb
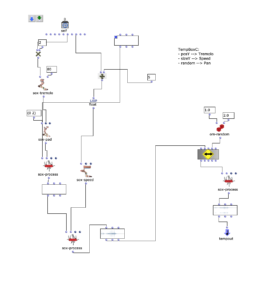
tempboxc
Position y –> Tremolo speed
Size y –> Playback speed
Random –> panning
OM Patch of the tempboxc
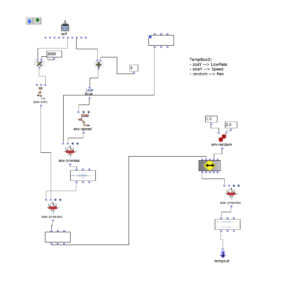
tempboxd
Position y –> Lowpass cutoff frequency
Size y –> Playback speed
Random –> panning
OM Patch of the tempboxd
With the creation of these boxes, the composition of the piece could begin.
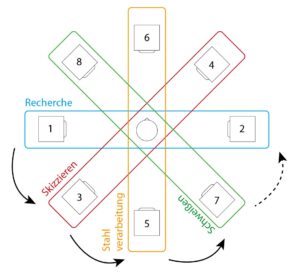
As already mentioned, the macroscopic structure of the construction process was to be retained. In practice, certain samples of the sections (research, sketching, steel processing, welding, steel drilling, 3d printing, wood drilling, wood sanding, painting and assembly) were selected in order to process them with the parameterized tempboxes into interesting sounding combinations, which should describe the current work step.
Detail of the maquette with arrangement
The result of the first iteration:
Second iteration
My goal for the second iteration was to place accents on samples that represent anchor points of the piece. More precisely, the panning used in the first iteration was to be reworked by adding a provisional Haas effect (delay between the left and right channels) to the existing logic. For this purpose, the result of the previous panning is duplicated inversely and then extended with a delay (up to 8 ms) and level adjustment, which are dynamically related to the strength of the panning. Finally, both sounds are merged and output from the tempbox.
OM Patch of the extended panning
The result of the first iteration:
Third iteration
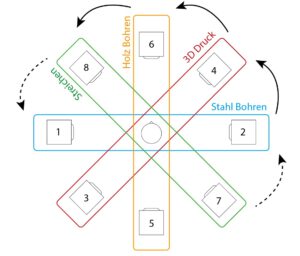
For the third and final iteration, the task was to make the piece available for an arbitrarily selectable setup of 8 channels. The structure was not to be changed. This gave me the opportunity to work on the panning again. Instead of setting the limit of the panning randomizer to 8 channels, I came up with the idea of raising the macroscopic structure even further. I chose the following speaker setup for this:
Setup of the speakers (with numbering of the channels)
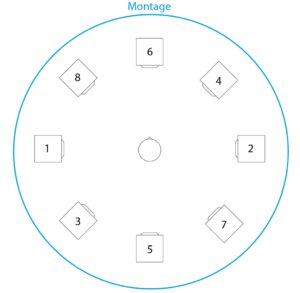
With this setup, it is possible to distribute the panning to two opposite speakers, depending on the sections of the piece. During the course of the piece, the sound should then move around the listener as a slow rotational movement.
Part 1 of macroscopic panning
Part 2 of macroscopic panning
Part 3 of macroscopic panning
This principle applies in parallel to the accentuation of some samples from the second iteration: while the other samples (depending on the section) are distributed to different pairs of speakers, the anchor elements remain on channels 1 and 2.
The final version is also available in 2-channel format:
Fourth iteration
In this iteration, the task was to spatialize the piece using the tools we learned in the course “Visual Programming of Space/Sound Synthesis” (VPRS) with Prof. Dr. Marlon Schumacher and Brandon L. Snyder
“chris builds a trolley for his hardware” was already so far developed at this point that I submitted it to Metamorphoses 2022 (a competition for acousmatic pieces). For this it was necessary to mix the piece on a 16 channel setup. Due to the imminent deadline, I had very little time to adapt the piece to the requirements. Therefore, the channels were simply doubled in REAPER and LFO panning was added to the respective pairs. Unfortunately, the piece was not accepted afterwards because the length of the piece did not meet the requirements. Since the spatialization also left a lot to be desired, I took the opportunity to use the newly learned tools to improve it.
I decided to discard the Metamorphoses 16-channel spatialization and return to the state of the third iteration. My goal was a spatialization that not only deals with the macroscopic structure (such as the steel processing, 3D printing…), but also with the microscopic structure, i.e. to make individual sounds more dynamic. The audio exported from OM (8 channel) served as the source material, which was then to be processed using the Ambisonics (IEM) VSTs.
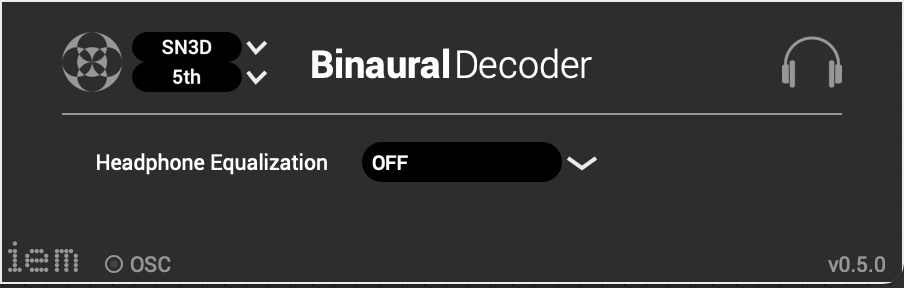
The Ambisonics template for REAPER was used as a workspace template, as it already provided a setup for the audio busses to finally render a 5th order Ambisonics file and a binaural stereo downmix. In the first step, the 8-channel audio file was routed so that it could be processed separately. To do this, channels 1-2, 3-4, 5-6 and 7-8 were sent to new tracks and the master send was deactivated. These tracks were then defined as multi-channel tracks with 36 channels and the stereo encoder (IEM) was inserted into the effect chain. The parameters for the spatialization (azimuth, elevation, roll and width) were then added as envelopes to the REAPER timeline to enable their dynamic processing. Finally, all tracks can be merged into the Ambisonics bus. The binaural downmix was used as a monitoring output.
A simplified representation of the routing in REAPER
In practice, points were inserted into the envelope tracks by hand, between which linear interpolation was then used to create dynamic changes in the parameters. I proceeded intuitively and listened to individual sections to get a basic idea of what kind of spatialization would emphasize this section. Then I looked at the individual sounds and their origins and tried to describe them with the help of the parameters. Examples of this are: an accelerating rotary movement when drilling, a jumping back and forth when the digital input of the 3D printer beeps or a complete mess when crumpling paper. I was already familiar with this type of workflow, not only when using DSP VSTs in the DAW, but also when programming DMX lights via the envelope.
When editing, I found the visual feedback of the EnergyVisualizer (IEM) not only very helpful to keep an overview. I therefore decided to record it and add it to the binaural downmix:
All uncompromised files can be found under the following link: https://drive.google.com/drive/folders/1bxw-iZEQTNnO92RTCmW_l5qRFjeuVxA9?usp=sharing


 The stereo and mono files were first encoded in 5th order Ambisonics (36 channels) and then converted into two channels using the binaural encoder.
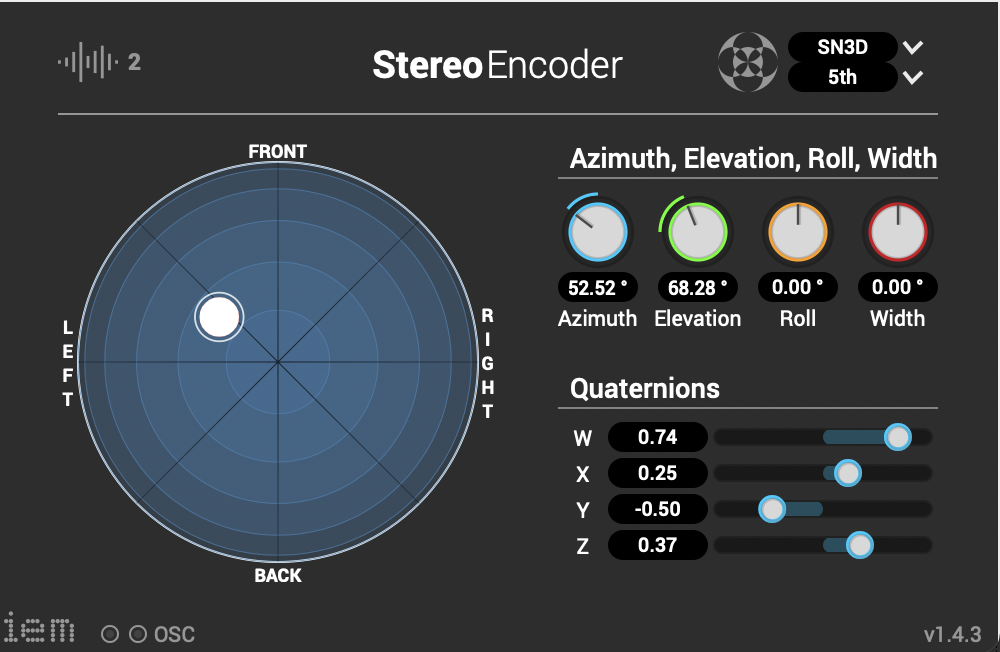
 Other post-processing effects (Detune, Reverb) were programmed by myself and are available on Github. The reverb is based on a paper by James A. Moorer About this Reverberation Business from 1979 and was written in C. The algorithm of the detuner was written in C from the HTML version of Miller Puckette’s handbook “The Theory and Technique of Electronic Music”. The result of the last iteration can be heard here.