SKAS symbolic sound processing and analysis/synthesis
Prof. Dr. Marlon Schumacher
Intermediate project by Andres Kaufmes
HfM Karlsruhe – IMWI (Institute for Music Informatics and Musicology)
Winter semester 2022/23
_____________
For this interim project, I worked on the implementation of a transient processor in OpenMusic with the help of the OM-Sox library.
A transient processor (also known as a transient designer or transient shaper) can be used to influence the attack/release behavior of the transients of an audio signal.
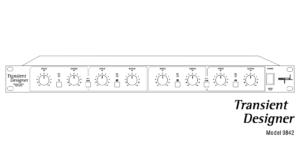
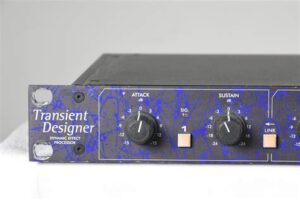
The first hardware device presented was the SPL TD4, introduced by SPL in 1998, which was available as a 19″ rack device and is still available today in an advanced version.
Transient Designer from SPL. (c) SPL
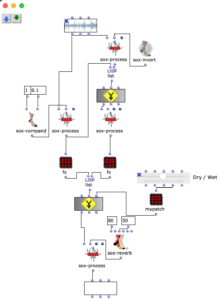
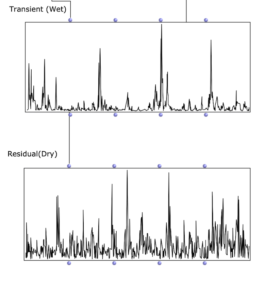
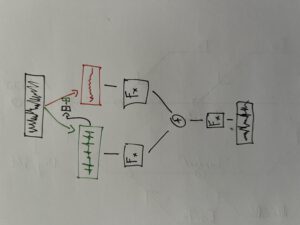
Transient Designers are particularly suitable for processing percussive sounds or speech. First, the transients must be isolated from the desired audio signal; this can be done using a compressor, for example. A short attack time “ducks” the transients and the signal can be subtracted from the original. The audio signal can then be processed with further effects in the course of the signal chain.
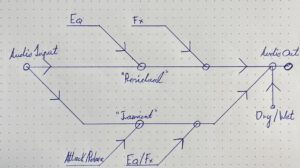
Transient processor patch. FX chain of the two signal paths (left “Transient”, right “Residual”).
At the top of the patch you can see the audio file to be processed, from which, as just described, the transients are isolated using a compressor and the resulting signal is subtracted from the original. Now two signal paths are created: The isolated transients are processed in the left-hand “chain”, the residual signal in the right-hand one. After both signal paths have been processed with audio effects, they are mixed together, whereby the mixing ratio (dry/wet) of both signal paths can be adjusted as desired. At the end of the signal processing there is a global reverb effect.
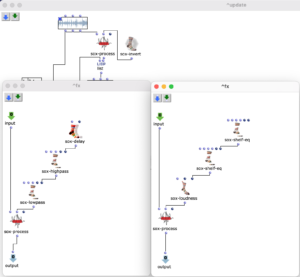
“Scope” view of the two signal paths. Sketches of the possible signal path and processing.
Inspired by the “Infinite Bad Guy” project, and all the very different versions of how some people have fueled their imaginations on that song, I thought maybe I could also experiment with creating a very loose, instrumental cover version of Billie Eilish’s “Bad Guy”.
Supervisor: Prof. Dr. Marlon Schumacher
A study by: Kaspars Jaudzems
Winter semester 2021/22
University of Music, Karlsruhe
To the study:
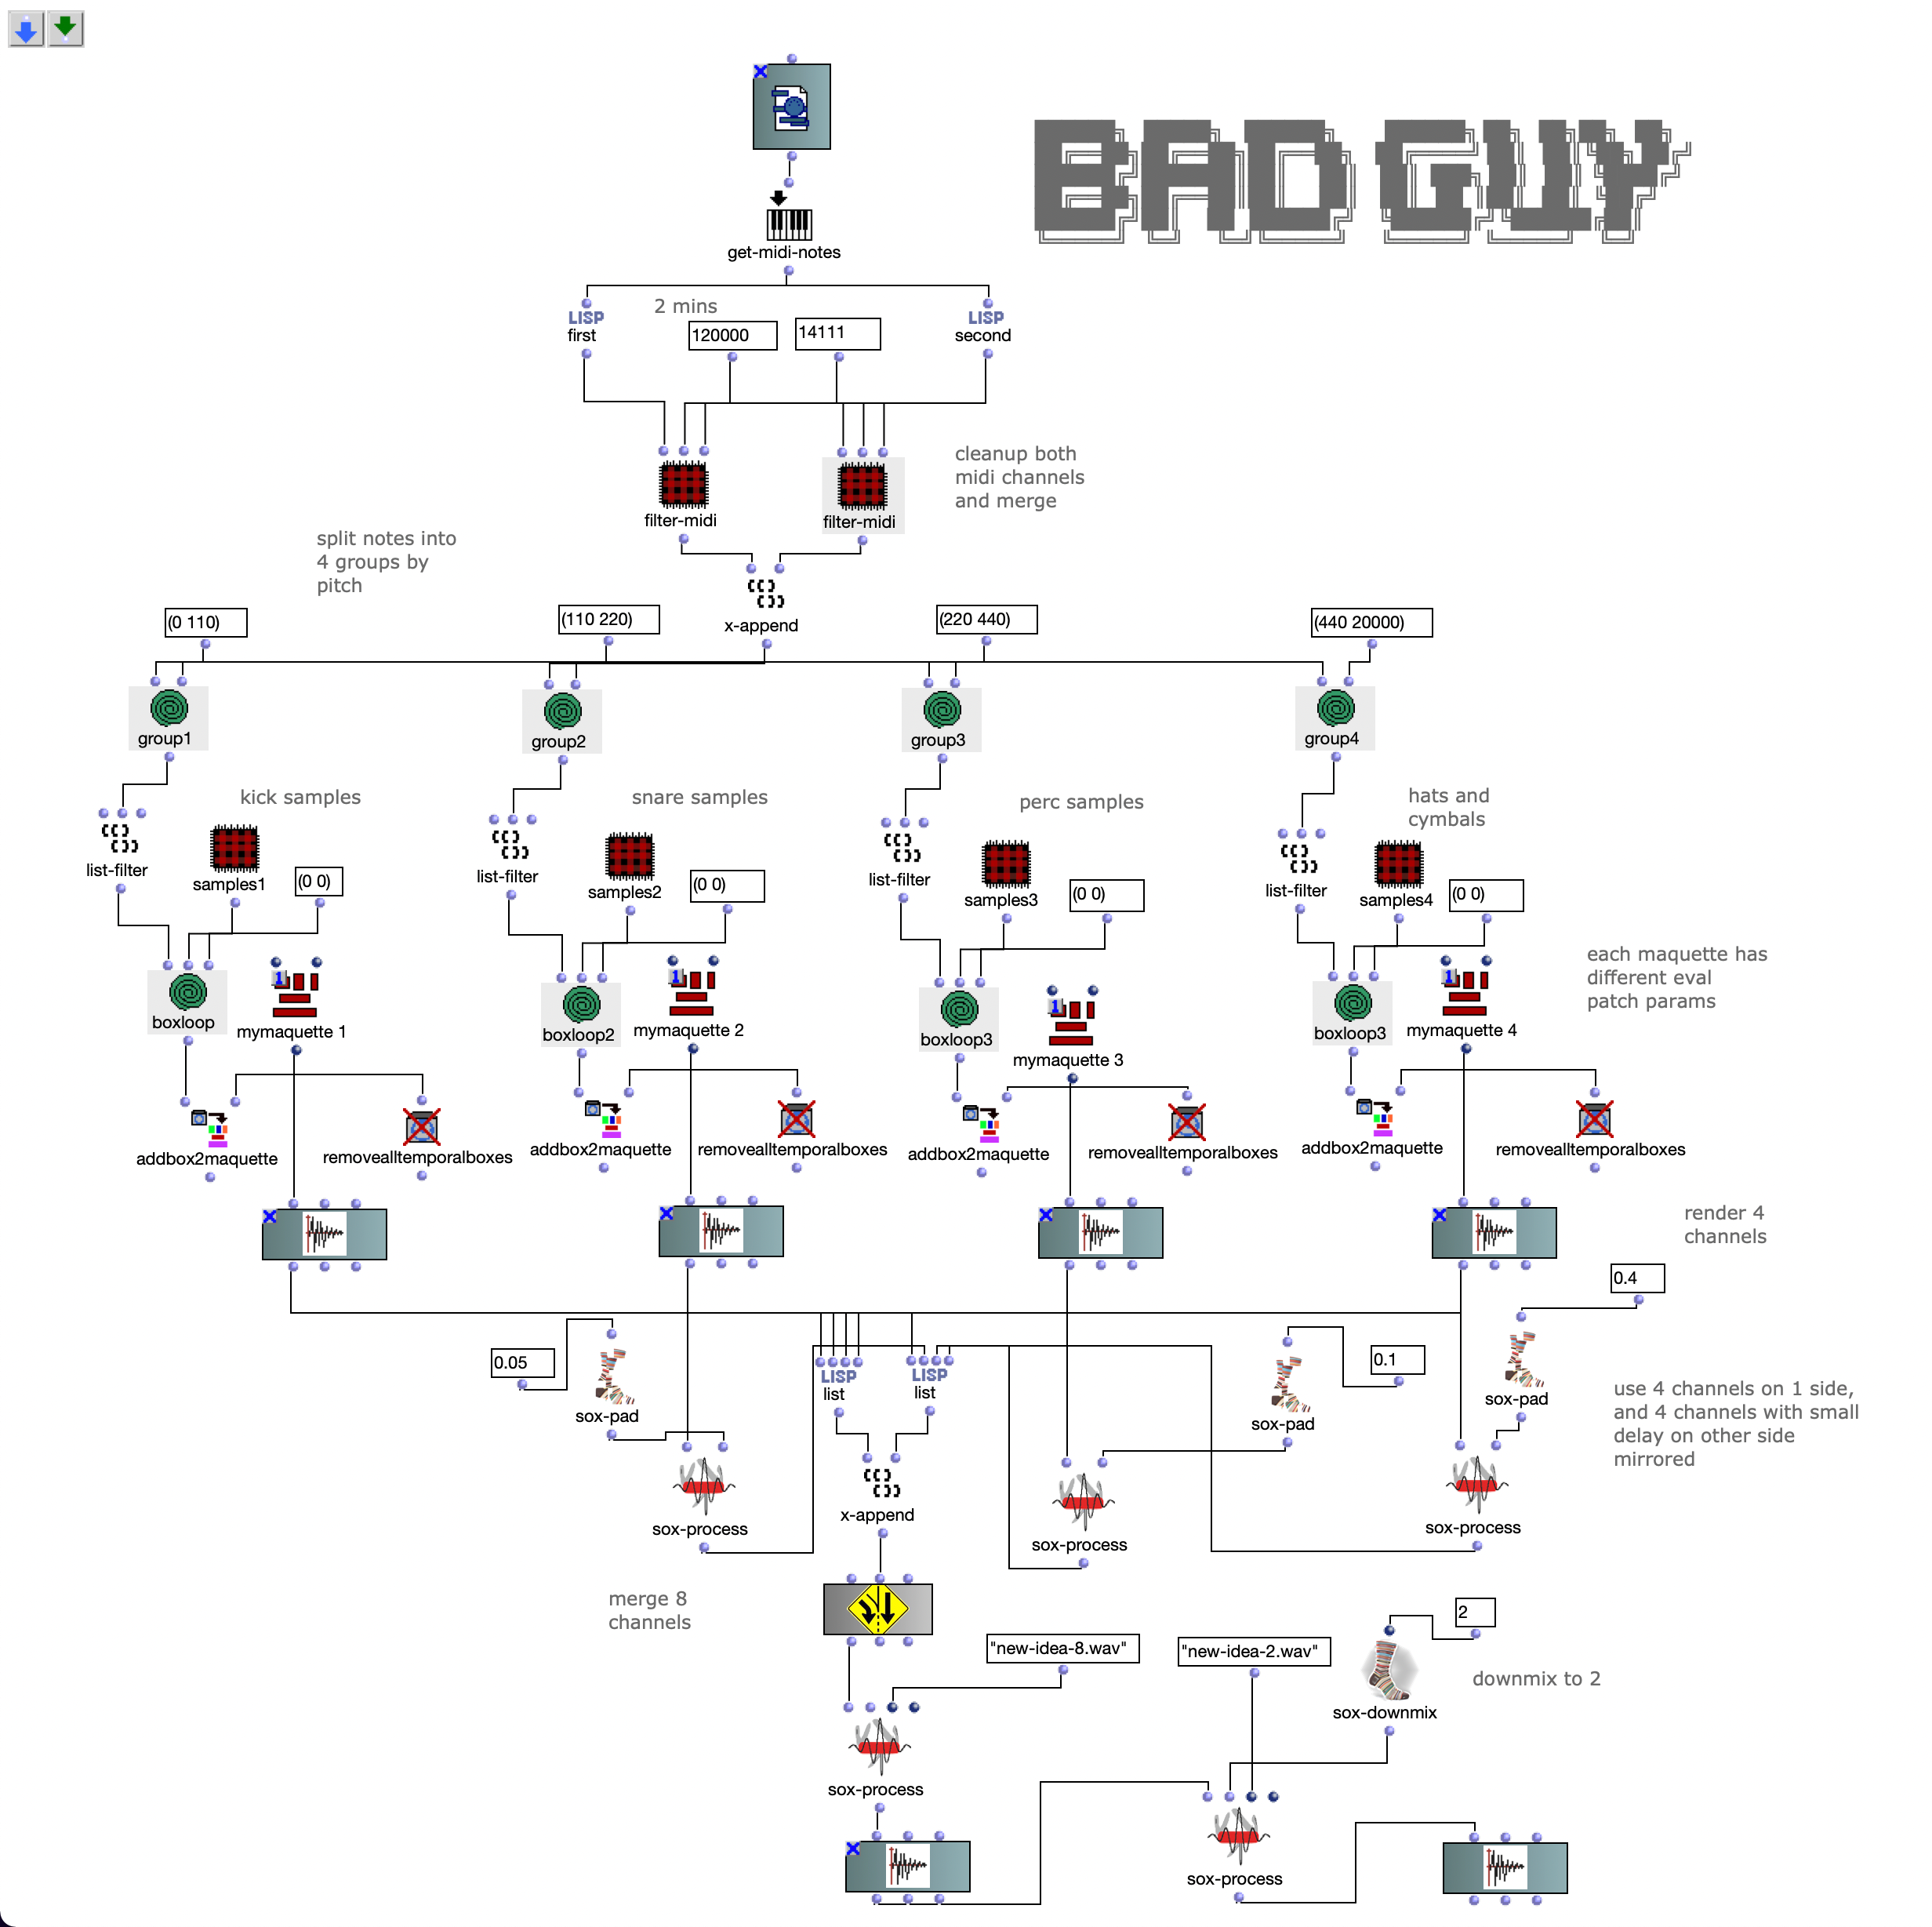
Originally, I wanted to work with 2 audio files, perform an FFT analysis on the original and “replace” its sound content with content from the second file, based only on the fundamental frequency. However, after doing some tests with a few files, I came to the conclusion that this kind of technique is not as accurate as I would like it to be. So I decided to use a MIDI file as a starting point instead.
Both the first and second versions of my piece only used 4 samples. The MIDI file has 2 channels, so 2 files were randomly selected for each note of each channel. The sample was then sped up or down to match the correct pitch interval and stretched in time to match the note length.
The second version of my piece added some additional stereo effects by pre-generating 20 random pannings for each file. With randomly applied comb filters and amplitude variations, a bit more reverb and human feel was created.
Acoustic study version 1
Acousmatic study version 2
The third version was a much bigger change. Here the notes of both channels are first divided into 4 groups according to pitch. Each group covers approximately one octave in the MIDI file.
Then the first group (lowest notes) is mapped to 5 different kick samples, the second to 6 snares, the third to percussive sounds such as agogo, conga, clap and cowbell and the fourth group to cymbals and hats, using about 20 samples in total. A similar filter and effect chain is used here for stereo enhancement, with the difference that each channel is finely tuned. The 4 resulting audio files are then assigned to the 4 left audio channels, with the lower frequency channels sorted to the center and the higher frequency channels sorted to the sides. The same audio files are used for the other 4 channels, but additional delays are applied to add movement to the multi-channel experience.
Acousmatic study version 3
The 8-channel file was downmixed to 2 channels in 2 versions, one with the OM-SoX downmix function and the other with a Binauralix setup with 8 speakers.
Acousmatic study version 3 – Binauralix render
Extension of the acousmatic study – 3D 5th-order Ambisonics
The idea with this extension was to create a 36-channel creative experience of the same piece, so the starting point was version 3, which only has 8 channels.
Starting point version 3
I wanted to do something simple, but also use the 3D speaker configuration in a creative way to further emphasize the energy and movement that the piece itself had already gained. Of course, the idea of using a signal as a source for modulating 3D movement or energy came to mind. But I had no idea how…
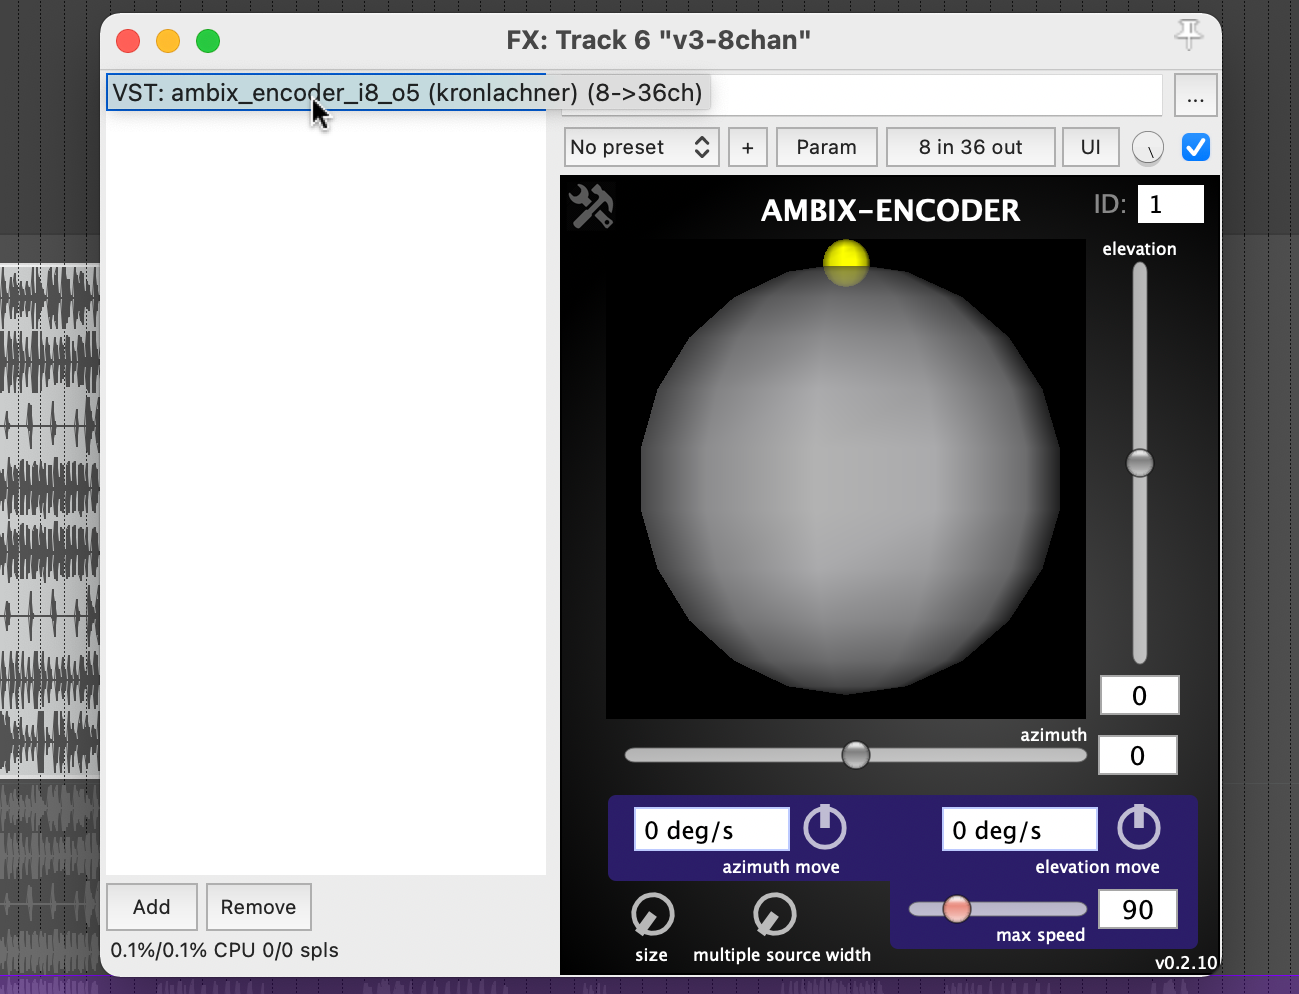
Plugin “ambix_encoder_i8_o5 (8 -> 36 chan)”
While researching the Ambix Ambisonic Plugin (VST) Suite, I came across the plugin “ambix_encoder_i8_o5 (8 -> 36 chan)”. This seemed to fit perfectly due to the matching number of input and output channels. In Ambisonics, space/motion is translated from 2 parameters: Azimuth and Elevation. Energy, on the other hand, can be translated into many parameters, but I found that it is best expressed with the Source Width parameter because it uses the 3D speaker configuration to actually “just” increase or decrease the energy.
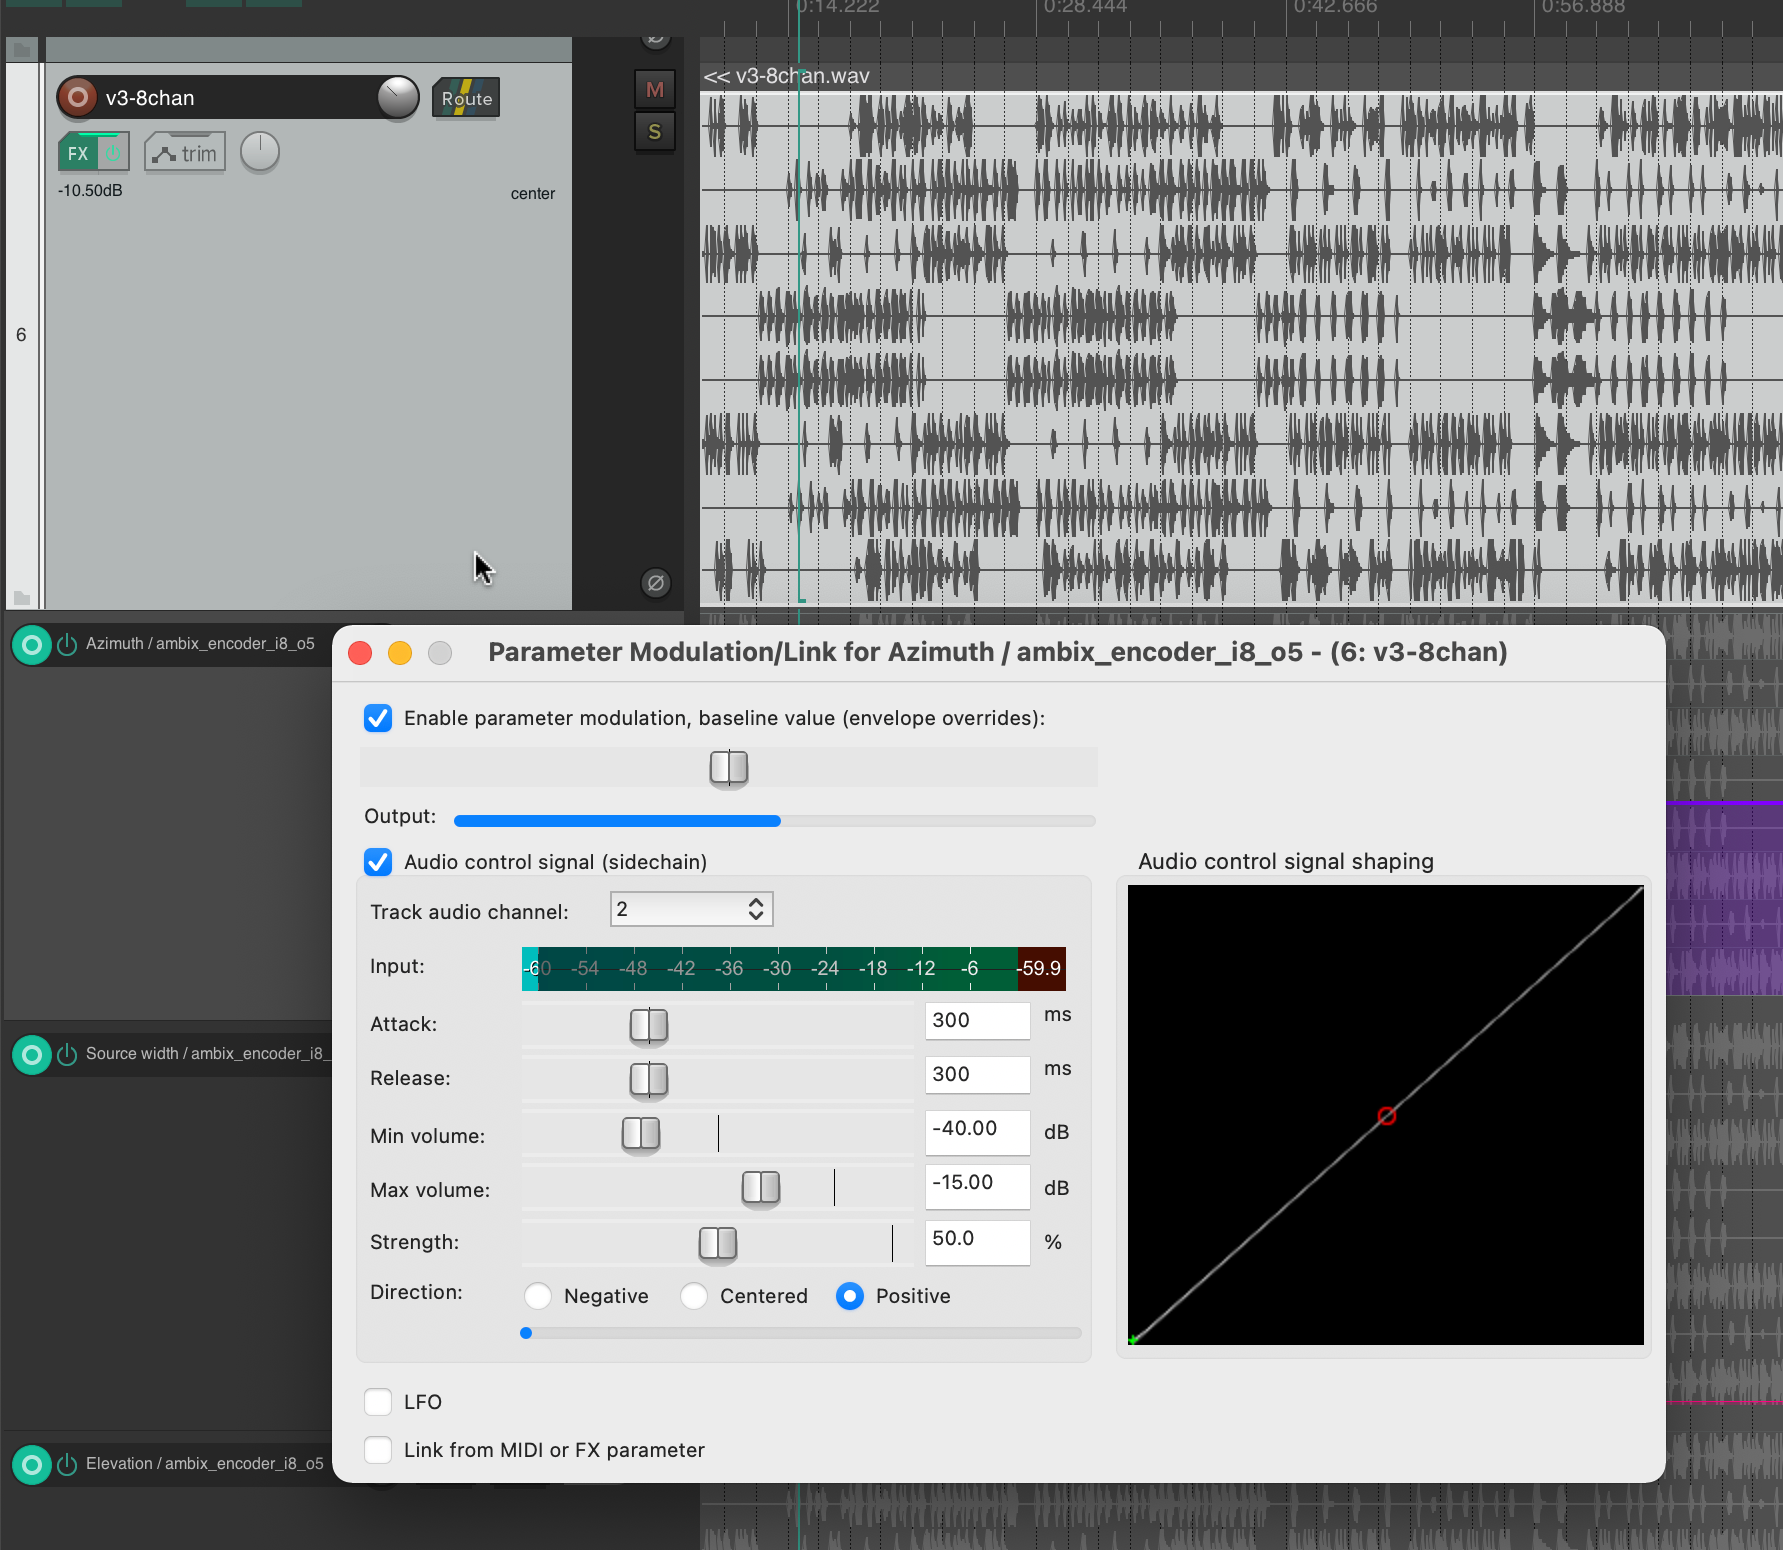
Knowing which parameters to modulate, I started experimenting with using different tracks as the source. To be honest, I was very happy that the plugin not only provided very interesting sound results, but also visual feedback in real time. When using both, I focused on having good visual feedback on what was going on in the audio piece as a whole.
This helped me to select channel 2 for Azimuth, channel 3 for Source Width and channel 4 for Elevation. If we trace these channels back to the original input midi file, we can see that channel 2 is assigned notes in the range of 110 to 220 Hz, channel 3 notes in the range of 220 to 440 Hz and channel 4 notes in the range of 440 to 20000 Hz. In my opinion, this type of separation worked very well, also because the sub-bass frequencies (e.g. kick) were not modulated and were not needed for this. This meant that the main rhythm of the piece could remain as a separate element without affecting the space or the energy modulations, and I think that somehow held the piece together.
Acousmatic study version 4 – 36 channels, 3D 5th-order Ambisonics – file was too big to upload
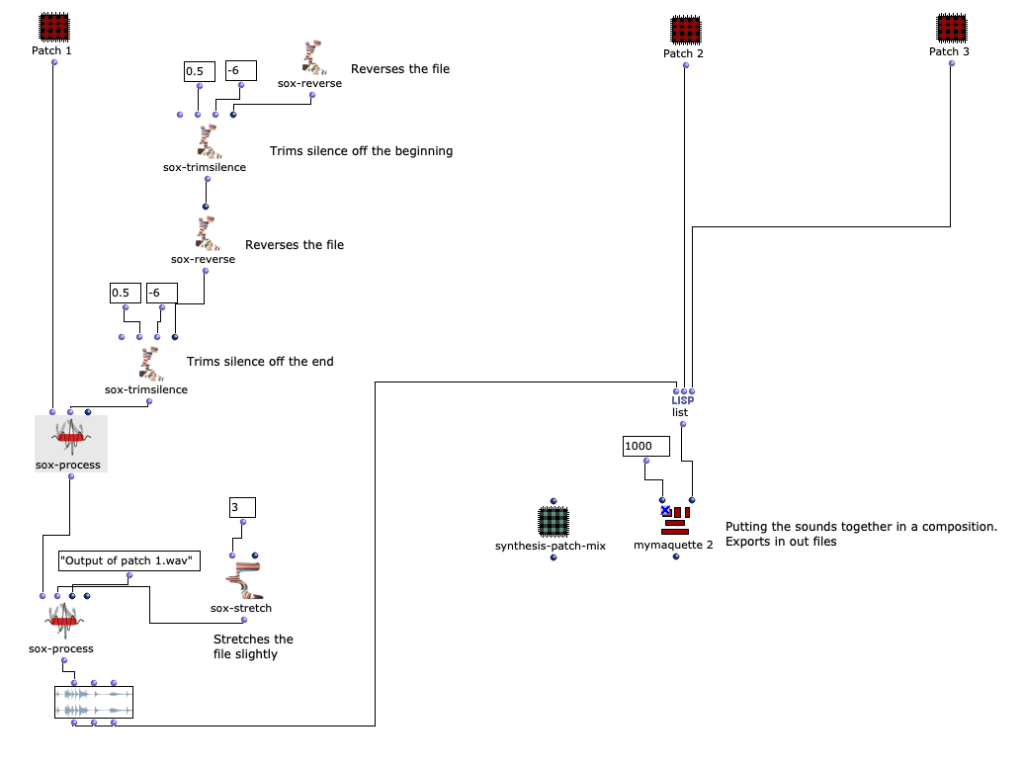
In this article I present my ideas, creative processes and technical data for the patch programmed for the class “Symbolic Sound Processing and Analysis/Synthesis” with Prof. Marlon Schumacher. The idea of this text is to show the technical solutions for my creative ideas and to share the knowledge gained to help the reader with their ideas. The purpose of this patch is to take sounds from everyday life and transform them into your own composition using several processes within Open Music.
The initial idea of the piece was to transform everyday sounds, for example the sound of a kettle, into a different, processed sound by implementing technical solutions in Open Music. This patch processes and merges several files into one composition. There are three iterations of the patch that I worked on during the semester. I will describe them in chronological order.
The original idea for the patch came from musique concréte. I wanted to make a 2-minute piece from concrete sounds (not synthesized in Open Music, but recorded). This patch consists of three subpatches that are connected to the maquette in the main patch.
This article is about the three iterations of an acousmatic study by Christoph Zimmer, which were carried out as part of the seminar “Symbolic Sound Processing and Analysis/Synthesis” with Prof. Dr. Marlon Schumacher at the HFM Karlsruhe. It covers the basic concept, ideas, subsequent iterations and the technical implementation with OpenMusic.
Responsible persons: Christoph Zimmer, Master student Music Informatics at the HFM Karlsruhe
Basic idea and concept:
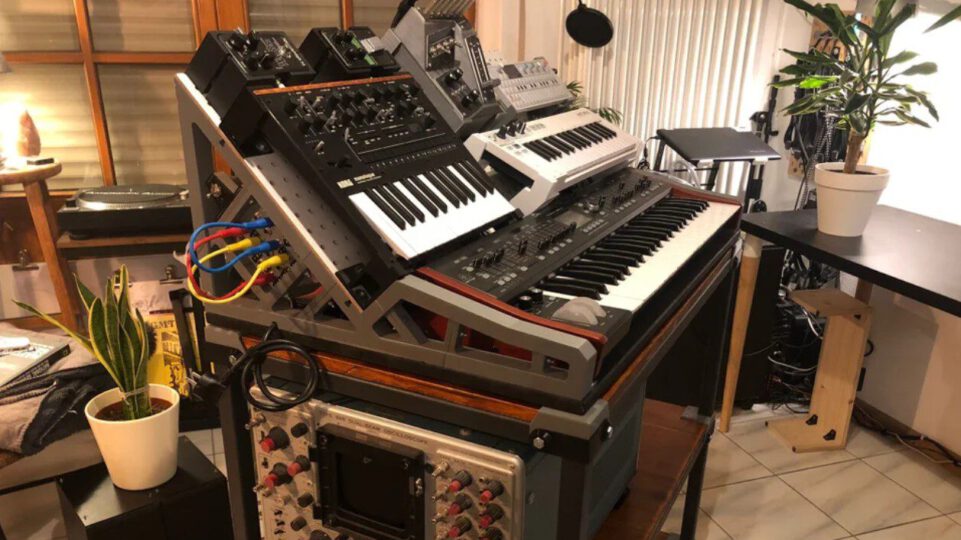
I usually work a lot with hardware for music, especially in the field of DIY. This often coincides with the organization and optimization of the workflow associated with this hardware. When we students were given the task of producing an acousmatic study in the form of musique concrète, I was initially disoriented. Up to that point, I had only dealt a little with “experimental” music genres. To be honest, I wasn’t even aware of the existence of musique concrète up to this point. So with this task I was thrown out of my usual workflow, sound synthesis with hardware, and therefore also out of my comfort zone. Now I had to use field recordings as samples.
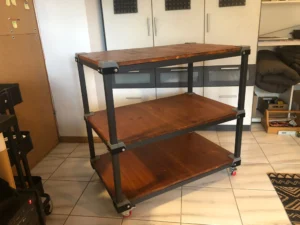
My DIY attitude intuitively led me to the decision to record the samples myself. I wanted to focus on a variation of samples. However, I was still dismissive of the idea of completely cutting myself off from my previous work. I wanted to bring a “meta-connection” to my hardware-focused work into the piece. Based on this idea, the piece “chris builds a trolley for his hardware” was created
The finished trolley for hardware. More pictures at: https://www.reddit.com/r/synthesizers/comments/ryyw8e/i_finally_made_a_proper_stand_for_my_synth_rack/
First iteration
The piece should therefore consist of samples that were not randomly produced or downloaded from the internet, but were created as a “by-product” of work that I actually carried out myself, in this case the construction of a trolley for music hardware. Over the course of two weeks, I used my smartphone to record the sounds that emerged as I went through the various work steps. As I made use of different materials and processing methods in these work steps, not only did a wide variation of sound textures emerge, but the macroscopic structure of the piece also formed by itself. It composed itself, so to speak. The desired meta-connection was thus created. Once the trolley was complete, it was time to start producing the piece.
The raw audio files of the recordings are each several minutes long. To simplify handling in OpenMusic, the individual sound elements were exported as .wav files. The DAW REAPER was used for this. The result was about 350 individual samples. These are available under the following link:
Here are a few examples of the sound elements used:
With the samples prepared, the work in OpenMusic could now begin.
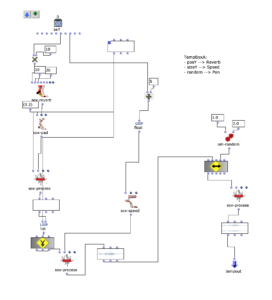
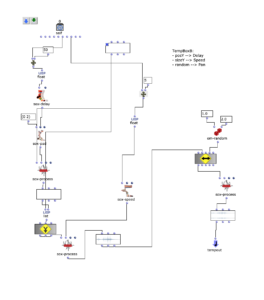
As is usual for musique concrète, the samples were to be processed with various effects to support the musical context. However, it was also important to me that these effects should not dominate in such a way that the sounds become unrecognizable and the context is lost. That’s why I had the idea of programming a workspace for the arrangement within an OpenMusic patch to make the samples dynamically editable. The “Maquette” object turned out to be ideal for this. Basically, this makes it possible to place other objects within an x-axis (time) and y-axis (parameterizable). These objects can then access their own properties in the context of the maquette. I then used these functions to create four different “Template Temporal Boxes” which use the parameterization of the maquette in different ways to apply effects to the respective samples. Using multiple templates further reduces complexity while maintaining a variation of modulation possibilities:
tempboxa
Position y –> Reverbance
Size y –> Playback speed
Random –> panning
OM Patch of the tempboxa
tempboxb
Position y –> Delay time
Size y –> Playback speed
Random –> panning
OM Patch of the tempboxb
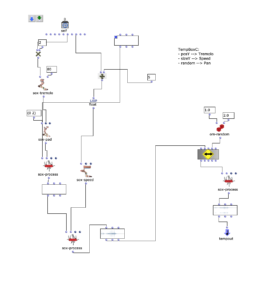
tempboxc
Position y –> Tremolo speed
Size y –> Playback speed
Random –> panning
OM Patch of the tempboxc
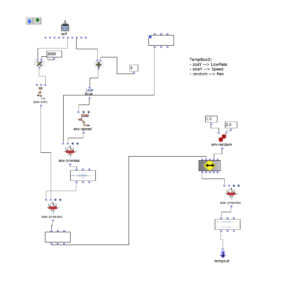
tempboxd
Position y –> Lowpass cutoff frequency
Size y –> Playback speed
Random –> panning
OM Patch of the tempboxd
With the creation of these boxes, the composition of the piece could begin.
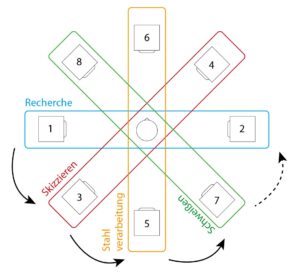
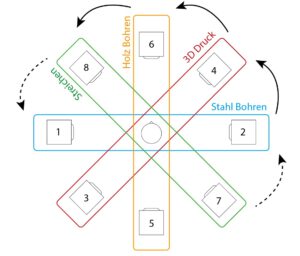
As already mentioned, the macroscopic structure of the construction process was to be retained. In practice, certain samples of the sections (research, sketching, steel processing, welding, steel drilling, 3d printing, wood drilling, wood sanding, painting and assembly) were selected in order to process them with the parameterized tempboxes into interesting sounding combinations, which should describe the current work step.
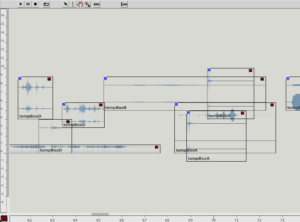
Detail of the maquette with arrangement
The result of the first iteration:
Second iteration
My goal for the second iteration was to place accents on samples that represent anchor points of the piece. More precisely, the panning used in the first iteration was to be reworked by adding a provisional Haas effect (delay between the left and right channels) to the existing logic. For this purpose, the result of the previous panning is duplicated inversely and then extended with a delay (up to 8 ms) and level adjustment, which are dynamically related to the strength of the panning. Finally, both sounds are merged and output from the tempbox.
OM Patch of the extended panning
The result of the first iteration:
Third iteration
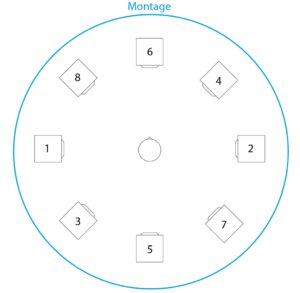
For the third and final iteration, the task was to make the piece available for an arbitrarily selectable setup of 8 channels. The structure was not to be changed. This gave me the opportunity to work on the panning again. Instead of setting the limit of the panning randomizer to 8 channels, I came up with the idea of raising the macroscopic structure even further. I chose the following speaker setup for this:
Setup of the speakers (with numbering of the channels)
With this setup, it is possible to distribute the panning to two opposite speakers, depending on the sections of the piece. During the course of the piece, the sound should then move around the listener as a slow rotational movement.
Part 1 of macroscopic panning
Part 2 of macroscopic panning
Part 3 of macroscopic panning
This principle applies in parallel to the accentuation of some samples from the second iteration: while the other samples (depending on the section) are distributed to different pairs of speakers, the anchor elements remain on channels 1 and 2.
The final version is also available in 2-channel format:
Fourth iteration
In this iteration, the task was to spatialize the piece using the tools we learned in the course “Visual Programming of Space/Sound Synthesis” (VPRS) with Prof. Dr. Marlon Schumacher and Brandon L. Snyder
“chris builds a trolley for his hardware” was already so far developed at this point that I submitted it to Metamorphoses 2022 (a competition for acousmatic pieces). For this it was necessary to mix the piece on a 16 channel setup. Due to the imminent deadline, I had very little time to adapt the piece to the requirements. Therefore, the channels were simply doubled in REAPER and LFO panning was added to the respective pairs. Unfortunately, the piece was not accepted afterwards because the length of the piece did not meet the requirements. Since the spatialization also left a lot to be desired, I took the opportunity to use the newly learned tools to improve it.
I decided to discard the Metamorphoses 16-channel spatialization and return to the state of the third iteration. My goal was a spatialization that not only deals with the macroscopic structure (such as the steel processing, 3D printing…), but also with the microscopic structure, i.e. to make individual sounds more dynamic. The audio exported from OM (8 channel) served as the source material, which was then to be processed using the Ambisonics (IEM) VSTs.
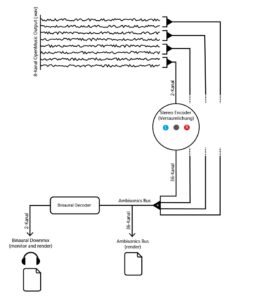
The Ambisonics template for REAPER was used as a workspace template, as it already provided a setup for the audio busses to finally render a 5th order Ambisonics file and a binaural stereo downmix. In the first step, the 8-channel audio file was routed so that it could be processed separately. To do this, channels 1-2, 3-4, 5-6 and 7-8 were sent to new tracks and the master send was deactivated. These tracks were then defined as multi-channel tracks with 36 channels and the stereo encoder (IEM) was inserted into the effect chain. The parameters for the spatialization (azimuth, elevation, roll and width) were then added as envelopes to the REAPER timeline to enable their dynamic processing. Finally, all tracks can be merged into the Ambisonics bus. The binaural downmix was used as a monitoring output.
A simplified representation of the routing in REAPER
In practice, points were inserted into the envelope tracks by hand, between which linear interpolation was then used to create dynamic changes in the parameters. I proceeded intuitively and listened to individual sections to get a basic idea of what kind of spatialization would emphasize this section. Then I looked at the individual sounds and their origins and tried to describe them with the help of the parameters. Examples of this are: an accelerating rotary movement when drilling, a jumping back and forth when the digital input of the 3D printer beeps or a complete mess when crumpling paper. I was already familiar with this type of workflow, not only when using DSP VSTs in the DAW, but also when programming DMX lights via the envelope.
When editing, I found the visual feedback of the EnergyVisualizer (IEM) not only very helpful to keep an overview. I therefore decided to record it and add it to the binaural downmix:
All uncompromised files can be found under the following link: https://drive.google.com/drive/folders/1bxw-iZEQTNnO92RTCmW_l5qRFjeuVxA9?usp=sharing
In this project, an audio-only augmented reality sound installation was created as part of the course „Studienprojekte Musikprogrammierung“ (“Study Projects Music Programming”) at the Karlsruhe University of Music. It is important for the following text to distinguish the terminology from virtual reality (VR for short), in which the user is completely immersed in the virtual world. Augmented reality (AR for short) is the extension of reality through the technical addition of information.
Motivation
On the one hand, this sound installation should meet a certain artistic standard, on the other hand, my personal goal was to bring AR and especially auditory AR closer to the participants and to get them excited about this new technology. Unfortunately, augmented reality is very often only understood as the visual representation of information, as is the case with navigation systems or smartphone applications, for example. However, in my opinion, it is important to sensitize people more and more to the auditory extension of reality. I am convinced that this technology also has enormous potential and that there is a lot of catching up to do in terms of public awareness compared to visual augmented reality. There are already numerous areas of application in which the benefits of auditory AR have been demonstrated. These range from areas in which many applications of visual AR can already be found, such as education, increasing productivity or purely for entertainment purposes, to specialist areas such as medicine. Ten years ago, for example, there were already attempts to use auditory AR to enhance the sense of hearing for people with visual impairments. By sonifying real objects, it was possible to create a purely auditory orientation aid.
Methodology
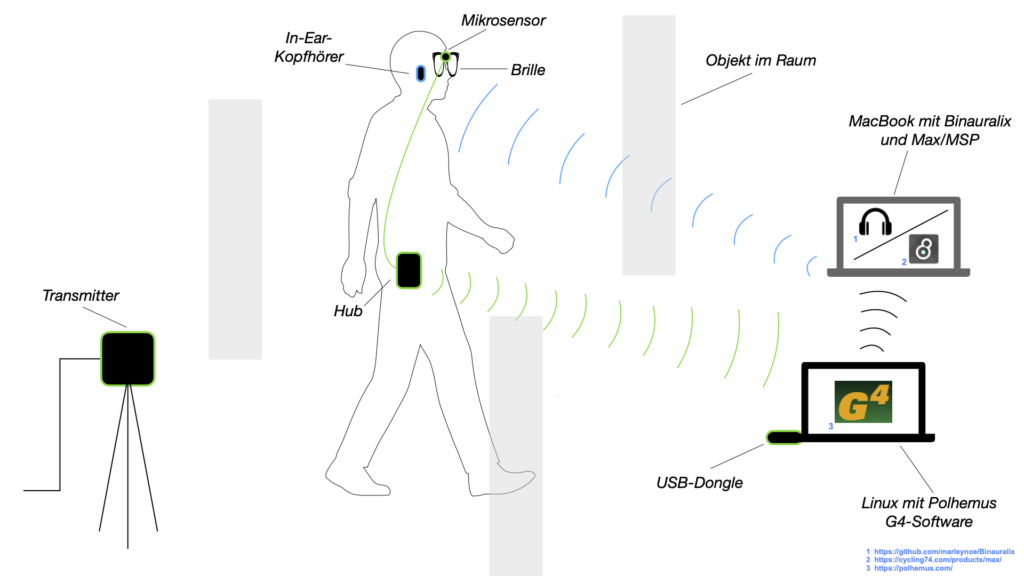
In this project, participants should be able to move freely in a room in which objects are positioned and although these do not produce sounds in reality, the participants should be able to perceive sounds through headphones. In this sense, it is an extension of reality (“augmented reality”), as information is added to reality in auditory form using technical means. Essentially, the areas for implementation extend on the one hand to the positioning of the person (motion capture) and binauralization and on the other hand in the artistic sense to the design of the sound scene by positioning and synthesizing the sounds.
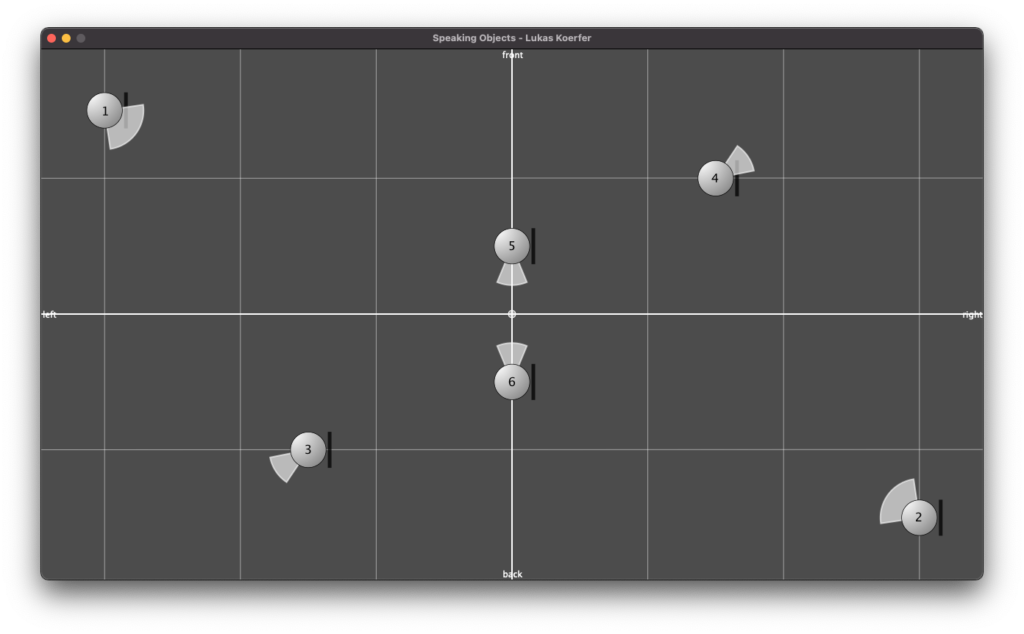
Figure 1
The motion capture in this project is realized with the Polhemus G4 system. The direction and position of a micro-sensor, which is attached to a pair of glasses worn by the participant, is determined by a magnetic field generated by two transmitters. A hub, which is connected to the micro-sensor via a cable, sends the motion capture data to a USB dongle connected to a laptop. This data is sent to another laptop, on which the binauralization takes place and which is ultimately connected to the wireless headphones.
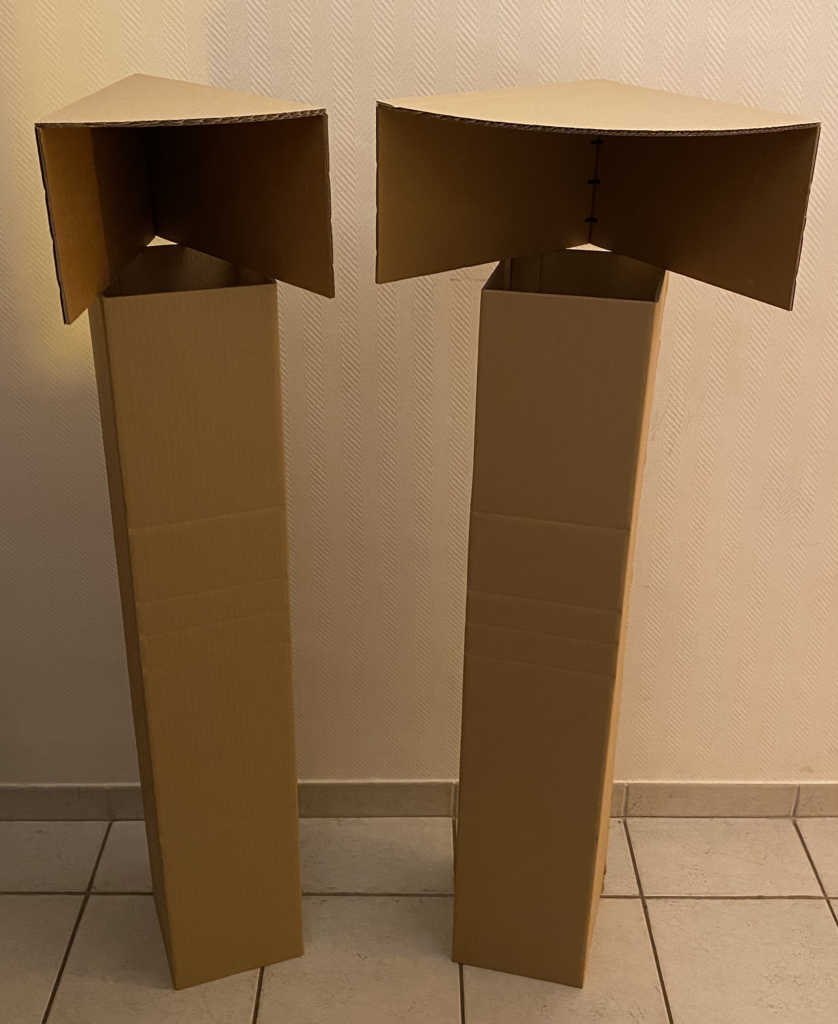
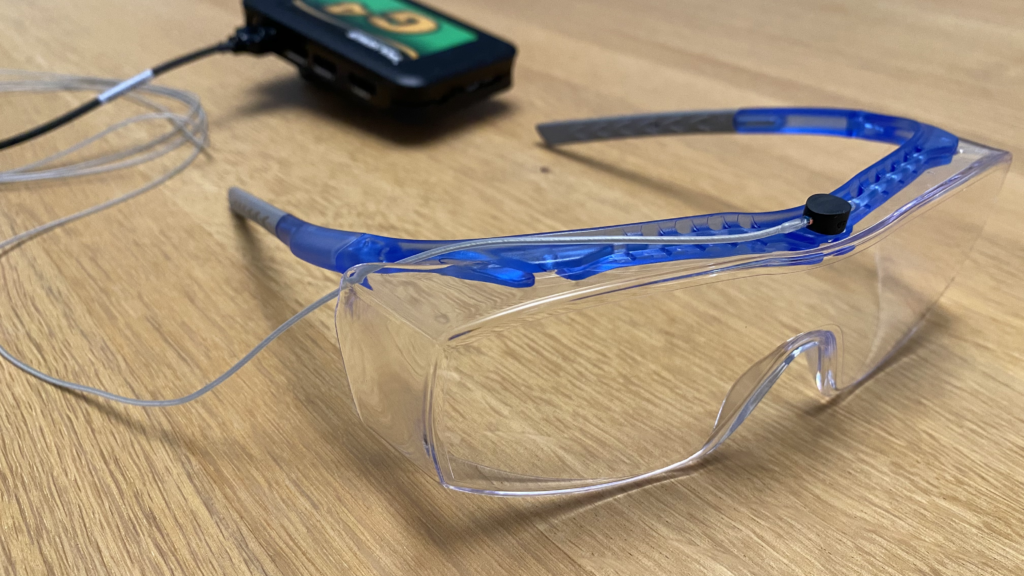
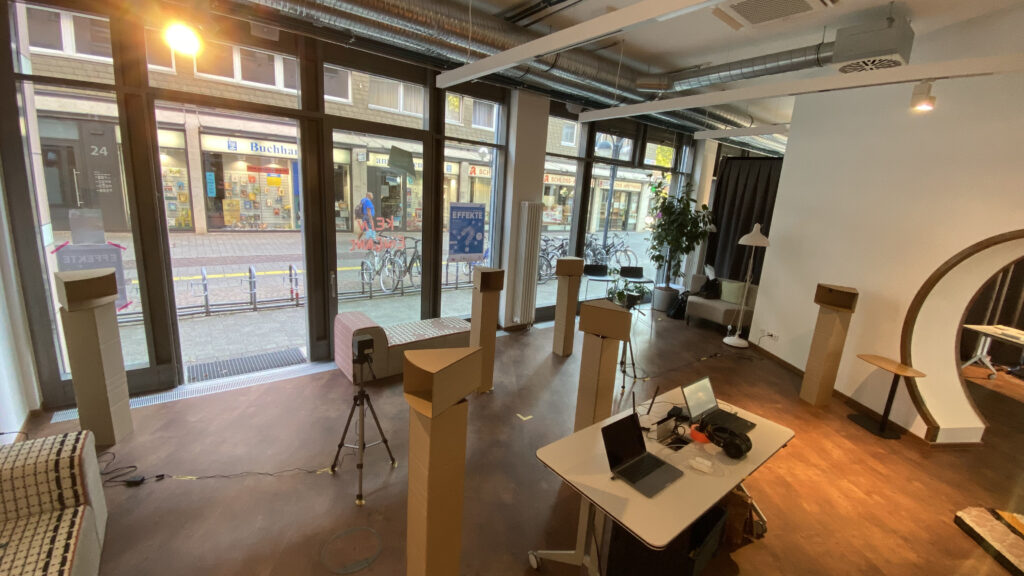
Figure 2 shows two of the six objects in one variant each (angles of 45° and 90°). The next illustration (Fig. 3) shows the over-glasses (protective glasses that can also be worn over glasses) that are used in the sound installation. These goggles have a wide nose bridge to which the micro-sensor is attached with a micro-mount from Polhemus.
Figure 2
Figure 3
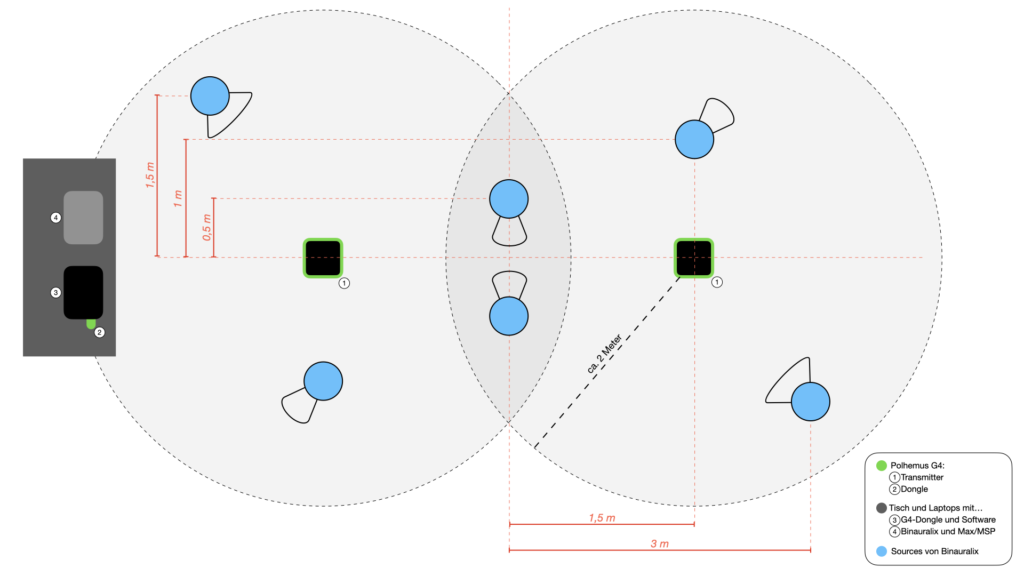
As previously explained, various decisions have to be made before the artistic aspect of the sound installation can be realized. This involves the positioning of the objects / sound sources and the sounds themselves.
Figure 4
Figure 5
Figure 4 shows a sketched top view of the complete structure. The six blue-colored circles mark the positions of the objects in the room and, of course, the sound sources of the scene in Binauralix, which can be seen in Figure 5. The direction and angle of the sources can be taken from the colorless areas (in Fig. 4), at either 45° or 90° angles, around the sound sources.
The completely wireless position detection and data transmission enables the participants to immerse themselves fully in this experience of the interactive reality-expanding sound world. The sound synthesis was carried out using the SuperCollider software. The sounds were mainly created through various tapping and clicking noises recorded by the SoundIn object, and finally changes and alienation of the sounds through amplitude and frequency modulation and various filters. By routing the sounds to a total of 6 output channels and “s.record(numChannels:6)”, I was able to create a two-minute multi-channel audio file in SuperCollider. When playing the file in Binauralix, the first channel is automatically mapped to source one, the second channel to source 2 and so on.
Technical implementation
The technical challenge for the implementation of the project initially consisted of receiving and reformatting the data from the sensor so that it could be used in Binauralix. The initial problem was that Binauralix is only available for MacOS and the software for the Polhemus G4 system is only available for Windows and Linux. As I had a MacBook and a laptop with Ubuntu Linux as my operating system at the time, I installed the Polhemus software for Linux.
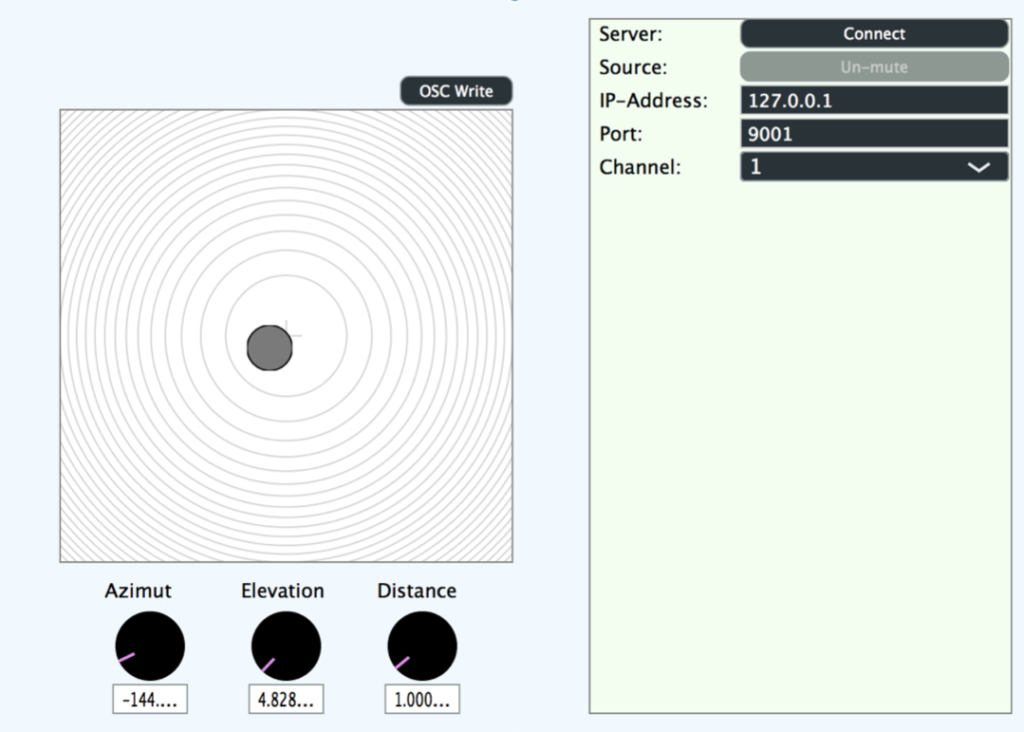
After building and installing the Polhemus G4 software on Linux, the five applications “G4DevCfg”, “CreateSrcCfg”, “g4term”, “g4display” and “g4export” were available. For my project, all devices used must first be connected and configured with “G4DevCfg”. The terminal application “g4export” can be used to transmit the sensor data via UDP by specifying the previously created source configuration file, the local IP address of the receiver device and a port. The source configuration file is a file in which the position and orientation of the transmitter are defined by a “virtual frame of reference” and settings can be made for the entry hemisphere into the magnetic field, floor compensation and source calibration file. To run the application, the transmitters and the hub must be switched on at this point, the USB dongle must be connected to the laptop and the sensor to the hub, and the hub must be connected to the USB dongle. If the MacBook is now in the same network as the Linux laptop, the data can be received by specifying the previously used port. This is done with my sound installation in a self-created MaxMSP patch.
Figure 6
In this application, the appropriate port must first be selected on the left-hand side. As soon as the connection is established and the messages arrive, you can view them in raw form under the selection field. The six values that can be seen at the top in the middle of the application are the values for position and orientation that have been separated from the raw message. Final settings for the correct calibration can now be made in the action field below. There is also the option to mirror the axes individually or to change the Yaw value if unexpected problems should arise when setting up the sound installation. Once the values have been formatted into messages that can be used by Binauralix (visible at the bottom right of the application), they are sent to Binauralix.
The following videos provide a view of the scene in Binauralix and an auditory impression as the listener — driven by the sensor data — moves through the scene.
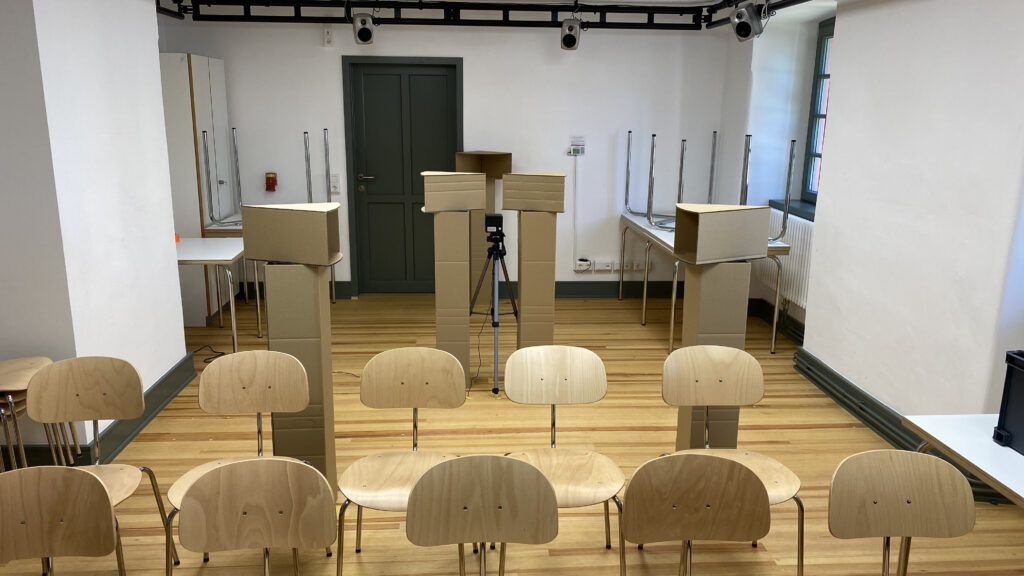
Past performances of the sound installation
The sound installation as a contribution to the EFFEKTE lecture series of the Wissenschaftsbüro-Karlsruhe
The sound installation as the subject of a workshop for the Kulturakademie at the HfM-Karlsruhe