Vorstellung des Projekts eines Alumni beim Ircam Forum 23 in Paris mit Software von Marlon Schumacher
Projektverantwortliche: Marco Bidin, Fernando Maglia
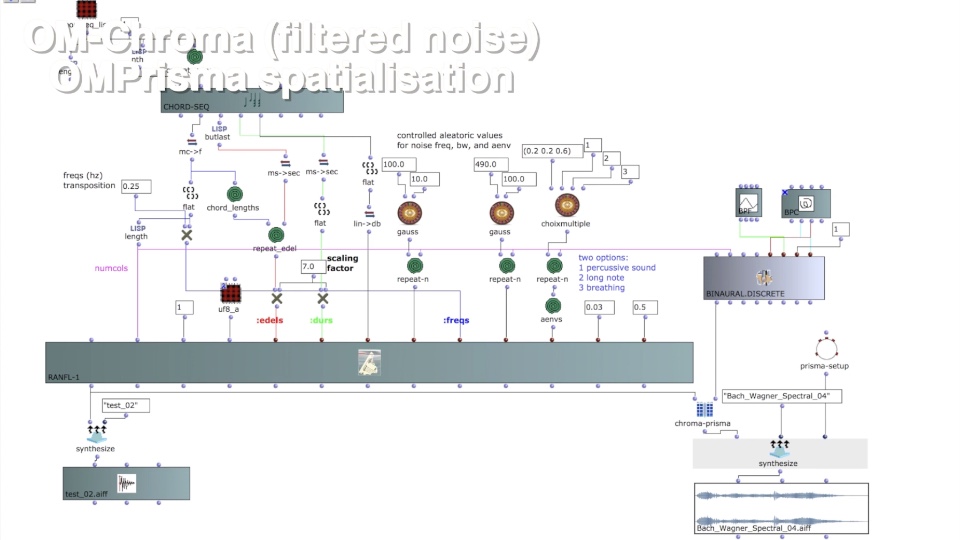
Im IRCAM-Forum im März 2023 in Paris (special edition zum Thema AR/VR Spatialization) hat der ehemalige Student und Mitarbeiter Marco Bidin Projekte zum Thema binaurale Klangsynthese vorgestellt, welche durch von Prof. Marlon Schumacher entwickelte Software realisiert wurden. Als Synthese-Werkzeuge kamen unter Anderem CSound, Cycling 74’s Max, OpenMusic mit der Library OMPrisma zum Einsatz, gemastert wurde in der DAW Logic Pro X. Die Klangsynthese verwendet teils subtraktive Ansätze, Waveguides und andere physikalische Modelle.
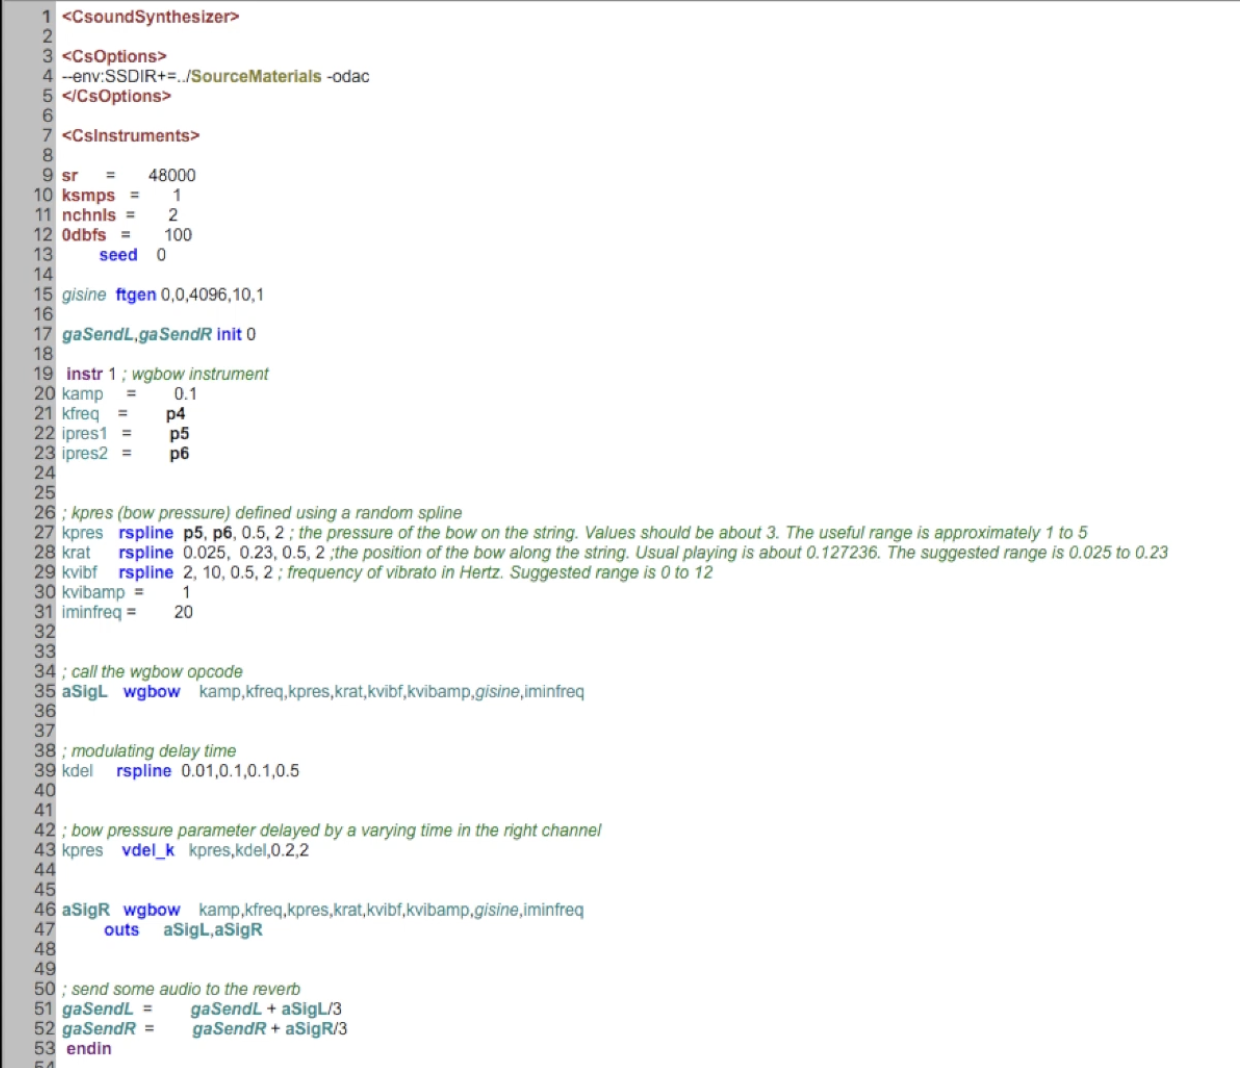
Ausschnitt eines in Csound implementierten Orchesters.
Music for Headphones III ist eine Produktion von ALEA, Associazione Laboratorio Espressioni Artistiche.
SKAS-Symbolische Klangverarbeitung und Analyse/Synthese
Prof. Dr. Marlon Schumacher
Zwischenprojekt von Andres Kaufmes
HfM Karlsruhe – IMWI (Institut für Musikinformatik und Musikwissenschaft)
WiSe 2022/23
_____________
Für dieses Zwischenprojekt habe ich mich mit der Implementierung eines Transient- Prozessors in OpenMusic mit Hilfe der OM-Sox Library beschäftigt.
Mit einem Transient Prozessor (auch Transient Designer oder Transient Shaper) lässt sich das Ein- und Ausschwingverhalten (Attack/Release) der Transienten eines Audiosignal beeinflussen.
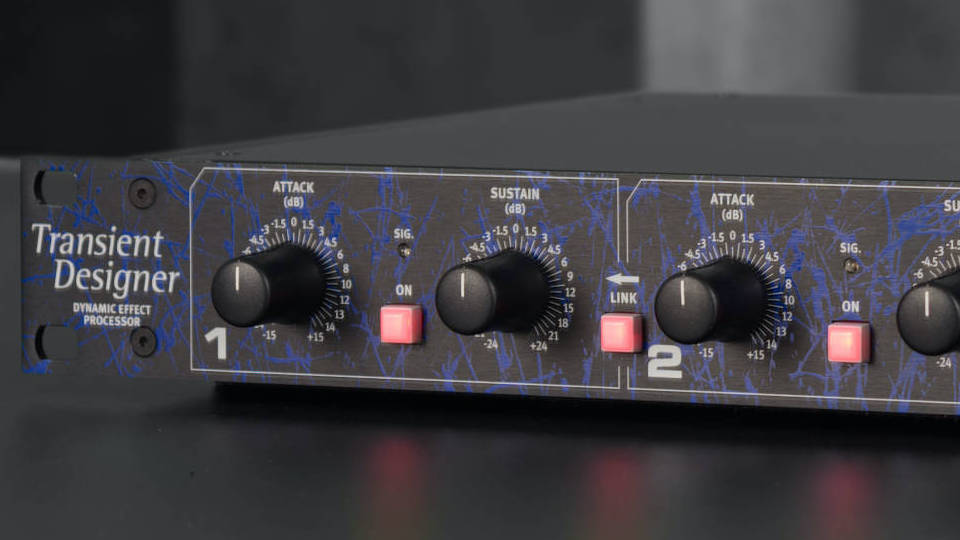
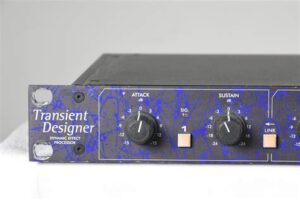
Das erste vorgestellte Hardware Gerät war der 1998 von der Firma SPL vorgestellte SPL TD4, welcher als 19″ Rack-Gerät erhältlich war und in fortgeschrittener Version bis heute erhältlich ist.
Transient Designer der Firma SPL. (c) SPL
Transient Designer eignen sich besonders für die Bearbeitung von perkussiven Klängen oder auch für Sprache. Zunächst müssen die Transienten aus dem gewünschten Audiosignal isoliert werden, dies lässt sich zum Beispiel mit Hilfe eines Kompressors umsetzen. Durch eine kurze Attack-Zeit werden die Transienten „geduckt“ und das Signal kann vom Original abgezogen werden. Anschließend kann das Audiosignal im Verlauf der Signalkette mit weiteren Effekten bearbeitet werden.
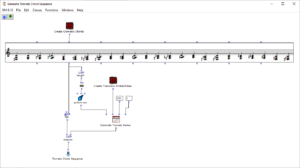
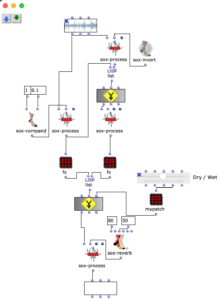
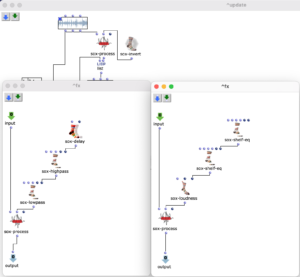
Transient-Prozessor Patch. FX- Kette der beiden Signalwege (links „Transient“, rechts „Residual“).
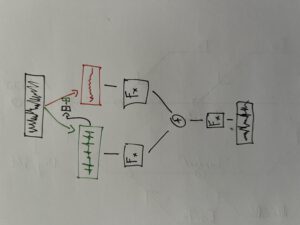
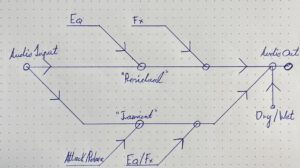
Im Patch zu sehen ist an oberster Stelle die zu bearbeitende Audiodatei, von welcher, wie eben beschrieben, mit Hilfe eines Kompressors die Transienten isoliert, und das resultierende Signal vom originalen abgezogen wird. Nun werden zwei Signalwege gebildet: Die isolierten Transienten werden in der linken „Kette“ verarbeitet, das residuale Signal in der rechten. Nachdem beide Signalwege mit Audioeffekten bearbeitet wurden, werden sie zusammengemischt, wobei das Mischverhältnis (Dry/Wet) beider Signalwege nach belieben eingestellt werden kann. Am Ende der Signalverarbeitung befinden sich ein globaler Reverb-Effekt.
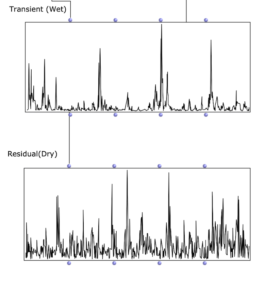
„Scope“ Ansicht der beiden Signalwege. Skizzen zum möglichen Signalweg und Verarbeitung.
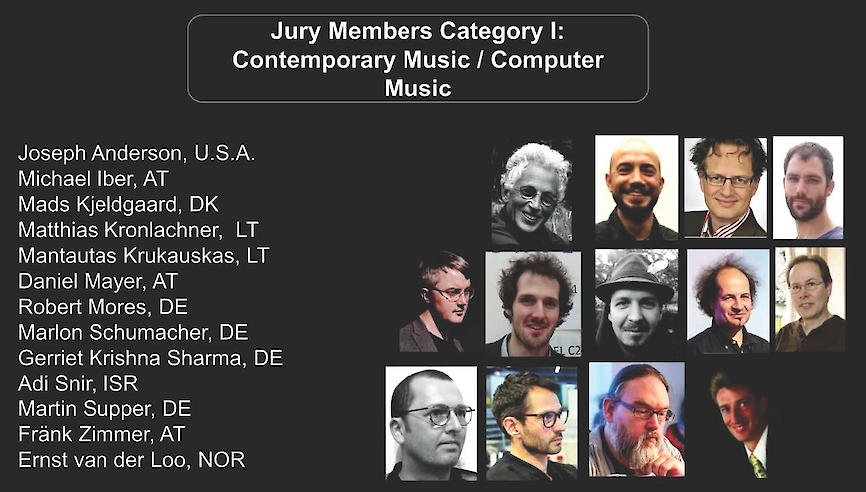
In October 2022, I served as a jury member for the Student 3D Audio production Competition from the Verband Deutscher Tonmeister e.V. The competition comprised of 3 categories. I was a judge in the category Contemporary Music/Computer Music.
The winning productions can be listened to online via head-tracked binaural audio, using this excellent (computervision-based) web-audio player here.
Abstract: Beschreibung des 6DOF Recording Systems der Firma Zylia für HOA und dessen Software, mit Streaming und Binauralix Anwendungen.
Verantwortliche: Prof. Dr. Marlon Schumacher, Eveline Vervliet
Introduction
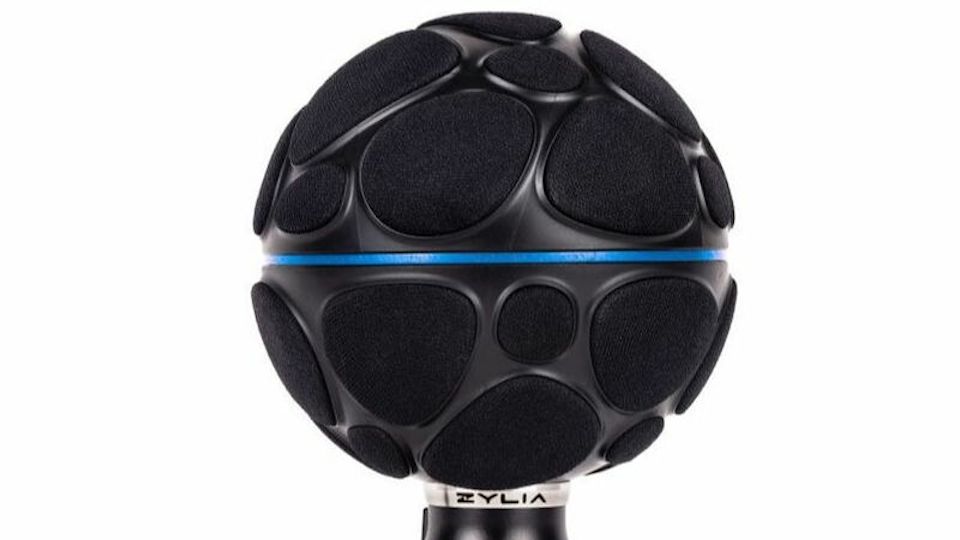
The Zylia microphone is a 19-capsule microphone array used for 3D/360 audio recording in 3rd ambisonics order. It’s easy to connect to your computer with a USB cable and compact in transportation.
Software
For proper functioning of the Zylia ZM-1, you must install a driver. Download the driver specific for your operating system here.
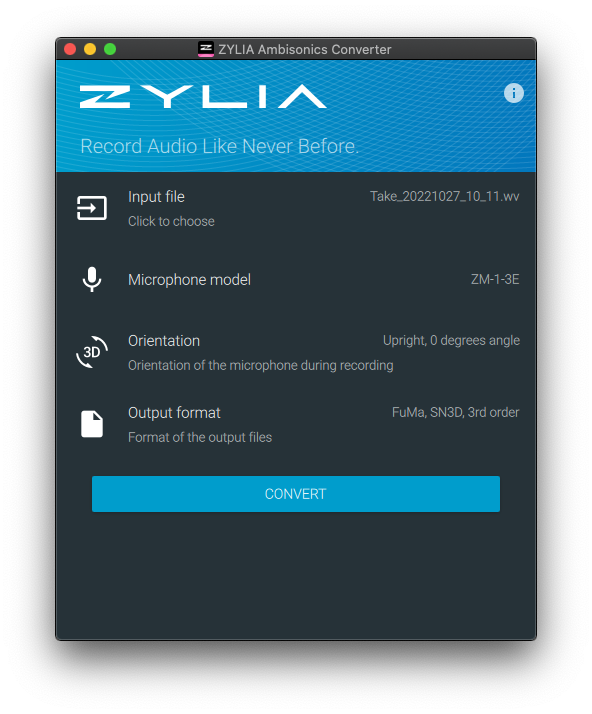
Zylia 6DoF Recording Application for recording with multiple Zylia microphones Zylia Ambisonics Converter for converting from A to B format Zylia Control Panel with some information on the connected microphone Zylia Streaming Application for setting up your live audio streaming with the Zylia microphone Zylia Studio for recording with one Zylia microphone
Download the software here. Note that licenses are required.
Workflow
Recording
Recording with the Zylia microphone can be done either in the standalone application Zylia Studio or in a DAW with the Zylia Studio Pro audio plugin. As a DAW, Reaper is most recommended.
Conversion
To use the recordings on other platforms or for applications like videos, the recordings have to be converted to an Ambisonics B-format. You can either use the standalone application or the Zylia Ambisonics Converter plugin.
There are several standards in the ambisonics world related to channel ordering and normalization levels. The most used one is the ambiX standard. For this, you choose the following settings: channel ordering ‚ACN‘ and normalization ‚SN3D‘. The following video from ZYLIA explains the workflow for converting a recording.
The raw recording from the Zylia microphone will contain of 19 channels. The converted file in B-format in 3rd order will have 16 channels. First encode the B-format in a software like MultiPlayer-mini before integrating it with the open-source software Binauralix.
In the following demonstration video, I open the 3rd order B-format of a Zylia recording in multiplayer mini and send it to Binauralix over Blackhole. The I communicate with Binauralix over OSC in Max. In this way, I can use the BITalino R-IoT sensor to control the listening orientation in Binauralix in real-time.
Abstract: Beschreibung des Inertial Motion Tracking Systems Bitalino R-IoT und dessen Software
Verantwortliche: Prof. Dr. Marlon Schumacher, Eveline Vervliet
Introduction
In this blog, I will explain how we can use machine learning techniques to recognize specific conductor gestures sensed via the the BITalino R-IoT platform in Max. The goal of this article is to enable you to create an interactive electronic composition for a conductor in Max.
This project is based on research by Tommi Ilmonen and Tapio Takala. Their article ‚Conductor Following with Artificial Neural Networks‘ can be downloaded here. This article can be an important lead in further development of this project.
Demonstration Patches
In the following demonstration patches, I have build further on the example patches from the previous blog post, which are based on Ircam’s examples. To detect conductor’s gestures, we need to use two sensors, one for each hand. You then have the choice to train the gestures with both hands combined or to train a model for each hand separately.
Detect static gestures with 2 hands combined
When training both hands combined, there are only a few changes we need to make to the patches for one hand.
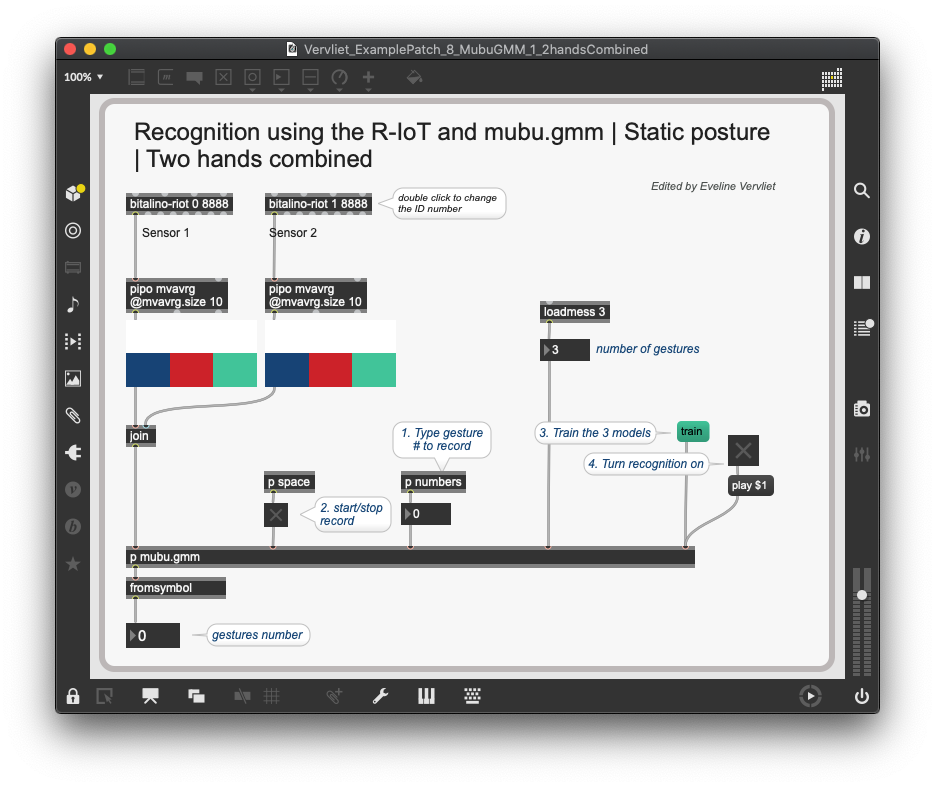
First of all, we need a second [bitalino-riot] object. You can double click on the object to change the ID. Most likely, you’ll have chosen sensor 1 with ID 0 and sensor 2 with ID 1. The data from both sensors are joined in one list.
In the [p mubu.gmm] subpatch, you will have to change the @matrixcols parameter of the [mubu.record] object depending on the amount of values in the list. In the example, two accelerometer data lists with each 3 values were joined, thus we need 6 columns.
The rest of the process is exactly the same as in previous patches: we need to record two or more different static postures, train the model, and then click play to start the gesture detection.
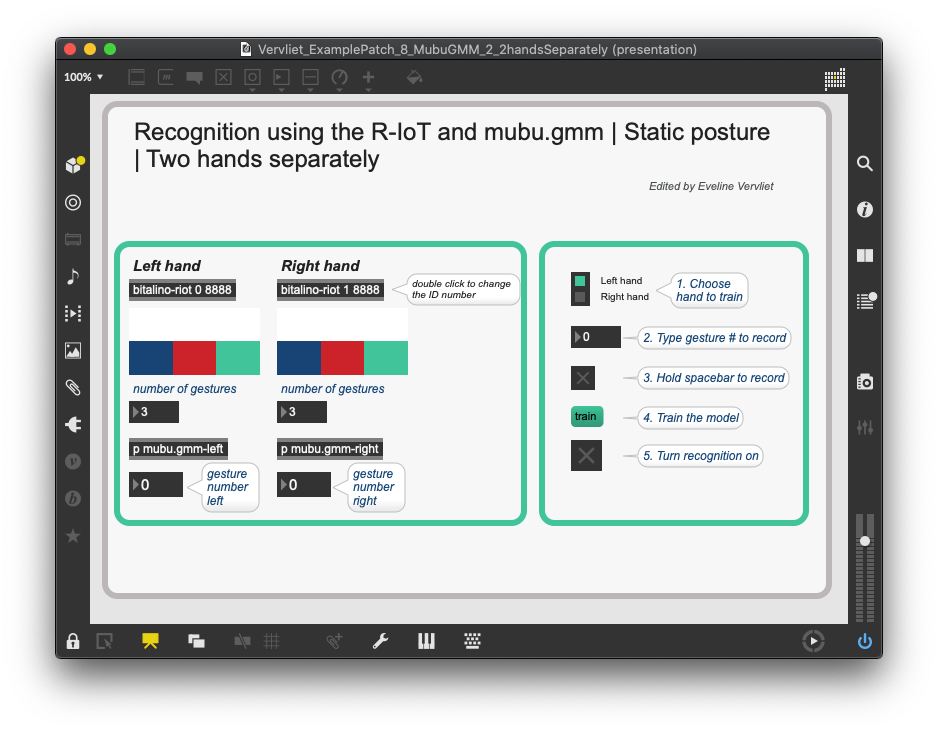
When training both hands separately, the training process becomes a bit more complex, although most steps remain the same. Now, there is a unique model for each hand, which has to be trained separately. You can see the models in the [p mubu.gmm-left] and [p mubu.gmm-right] subpatches. There is a switch object which routes the training data to the correct model.
In the above example, I personally found the training with both hands separate to be most efficient: even though the training process took slightly longer, the programming after that was much easier. Depending on your situation, you will have to decide which patch makes most sense to use. Experimentation can be a useful tool in determining this.
Detect dynamic gestures with 2 hands
The detection with both hands of dynamic gestures follow the same principles as the above examples. You can download the two Max patches here:
The mentioned tools can be used to detect ancillary gestures in musicians in real-time, which in turn could have an impact on a musical composition or improvisation. Ancillary gestures are „musician’s performance movements which are not directly related to the production or sustain of the sound“ (Lähdeoja et al.) but are believed to have an impact both in the sound production as well as in the perceived performative aspects. Wanderley also refers to this as ‘non-obvious performer gestures’.
In a following article, Marlon Schumacher worked with Wanderley on a framework for integrating gestures in computer-aided composition. The result is the Open Music library OM-Geste. This article is a helpful example of how the data can be used artistically.
Links to articles:
Marcelo M. Wanderley – Non-obvious Performer Gestures in Instrumental Musicdownload
O. Lähdeoja, M. M. Wanderley, J. Malloch – Instrument Augmentation using Ancillary Gestures for Subtle Sonic Effectsdownload
M. Schumacher, M. Wanderley – Integrating gesture data in computer-aided composition: A framework for representation, processing and mappingdownload
Detecting gestures in musicians has been a much-researched topic in the last decades. This folder holds several other articles on this topic that could interest.
Abstract: Beschreibung des Inertial Motion Tracking Systems BITalino R-IoT und dessen Software
Verantwortliche: Prof. Dr. Marlon Schumacher, Eveline Vervliet
Introduction to the BITalino R-IoT sensor
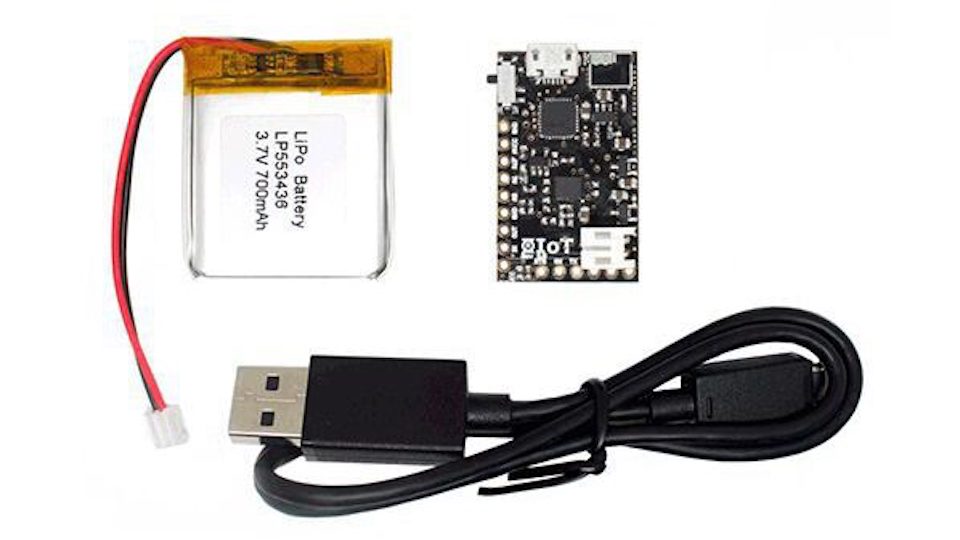
The R-IoT module (IoT stands for Internet of Things) from BITalino includes several sensors to calculate the position and orientation of the board in space. It can be used for an array of artistic applications, most notably for gesture capturing in the performative arts. The sensor’s data is sent over WiFi and can be captured with the OSC protocol.
The R-IoT sensor outputs the following data:
Accelerometer data (3-axis)
Gyroscope data (3-axis)
Magnetometer data (3-axis)
Temperature of the sensor
Quaternions (4-axis)
Euler angles (3-axis)
Switch button (0/1)
Battery voltage
Sampling period
The accelerometer measures the sensor’s acceleration on the x, y and z axis. The gyroscope measures the sensor’s deviation from its ’neutral‘ position. The magnetometer measures the sensor’s relative orientation to the earth’s magnetic field. Euler angles and quaternions measure the rotation of the sensor.
The sensor has been explored and used by the {Sound Music Movement} department of Ircam. They have distributed several example patches to receive and use data from the R-IoT sensor in Max. The example patches mentioned in this article are based on these.
The sensor can be used with all programs that can receive OSC data, like Max and Open Music.
Max patches by Ircam and other software software/ ├motion-analysis-max-master/ │├max-bitalino-riot/ ││⎿bitalino-riot-analysis-example.maxpat │├max-motion-features/ ││├freefall.maxpat ││├intensity.maxpat ││├kick.maxpat ││├shake.maxpat ││├spin.maxpat ││⎿still.maxpat │ ⎿README.md
Demonstration Videos
In the following demonstration videos and example patches, we use the Mubu library in Max from Ircam to record gestures with the sensor, visualise the data and train a machine learning algorithm to detect distinct postures. The ‚Mubu for Max‘ library must be downloaded in the max package manager.
Detect static gestures with mubu.gmm
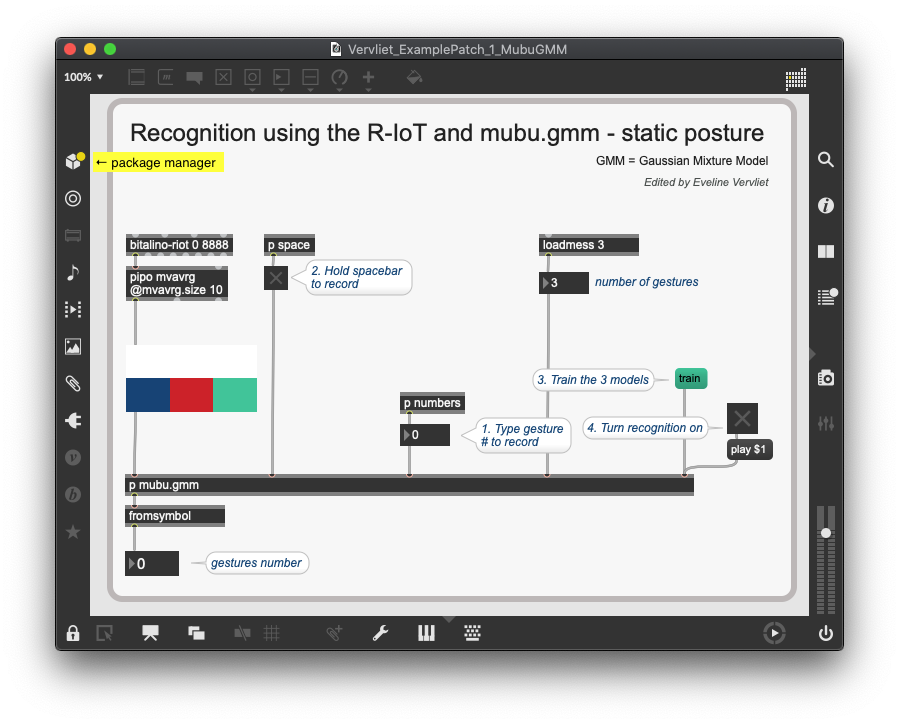
First, we use the GMM (Gaussian mixture model) with the [mubu.gmm] object. This model is used to detect static gestures. We use the accelerometer data to record three different hand postures.
Detect dynamic gestures with Mubu Gesture Follower
The Gesture Follower (GF) is a separate tool from the Mubu library that can be used in gesture recognition applications. In the following video, the same movements are trained as in the Mubu.hhmm demonstration so we can easily compare both methods.
Gesture detection and vocalization with Mubu in Max for the Bitalino R-IoT
The [mubu.xmm] object uses hierarchical multimodel hidden Markov models for gesture recognition. In the following demonstration video, gestures and audio is recorded simultaneously. After training, a gesture will trigger its accompanying audio recording. The sound is played back via granular or concatenative synthesis.
Momentan umfasst die Library zwei Funktionen, die sowohl mit CommonLisp, als auch mit schon bestehenden Funktionen aus dem OM-Package geschrieben sind.
Zudem ist die Komposition im Umfang der zu kontollierenden Parametern, momentan auf die Harmonik und die Stimmführung begrenzt.
Für die Zukunft möchte ich ebenfalls eine Funktion schreiben, welche mit den Parametern Metrik und Einsatzabstände, die Komposition auch auf zeitlicher Ebene erlaubt.
Entwicklung: Lorenz Lehmann
Betreuung und Beratung: Prof. Dr. Marlon Schumacher
Mein herzlicher Dank für die freundliche Unterstützung gilt Joseph Branciforte und
I present in this article residual – i, a three-minute solo piece for prepared piano commissioned as a companion work to John Cage’s Sonatas and Interludes for prepared piano. In analyzing Cage’s work and subsequently composing a companion to it, I employed a self-designed texture synthesis tool driven by machine learning clustering. The technical overview of that tool can be read at this other blogpost, or in the proceedings of the 2022 International Conference on Technologies for Music Notation and Representation (TENOR 2022). The blogpost you are reading now will briefly explain how that tool (and generally, music informatics) was applied in composing this short piano piece.
Background
John Cage’s Sonatas and Interludes (1946-48) is a 60-minute work for solo prepared piano that involves placing various objects (metal screws, bolts, nuts, pieces of plastic, rubber and eraser) in the strings of the piano. These objects ‚prepare‘ the piano, altering its sound and bringing out a variety of different, heterogenous timbres. Some keys produce chords, others buzz, or even have the pitch completely removed. The sound profile of the Sonatas and Interludes are arguably the work’s most iconic aspect.
However, the form of the Sonatas and Interludes is also noteworthy. The work consists of sixteen sonatas and four interludes, with most movements lasting somewhere between 1 and 4 minutes each. As part of an ongoing commissioning project, pianist and composer Amy Williams premieres new ‚interludes‘ which are placed amidst the existing sonatas and interludes by Cage. In early 2022 I received the opportunity to compose a short piece that would use a piano with Cage’s „preparations“, and would be inserted as an interlude amidst the sonatas and interludes of Cage’s work.
Approach
I was interested in composing a piece that acknowledged both the sound- and time-identity of the Sonatas and Interludes. While arguably the most iconic aspect of Cage’s Sonatas and Interludes is its sounds, I feel that the work’s form, it’s time-based content, is equally impactful. Many of the its movements are cast in AABB form, reflecting classical period sonatas. Additionally, the distribution of the individual sonatas and interludes take a symmetrical form: four groups of four sonatas each, partitioned by the four interludes:
As a pre-compositional constraint, I decided that all sonorities in my piece would be taken/excerpted directly from the score of the Cage. To use the metaphor of a painter, the score of the Cage was my palette of colors, and not the prepared piano itself. This meant that not only every chord or single note in my piece would be excerpted from the Cage, it also meant that the chord or note’s particular duration would also be used in my piece. The sound and duration were joined as a single item. In a way, my piece was a form of granular synthesis, taking single-attack grains of the Sonatas and Interludes, and recontextualizing them in a new order.
Preprocessing
In order to observe and meaningfully comprehend all the individual sonorities in the 60-minute-long Cage, I used a simple machine learning clustering method to categorize all ~7k sonorities into 12 groups. Using my texture synthesis tool, I was not only able to organize audio features of these ~7k sonorities in a a visual editor, I was also able to export and listen to each individual sonority as a single, short audio file.
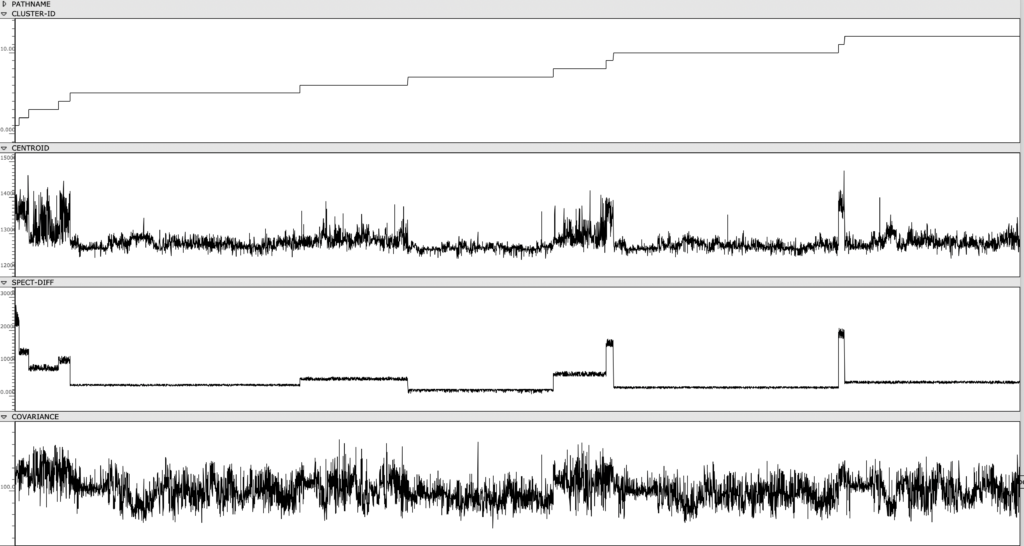
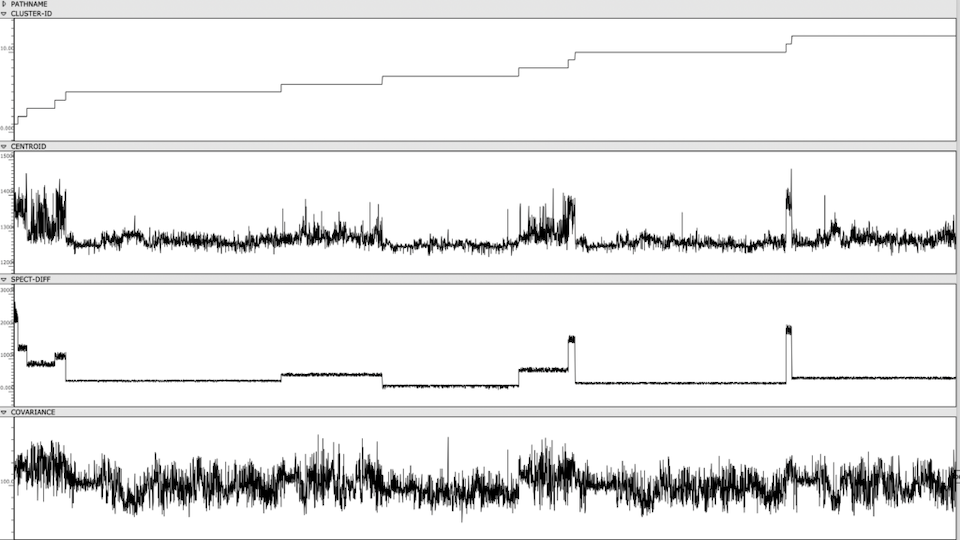
Figure 1: Clusters and audio features are visually represented and sorted, providing an out-of-time view of the Cage’s spectral content.
Once the sonorities have been extracted as individual transients, I used a k-means clustering method to sort these sonorities into 12 clusters. To briefly explain this machine learning method, the clustering algorithm receives a vector of several audio features as an input representing a sonority from the Cage (the audio features used were spectral centroid, spectral difference, and spectral covariance*). The algorithm then sorts these audio vectors into 12 groups, placing sounds with similar vector-values in the same group. This process in unsupervised, meaning it is not seeking to emulate a trained result that I predetermined. Rather, because these three audio features, as a trio, don’t represent any particularly given parameter in music, the algorithm returns clusters of sound that are correlated along multifaceted sound profiles that are aurally cohesive but not as simple as being sorted by a single parameter like pitch, duration, brightness, or noisiness.
Composition
My piece residual – i uses sonorities exclusively from clusters 2, 4, 9, 11. Referring back to the class-array figure, there is a clear line of differentiation between these clusters and the rest, correlated specifically to the spectral difference of the sonorities. These sonorities had an unusually high spectral difference, due either to their bright harmonic content (which creates a sharp delta between the attack and sustain of the transient) or their short duration (which creates a sharp delta between the attack and sustain/resonance of the transient). By placing each of these clusters in sequence, and the sounds within each cluster in sequence, this quality of shortness and brightness is clearly audible (see audio).
I treated this sequence as a kind of DNA for the piece. Large portions of it were copied into the score (sequences of around 20-30 transients. This process was done by hand, listening to each individual transient in the sequence, and looking up in the score of the Cage what the corresponding notes were). It was at this point that the machine learning methods involved in the piece are finished. From here, I began to sculpt and shape these longer sequences into shorter bursts. I also added repeat brackets at different moments, creating moments of ‚freeze‘ in the piece’s hurtling forward momentum.
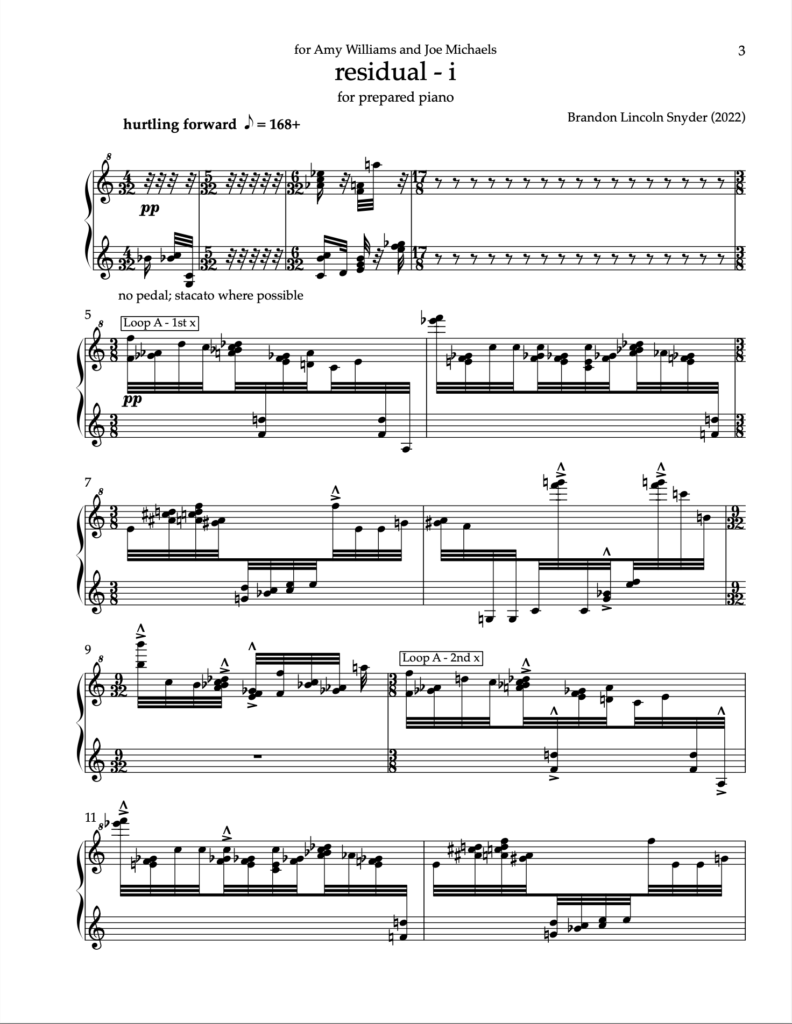
Figure 3a: Loop A designates the first several (circa 20) sonorities in the cluster sequence, looped over and over. This sequence served as a scaffolding from which the piece was composed around.
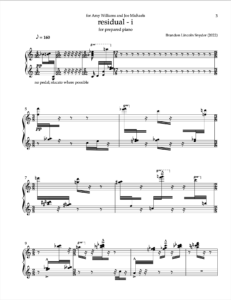
Figure 3b: This is the same page of the score, after notes have been removed, transforming the work into short bursts of sound.
Conclusion
Many of the cutting edge applications of machine learning in audio are towards the improvement of automated transcription, neural audio synthesis, and other tasks which have a clear goal and benchmark to test against. My particular application of machine learning in this piece is not for optimizing any task like this. Rather, the act of clustering audio served more as a means to explore the Sonatas and Interludes from a vantage point that I had not yet seen them from. Similar to my previous works that involve machine learning, being aware of how the machine learning methods are implemented is an essential first step in mindfully composing a work using such methods. As suggested by the title, residual – i serves as a proof of concept for a possible larger set of companion pieces, in which machine learning methods are used as a means to critically reexamine and „re-hear“ a familiar piece of music.
Listen to a full performance of residual – i here.
*These three features are measurements typically used to categorize the timbre and spectral content of an audio signal. The spectral centroid represents the center of mass in a spectrum. The spectral difference represents the average delta in energy between adjacent windows of the spectrum. The spectral covariance represents the spectral variability of a signal, i.e. how much the signal varies between its frequency bins.
Abstract: Beschreibung des elektromagnetischen Motion Tracking Systems G4 des Herstellers Polhemus und dessen Software
Verantwortliche: Prof. Dr. Marlon Schumacher, Daniel Fütterer
Das Polhemus G4 System erlaubt das Tracking von Positions- und Orientierungsdaten über magnetisch arbeitende Sensoren. Sender werden im Raum platziert und eingemessen/kalibriert, die Sensoren am zu messenden Objekt befestigt und an kabellose und tragbare Hubs angeschlossen. Diese übertragen die Daten an den PC, der wiederum diese Daten auswerten oder (wie in unserem Anwendungsfall) ins Netzwerk streamt.
Die Software des Herstellers läuft auf Windows und Linux, ist via kodiertem UDP-Export kompatibel mit der Spiele-Engine Unity und besteht jeweils aus mehreren Komponenten für Registrierung, Kalibrierung, Monitoring und Übertragung (z.B. mit Named Pipe oder UDP). Darüberhinaus sind große Teile der Software Open Source, was die Entwicklung individueller Tools ermöglicht.
Unter Linux gibt es eine Suite aus mehreren Programmen:
g4devcfg: Proprietäres Tool zur Konfiguration der Polhemus-Hardware (Dongle und Hub)
g4track_lib: Bibliotheken zur Verwendung mit den anderen Programmen
createcfgfile: Programm zur Erstellung der Config-Files (Aufstellung der Hardware)
g4display: Grafische Anzeige der Sensor-Position und -Orientierung
g4term: Textuelle Ausgabe der Sensor-Daten
g4export (Entwicklung von Janis Streib): Kommandozeilenprogramm zur Übertragung der Sensordaten via OSC
Angewendet wird die Software in Kombination mit Programmen wie Max/MSP oder PureData, die in der Lage sind, den OSC-Stream der Sensordaten auszulesen und zu verarbeiten.
Eine Beispielanwendung wird im Projekt des Studenten Lukas Körfer realisiert: Speaking Objects.
Inspiriert vom „Infinite Bad Guy“ Projekt und all den sehr unterschiedlichen Versionen, wie manche Leute ihre Fantasie zu diesem Song beflügelt haben, dachte ich, vielleicht könnte ich auch damit experimentieren, eine sehr lockere, instrumentale Coverversion von Billie Eilish’s „Bad Guy“ zu erstellen.
Betreuer: Prof. Dr. Marlon Schumacher
Eine Studie von: Kaspars Jaudzems
Wintersemester 2021/22
Hochschule für Musik, Karlsruhe
Zur Studie:
Ursprünglich wollte ich mit 2 Audiodateien arbeiten, eine FFT-Analyse am Original durchführen und dessen Klanginhalt durch Inhalt aus der zweiten Datei „ersetzen“, lediglich basierend auf der Grundfrequenz. Nachdem ich jedoch einige Tests mit einigen Dateien durchgeführt hatte, kam ich zu dem Schluss, dass diese Art von Technik nicht so präzise ist, wie ich es gerne hätte. Daher habe ich mich entschieden, stattdessen eine MIDI-Datei als Ausgangspunkt zu verwenden.
Sowohl die erste als auch die zweite Version meines Stücks verwendeten nur 4 Samples. Die MIDI-Datei hat 2 Kanäle, daher wurden 2 Dateien zufällig für jede Note jedes Kanals ausgewählt. Das Sample wurde dann nach oben oder unten beschleunigt, um dem richtigen Tonhöhenintervall zu entsprechen, und zeitlich gestreckt, um es an die Notenlänge anzupassen.
Die zweite Version meines Stücks fügte zusätzlich einige Stereoeffekte hinzu, indem 20 zufällige Pannings für jede Datei vor-generiert wurden. Mit zufällig angewendeten Kammfiltern und Amplitudenvariationen wurde etwas mehr Nachhall und menschliches Gefühl erzeugt.
Akusmatische Studie Version 1
Akusmatische Studie Version 2
Die dritte Version war eine viel größere Änderung. Hier werden die Noten beider Kanäle zunächst nach Tonhöhe in 4 Gruppen eingeteilt. Jede Gruppe umfasst ungefähr eine Oktave in der MIDI-Datei.
Dann wird die erste Gruppe (tiefste Töne) auf 5 verschiedene Kick-Samples abgebildet, die zweite auf 6 Snares, die dritte auf perkussive Sounds wie Agogo, Conga, Clap und Cowbell und die vierte Gruppe auf Becken und Hats, wobei insgesamt etwa 20 Samples verwendet werden. Hier wird eine ähnliche Filter-und-Effektkette zur Stereoverbesserung verwendet, mit dem Unterschied, dass jeder Kanal fein abgestimmt ist. Die 4 resultierenden Audiodateien werden dann den 4 linken Audiokanälen zugeordnet, wobei die niedrigeren Frequenzen kanale zur Mitte und die höheren kanale zu den Seiten sortiert werden. Für die anderen 4 Kanäle werden dieselben Audiodateien verwendet, aber zusätzliche Verzögerungen werden angewendet, um Bewegung in das Mehrkanalerlebnis zu bringen.
Akusmatische Studie Version 3
Die 8-Kanal-Datei wurde auf 2 Kanäle in 2 Versionen heruntergemischt, einer mit der OM-SoX-Downmix-Funktion und der andere mit einem Binauralix-Setup mit 8 Lautsprechern.
Akusmatische Studie Version 3 – Binauralix render
Erweiterung der akousmatischen Studie – 3D 5th-order Ambisonics
Die Idee mit dieser Erweiterung war, ein kreatives 36-Kanal-Erlebnis desselben Stücks zu schaffen, also wurde als Ausgangspunkt Version 3 genommen, die nur 8 Kanäle hat.
Ausgangspunkt Version 3
Ich wollte etwas Einfaches machen, aber auch die 3D-Lautsprecherkonfiguration auf einer kreativen weise benutzen, um die Energie und Bewegung, die das Stück selbst bereits gewonnen hatte, noch mehr hervorzuheben. Natürlich kam mir die Idee in den Sinn, ein Signal als Quelle für die Modulation von 3D-Bewegung oder Energie zu verwenden. Aber ich hatte keine Ahnung wie…
Plugin „ambix_encoder_i8_o5 (8 -> 36 chan)“
Bei der Recherche zur Ambix Ambisonic Plugin (VST) Suite bin ich auf das Plugin „ambix_encoder_i8_o5 (8 -> 36 chan)“ gestoßen. Dies schien aufgrund der übereinstimmenden Anzahl von Eingangs- und Ausgangskanälen perfekt zu passen. In Ambisonics wird Raum/Bewegung aus 2 Parametern übersetzt: Azimuth und Elevation. Energie hingegen kann in viele Parameter übersetzt werden, aber ich habe festgestellt, dass sie am besten mit dem Parameter Source Width ausgedrückt wird, weil er die 3D-Lautsprecherkonfiguration nutzt, um tatsächlich „nur“ die Energie zu erhöhen oder zu verringern.
Da ich wusste, welche Parameter ich modulieren muss, begann ich damit zu experimentieren, verschiedene Spuren als Quelle zu verwenden. Ehrlich gesagt war ich sehr froh, dass das Plugin nicht nur sehr interessante Klangergebnisse lieferte, sondern auch visuelles Feedback in Echtzeit. Bei der Verwendung beider habe ich mich darauf konzentriert, ein gutes visuelles Feedback zu dem zu haben, was im Audiostück insgesamt vor sich geht.
Dies half mir, Kanal 2 für Azimuth, Kanal 3 für Source Width und Kanal 4 für Elevation auszuwählen. Wenn wir diese Kanäle auf die ursprüngliche Eingabe-Midi-Datei zurückverfolgen, können wir sehen, dass Kanal 2 Noten im Bereich von 110 bis 220 Hz, Kanal 3 Noten im Bereich von 220 bis 440 Hz und Kanal 4 Noten im Bereich von 440 bis 20000 Hz zugeordnet ist. Meiner Meinung nach hat diese Art der Trennung sehr gut funktioniert, auch weil die Sub-bass frequenzen (z. B. Kick) nicht moduliert wurden und auch nicht dafur gebraucht waren. Das bedeutete, dass der Hauptrhythmus des Stücks als separates Element bleiben konnte, ohne den Raum oder die Energiemodulationen zu beeinflussen, und ich denke, das hat das Stück irgendwie zusammengehalten.
Akusmatische Studie Version 4 – 36 channels, 3D 5th-order Ambisonics – Datei war zu groß zum Hochladen